FastMCP v2.2.7 is out, and with it comes support for adding authentication to FastMCP servers. What this means is that when a MCP client attempts to connect to the MCP server, the standard OAuth Authorization Code flow may be used to authenticate the client before granting them access to the MCP server’s tools and resources. Since Pangea AuthN supports acting as an OAuth server, in this post we’ll be going over how to configure a FastMCP server to authenticate MCP clients with the Pangea AuthN service.
We have previously covered this topic, but we have since simplified the integration by publishing an open-source Python package that can be conveniently imported into an existing FastMCP server. The rest of this post will go over the setup.
Create a Pangea account at https://pangea.cloud/signup. During the account creation process, an organization (top-level group) and project (individual app) will be created as well. On the "Get started with a common service" dialog, just click on the Skip button to get redirected to the developer console.
In the developer console, there will be a list of services in the left hand panel. Click the AuthN service to enable it.
In the modal, there will be a prompt to create a new Pangea API token or to extend an existing one. Choose Create a new token and click on Done.
Note down the Hosted Login URL for later. This will be used as the value of
PANGEA_AUTHN_ISSUER_URL.In the left hand panel, click on OAuth Server. Then navigate to the Scopes tab. We’ll create a new scope to represent one’s permission to authenticate with the MCP server.
To add a custom scope value, click the + Scope button on the right. In the Create Scope dialog, provide the new scope value details in the following fields:
Name: Define the scope value. Note this down for later. A sample one could be “user”.
Display Name: Provide a recognizable name that will appear in the Display Name column in the scopes list.
Description: Explain what this scope value represents. For example, describe the permissions granted with this scope value.
Consent Required: Check this option to require explicit user approval for adding this scope value to the access token. This setting may remain unchecked for the purposes of this example.
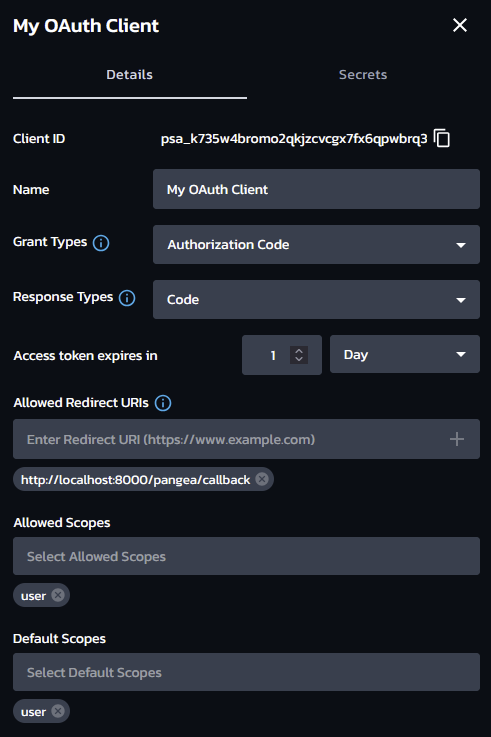
Navigate back to the Clients tab, then click on the + OAuth Client button on the right to begin creating a new OAuth client.
Name: Assign a recognizable name to your client as it will appear in the list of clients in the OAuth Server settings. This name may be updated at any time.
Grant Type: must be Authorization Code.
Response Types: only Code is required.
Allowed Redirect URIs: enter http://localhost:8000/pangea/callback. Note that for a production MCP server, this should use the remote address of the server (e.g. https://mcp.example.org/pangea/callback) instead of a localhost address.
Allowed Scopes & Default Scopes: add the scope that was created earlier (e.g. “mcp”).
Note down the Client ID and Client Secret for later. Each of these will need to be set as environment variables
PANGEA_AUTHN_OAUTH_CLIENT_IDandPANGEA_AUTHN_OAUTH_CLIENT_SECRETrespectively.
Now let’s move on to the code. A typical definition of a FastMCP server might look like this:
from fastmcp import FastMCP

mcp = FastMCP(name="My MCP Server")
To add authentication, we’ll first need to install the pangea-authn-fastmcp package:
pip install -U pangea-authn-fastmcp
And then import the PangeaOAuthProvider class and configure FastMCP to use it:
from fastmcp import FastMCP
from mcp.server.auth.settings import ClientRegistrationOptions

from pangea_authn_fastmcp import PangeaOAuthProvider

# You can use Pangea Vault APIs to retrieve these secrets dynamically at runtime, with support for automatic rotation policies.
# See: <https://pangea.cloud/docs/vault/>
PANGEA_AUTHN_ISSUER_URL = "https://pdn-[...].login.aws.us.pangea.cloud"
PANGEA_AUTHN_CLIENT_ID = "psa_[...]"
PANGEA_AUTHN_CLIENT_SECRET = "pck_[...]"
PANGEA_VAULT_TOKEN = "pts_[...]"

MCP_SCOPES = ["user"]

# In production, this would be the remote URL of the MCP server.
MCP_ISSUER_URL = "http://localhost:8000"

# Create the OAuth provider that will use Pangea AuthN for authentication.
oauth_provider = PangeaOAuthProvider(
    mcp_issuer_url=MCP_ISSUER_URL,
    pangea_authn_issuer_url=PANGEA_AUTHN_ISSUER_URL,
    pangea_authn_client_id=PANGEA_AUTHN_CLIENT_ID,
    pangea_authn_client_secret=PANGEA_AUTHN_CLIENT_SECRET,
    mcp_scopes=MCP_SCOPES,
    pangea_authn_scopes=MCP_SCOPES,
    client_registration_options=ClientRegistrationOptions(
        enabled=True, valid_scopes=MCP_SCOPES, default_scopes=MCP_SCOPES
    ),
    required_scopes=MCP_SCOPES,
)

# Configure FastMCP to use the OAuth provider.
mcp = FastMCP(name="My MCP Server", auth=oauth_provider)

# Register a callback route for the OAuth provider.
mcp.custom_route("/pangea/callback", methods=["GET"])(oauth_provider.callback_handler)
The PANGEA_AUTHN_ISSUER_URL above should be replaced with the Hosted Login URL displayed on the AuthN Overview page.
With all of that in place, the FastMCP server should now be ready to authenticate users via Pangea AuthN. To learn more about Pangea AuthN’s many features—such as social login, single sign-on (SSO), and custom branding—check out the documentation.