Integrating Pangea Audit and Embargo with RedwoodJS
Quickview
| Description | Integrate Pangea Secure Audit Log and Embargo into the authentication flow of the RedwoodJS Sample App |
| Language(s) | TypeScript |
| Pangea SDK | Javascript/Node.js |
Overview
Learn how to integrate Pangea's Secure Audit Log and Embargo services into RedwoodJS' native login flow. In this tutorial, you'll ensure compliance with frameworks like SOX and others by logging critical authentication activities - logins, password changes, and account creation. Further, you'll learn how to use the Embargo service to block account creation and access to a user attempting to log in from an embargoed country.
Requirements
This walkthrough uses the RedwoodJS sample app, built in the RedwoodJS tutorial, as a starting point for integrating Pangea. It assumes that you have been through steps 1 through 4 of the excellent
RedwoodJS tutorial. If you prefer to skip the RedwoodJS tutorial, the RedwoodJS example app can be found here.This tutorial is intended to be a step-by-step walkthrough, adding Pangea integration to the sample app. If you'd prefer to review a completed version of this integration, use this branch of the above repo.
Additionally, this tutorial assumes a basic understanding of how to enable, configure, and use Pangea services. To learn more about that, check out our
getting started guide.Note: This example will be in TypeScript (because I'm a rational human being). If you would prefer pure Javascript, some translation will be required.
Prerequisites
- A Pangea Account - sign up here
- An enabled Pangea Audit Service
- An enabled Pangea Embargo Service with the ITAR list enabled
- RedwoodJS (latest version)
- A RedwoodJS example App completed through step 4, section "Authentication," using dbAuth
Part 1 - Creating the Pangea Module
Now that you have a RedwoodJS blogging app, complete with Authentication, up and running, you must feel pretty awesome! Before we can start logging into Pangea Secure Audit Log, we need to create a Pangea module that can be imported throughout the rest of the RedwoodJS code.
Step 1: Install the Pangea SDK:
The first thing we need to do is install the Pangea Node.js SDK. You'll want to open your Terminal app and ensure you're in your Redwood Sample app root directory. Then run,
yarn workspace api add pangea-node-sdk
This will install the Pangea Javascript SDK in the API workspace of your Redwood project.
Step 2: Create Pangea environment variables
At the root of your RedwoodJS App, there will be a .env file. Here you'll need to append the following variables to the end of the file:
PANGEA_AUDIT_TOKEN=<audit_token>
PANGEA_EMBARGO_TOKEN=<embargo_token>
PANGEA_DOMAIN=<pangea_domain>
Note: You'll need to replace the values in angle brackets with real values from your Pangea project.
You can find these variables in the Pangea Console on the overview section of their respective service. You can find the Pangea Domain (the same for both services) in the top-right of the <service> overview dashboard. You can copy the token from the token listing at the bottom of the <service> overview dashboard.
The variables ending in TOKEN are the API Keys granting access to the respective Pangea APIs. Finally, the PANGEA_DOMAIN will tell the SDK where to go to hit your Pangea service APIs (domain will change depending on CSP, Geo, and location selected).
Step 3: Create the Pangea Module
To create a Pangea module, you need to create a pangea.ts file in the /\<project_root\>/api/src/lib directory. We'll need to do a few things in this module to prepare it for inclusion in our other projects. First, we'll want to import AuditService, EmbargoService, and PangeaConfig from pangea-node-sdk.
Add the following to the first line in your new /<project_root>/api/src/lib/pangea.ts file.
import { AuditService, EmbargoService, PangeaConfig } from "pangea-node-sdk";
Next, you'll want to load the configuration values added in Step 2 from your .env file. You can add the following to your pangea.ts file.
const DOMAIN = process.env.PANGEA_DOMAIN;
const auditToken = process.env.PANGEA_AUDIT_TOKEN;
const embargoToken = process.env.PANGEA_EMBARGO_TOKEN;
With the configuration values loaded, you'll now be able to create PangeaConfig instances for both the Embargo and Audit Services.
const auditConfig = new PangeaConfig({
  domain: DOMAIN,
});

const embargoConfig = new PangeaConfig({
  domain: DOMAIN,
});
With the PangeaConfig instances created, you need to create instances of the AuditService and EmbargoService, which will be what you use to call the Pangea APIs. To do this, you add:
const audit = new AuditService(auditToken, auditConfig);
const embargo = new EmbargoService(embargoToken, embargoConfig);
Lastly, you'll need to create a named export for when this pangea module is imported into other parts of your code. Do this by adding the following:
export { audit, embargo };
At this point, your Pangea.ts code should look like as such:
/<project_root>/api/src/lib/pangea.ts
import { AuditService, EmbargoService, PangeaConfig } from "pangea-node-sdk";

const DOMAIN = process.env.PANGEA_DOMAIN;
const auditToken = process.env.PANGEA_AUDIT_TOKEN;
const embargoToken = process.env.PANGEA_EMBARGO_TOKEN;

const auditConfig = new PangeaConfig({
  domain: DOMAIN,
});

const embargoConfig = new PangeaConfig({
  domain: DOMAIN,
});

const audit = new AuditService(auditToken, auditConfig);
const embargo = new EmbargoService(embargoToken, embargoConfig);

export { audit, embargo };
Congratulations! You've created a Pangea module which will be the foundation for the rest of this tutorial. Not only that, you can use this module in any TypeScript project that you might be building. Even cooler - as Pangea creates new services, you can extend this file to include other services you might need in your project. Give yourself a giant pat on the back. Now comes the fun part!
Part 2 - Adding Secure Audit Log to the example app authN flow
You put in the work! You've got a brand-spankin' new pangea.ts module; let's put it to work. In this Part, you'll add audit logging to the login, password change, and account creation processes. As mentioned, logging security operations like logins, password changes, and account creation can be critical for compliance frameworks like SOX and SOC2. However, even if those frameworks are not applicable, logging these events can still be crucial in reconstructing and security breach or incident that may need further investigation.
Step 1: Import the pangea module
First things first, find the /\<project_root\>/api/src/functions/auth.ts file. To add logging to the login process, you'll need to import your handy-dandy new pangea module. I recommend importing audit and embargo, as you'll be using embargo in Part 3. Add the following import to /\<project_root\>/api/src/functions/auth.ts.
import { audit, embargo } from "src/lib/pangea";
Note that api is not necessary in the import path. That's because RedwoodJS has already divided your project into workspaces, with api being one of them.
Step 2: Adding a simple audit message to the login flow
I know the first place I thought of adding audit logging was to user login, and I'm going to guess that's what you thought too. Let's start with a simple message that says \<user\> successfully logged in. To do this, you'll need to find the handler in loginOptions in the /\<project_root\>/api/src/functions/auth.ts file. The handler() is called after someone provides a username and password before logging them into the App. This will be important in Part 3 when you add embargo checking to the App.
To add the log message, you try adding the following to your code:
handler: (user) => {
    audit.log({
        message: `${user.email} successfully logged in.`,
    })
    return user
},
Start your RedwoodJS App using the following command in your terminal from your project_root
yarn rw dev
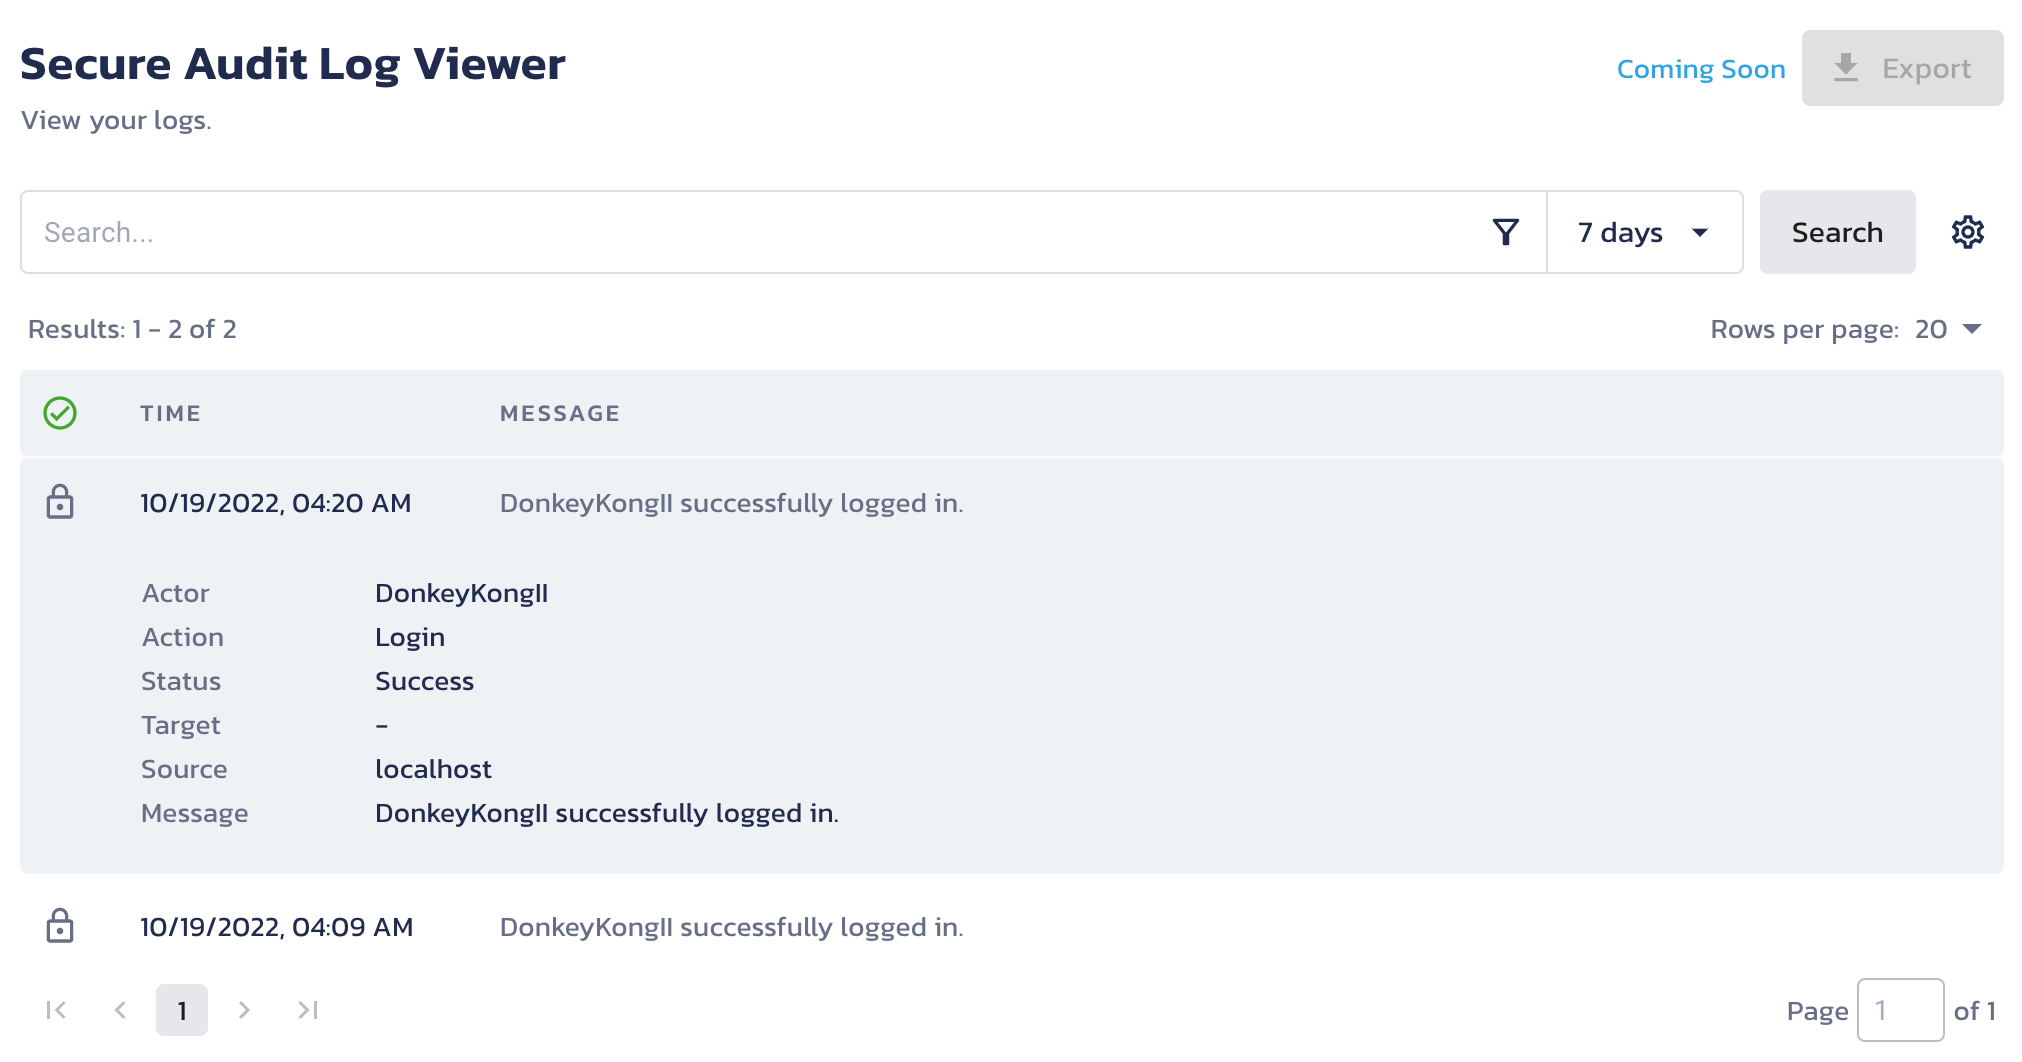
Assuming you're still using the SQLite version of the App (which, if you followed the prerequisites, you should be), you'll want to create an account and then try logging in. If everything worked as it should, you should have a new log message in your Pangea Secure Audit Log. To check this, go to the Pangea User Console >> Secure Audit Log >> View Logs. You should see your message there. If not, check the terminal you used to start your App and look for errors.

Step 3: Adding more audit fields
If you read our blog post Audit Log Field Guide - Time Travel and Humblebrags , you'll know that logging more than just a message can be important for the usability of your logs. What you'll want to do now is break up your message into several components:
- Actor - The user logging in
- Action - "login"
- Status - "success" for successful logins, "failed" for failed logins.
- Source - the client IP address for the request
- Message - That's already done.
Breaking the logged audit message up individually ensures that the log record is search-friendly while also ensuring a human-readable message in the "message" field.
Before you can do anything to update your audit.log call, you'll want to add some code to be able to retrieve the client-ip address. It should be noted that this code is generic. In a proxied environment, you may need to perform additional steps to identify the client-ip.
To retrieve the client IP add the following function to your /\<project_root\>/api/src/functions/auth.ts file, just below the line starting with export const handler = async (event, context) => {
export const handler = async (event, context) => {
  const ipAddress = ({ event }) => {
    return (
      event?.headers?.['client-ip'] ||
      event?.requestContext?.identity?.sourceIp ||
      'localhost'
    )
  }
This code will attempt to retrieve the client IP from the header or request context. If it can't find it, it will return localhost.
Now that you can get the client IP let's update the audit.log call. To do this, add the following to the call you wrote in Step 1.
const clientIp = ipAddress(event);
audit.log({
  actor: user.email,
  action: "Login",
  status: "Success",
  source: `${clientIp}`,
  message: `${user.email} successfully logged in.`,
});
If your project is still running, you should be able to log out and log back in. If not, restart your project by running the following command in your terminal from project_root
yarn rw dev
Log in again and check the audit log viewer in the Pangea User Console >> Secure Audit Log >> View Logs. You should now see a newly logged message with the additional fields you just added.

Step 4: Adding Secure Audit Log to password reset and account creation.
It's great that you're recording logins, but you really should be recording password resets and account creations too. Recording account creations will allow you to recreate accurate audit timelines from when an account was created to when an incident occurred. Password resets are also important - they can be a leading indicator of an account breach.
The good news is since you've already done all the hard work adding Secure Audit Log to these other areas will be a piece of cake.
To add audit logging to password resets find the handler in resetPasswordOptions in /\<project_root\>/api/src/functions/auth.ts. Then add the following code:
handler: (user) => {
  const clientIp = ipAddress(event)
  audit.log({
    actor: user.email,
    action: 'Password Reset',
    status: 'Success',
    source: `${clientIp}`,
    message: `${user.email} performed a password reset.`,
  })
  return user
},
To add audit logging to account creations find the handler in signupOptions in /\<project_root\>/api/src/functions/auth.ts. Then add the following code:
handler: ({ username, hashedPassword, salt, userAttributes }) => {
	const clientIp = ipAddress(event)
	audit.log({
	  action: 'Create Account',
	  status: 'Success',
	  source: `${clientIp}`,
	  message: `An account (${username}) was created from ${ipResults.clientIp}`,
	})
	return db.user.create({
	  data: {
	    email: username,
	    hashedPassword: hashedPassword,
	    salt: salt,
	    // name: userAttributes.name
	  },
	})
},
See, super easy. Now try the account creation and password reset processes to validate that the log messages are recorded as expected. Remember to start your redwood app if you have stopped it using the following command from your terminal in project_root.
yarn rw dev
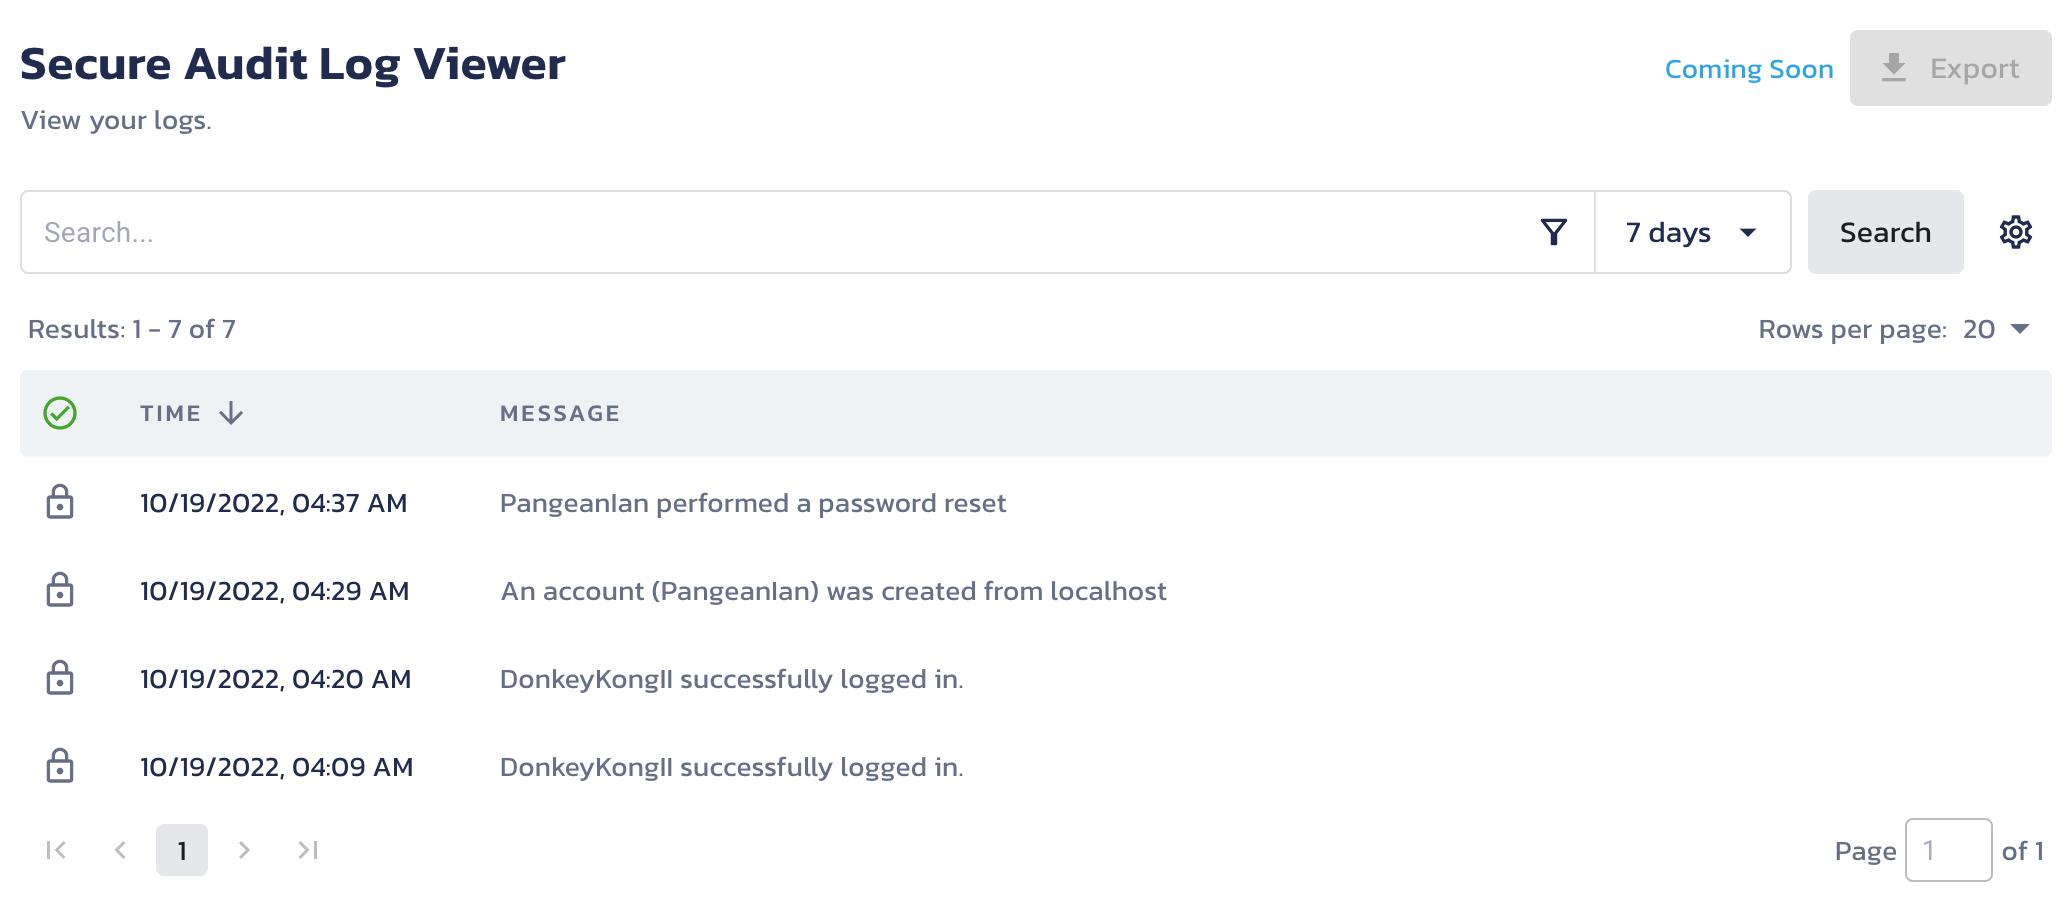
Review your audit logs in the Pangea User Console >> Secure Audit Log >> View Logs.

Congratulations, your App is more secure AND more compliant!
Part 3 - Blocking embargoed countries
The RedwoodJS is just a very simple blogging app. It's unlikely you'd apply any embargo restrictions to it, but let's assume there are. Specifically, let's assume that the ITAR Embargo list (International Traffic in Arms Regulations) applies to it. Great news! Pangea just so happens to have that list as an out-of-the-box Embargo list. What a happy coincidence.
In all seriousness, the embargo service can be an invaluable asset for companies that do need to adhere to embargoes and sanctions. It allows you to submit an IP address (in this case, a client IP), and check to see if it exists on an embargo list (in this case, the ITAR list). The API will return whether the IP exists on any of the enabled lists, at which point you can decide how to respond. In the case of this example, you'll respond with a message letting the customer know that access is denied. You'll also write an audit log record, recording the attempted login or account creation.
Step 1: Adding the embargo check to login
The easiest thing to do would be simply to find the audit.log code, add the embargo check, and then change the logged message and app behavior, depending on what was returned. A little foreshadowing... that won't work due to a couple of problems, but let's start here anyway.
Find the handler in loginOptions where you added the audit.log code to the login flow. First you'll add code to call the Embargo service.
handler: (user) => {
	const clientIp = ipAddress(event)
	const embargoResp = await embargo.ipCheck(clientIp)
	if (embargoResp.result.count > 0){
		audit.log({
			action: 'Create Account',
			status: 'Failed',
			source: `${ipResults.clientIp}`,
			message: `${clientIp} is attempting to log in from an embargoed country - ${embargoResp.country} (${embargoResp.countryCode})`,
		})
		throw new Error(
			`Access Denied. You are attempting log in from an embargoed country - ${embargoResp.country} (${embargoResp.countryCode})`
		)
	} else	{
		audit.log({
			actor: user.email,
			action: 'Login',
			status: 'Success',
			source: `${clientIp}`,
			message: `${user.email} successfully logged in.`,
		})
		return user
	}
},
If you're writing this code in a modern editor or IDE, you'll probably notice that the code is complaining that you're using await in a function not marked as async. This happens because you have to await the results from the async call to embargo.ipCheck before you can use them. To resolve this add async after handler: like so:
handler: async (user) => {
You may notice that this code throws an error when a user tries to log in from an embargoed country. The RedwoodJS sample app will resolve this error in a nice toast message to the end user. Congratulations on adding an embargo check to the login flow, but, unfortunately, there be dragons still.
Step 2: Sending only valid IPs to the Embargo Service
If you went ahead with the example, you might notice that you don't get the expected result. Assuming you're running this example from your local machine, you're getting "localhost" back from the ipAddress function that you created, which is not a legitimate IP address, causing the embargo.ipCheck to fail.
To fix this problem, you'll want to validate that the IP address is an IP address. An easy way to do this is to add the package ip-address to your example app. You can do this by running the following from your project_root
yarn workspace api add ip-address
Once added, import it into your /\<project_root\>/api/src/functions/auth.ts file.
import { Address4 } from "ip-address";
Note: I'm assuming IPv4 here, and only checking for IPv4 format.
In order to do this embargo check properly, you'll want to validate that the IP address is indeed an IP address, check the ip, and then review the results. Rather than do all of that inline, it would be easier and cleaner to do this in a new function, especially because this will be necessary to reuse during account creation.
Add the following code just below the ipAddress function you added earlier:
export const handler = async (event, context) => {
  const ipAddress = ({ event }) => {
    return (
      event?.headers?.['client-ip'] ||
      event?.requestContext?.identity?.sourceIp ||
      'localhost'
    )
  }

  const checkIpAddress = async (): Promise<{
    found: number
    clientIp: string
    country: string
    countryCode: string
  }> => {
    let found = 0
    let country = undefined
    let countryCode = undefined

    //is a valid IP?
    const clientIp = ipAddress(event)
    if (Address4.isValid(clientIp)) {
      //perform embargo check
      const embargoResp = await embargo.ipCheck(ipAddress(event))
      found = embargoResp.result.count
      if (embargoResp.result.count > 0) {
        country = embargoResp.result.sanctions[0].embargoed_country_name
        countryCode = embargoResp.result.sanctions[0].embargoed_country_iso_code
      }
    }

    return {
      found: found,
      clientIp: clientIp,
      country: country,
      countryCode: countryCode,
    }
  }
In the above code, you'll use Address4 from the ip-address package to validate that the client IP is indeed a client IP. Then you'll perform the embargo check. You'll return 0 in the found field of the response if the ip was not found in any embargo list and some number greater than 0 if it was. This code assumes that the number of lists in which the IP address was found is not important.
You'll now want to update your handler in login options to use the new checkIpAddress function you just created.
handler: async (user) => {
  const ipResults = await checkIpAddress()
  if (ipResults.found > 0) {
    audit.log({
      actor: user.email,
      action: 'Login',
      status: 'Success',
      source: `${ipResults.clientIp}`,
      message: `${user.email} is attempting to login from an embargoed country - ${ipResults.country} (${ipResults.countryCode})`,
    })
    throw new Error(
      `Access Denied. You are attempting to login from an embargoed country - ${ipResults.country} (${ipResults.countryCode})`
    )
  } else {
    audit.log({
      actor: user.email,
      action: 'Login',
      status: 'Success',
      source: `${ipResults.clientIp}`,
      message: `${user.email} successfully logged in.`,
    })
    return user
  }
},
Finally, if you try this code, you should see that it works as expected... at least, you hope. The trouble is, if you're running this on your local machine, the only IP address ever returned is 'localhost.' That doesn't give you much opportunity to test the embargo check, does it?
To simulate a request from an embargoed nation, update your ipAddress function to return 210.52.109.1 (a North Korean IP address) instead of localhost when no client IP can be determined.
export const handler = async (event, context) => {
  const ipAddress = ({ event }) => {
    return (
      event?.headers?.['client-ip'] ||
      event?.requestContext?.identity?.sourceIp ||
      '210.52.109.1'
    )
  }
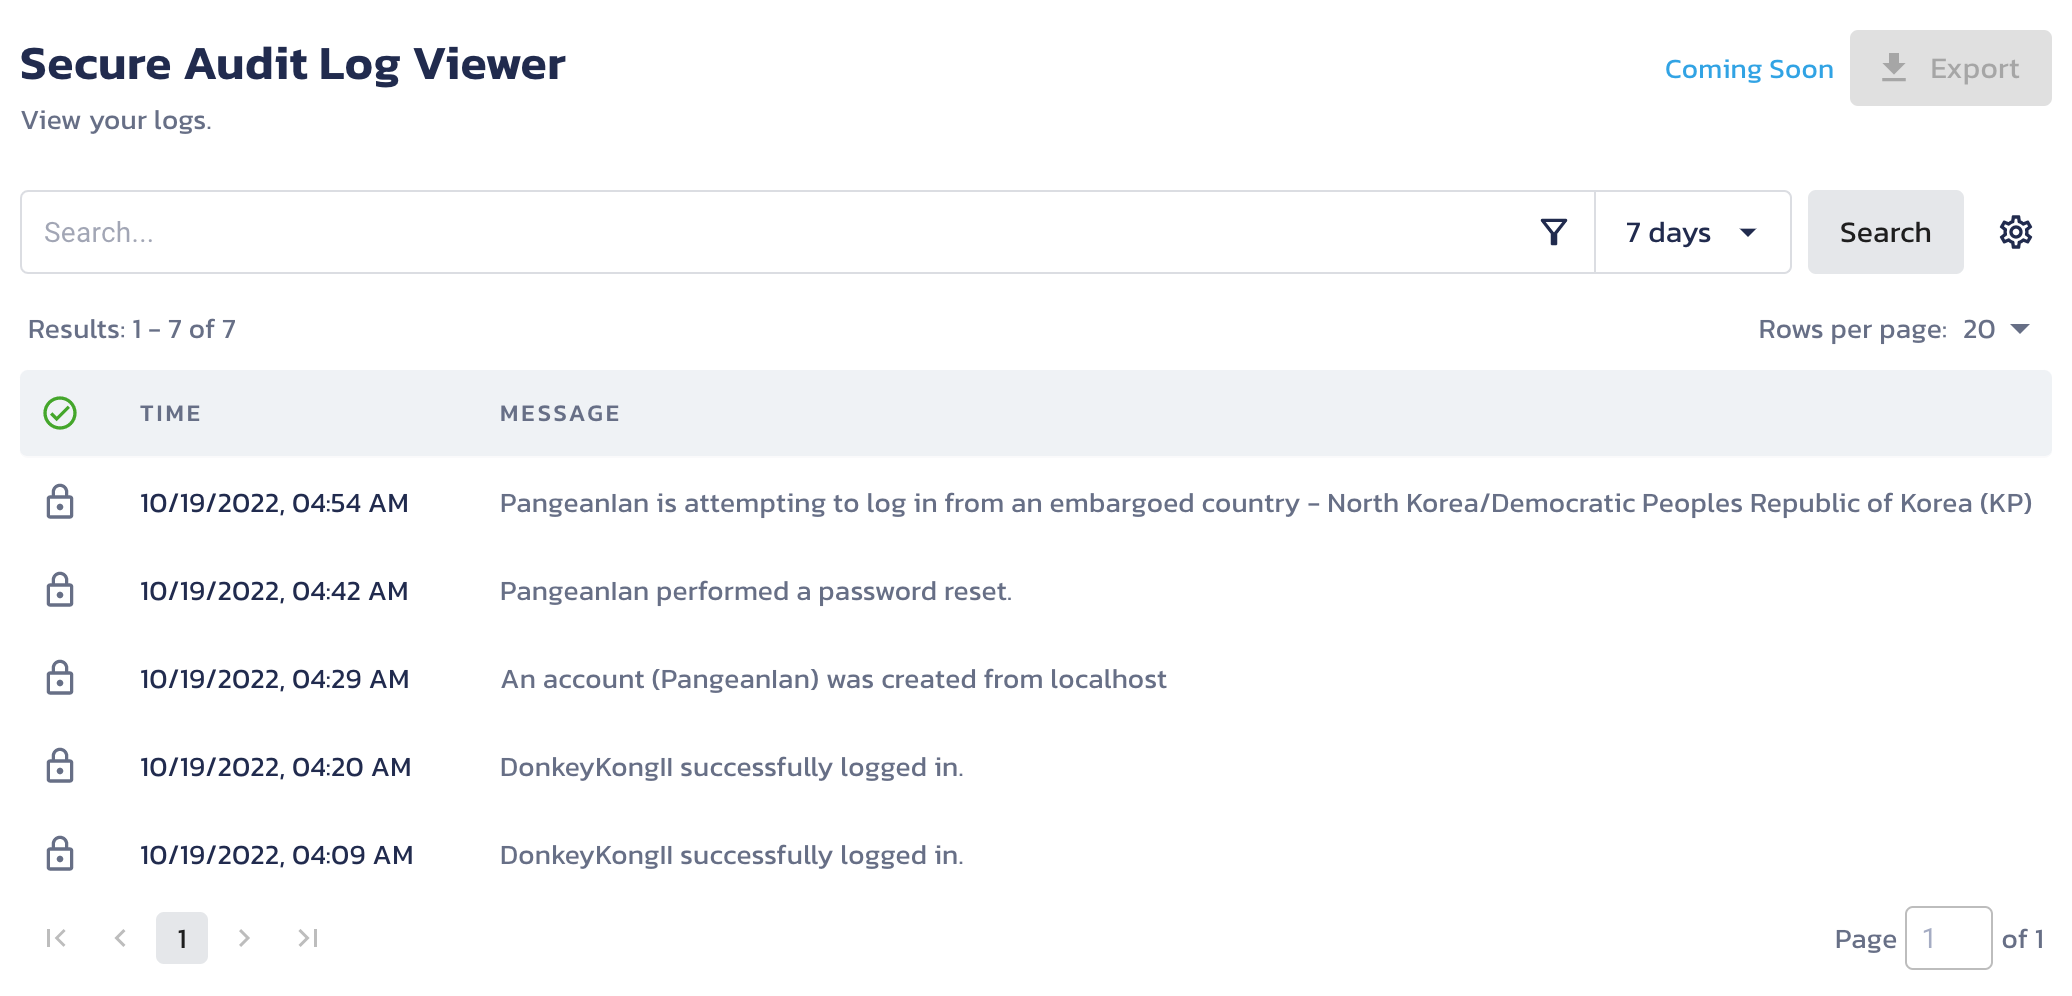
If your App is still running, try your code one more time, you should see that you are unable to login to your example App.
yarn rw dev
Review your audit logs in the Pangea User Console >> Secure Audit Log >> View Logs.

Step 3: Adding the embargo check to account creation
You have one more task. That's to add the Embargo check to the account creation process. I'll challenge you not to look at the code directly beneath this and try to do it yourself. Then compare it against the following code that I've added to the handler of signupOptions:
handler: async ({ username, hashedPassword, salt, userAttributes }) => {
  const ipResults = await checkIpAddress()
  if (ipResults.found > 0) {
    audit.log({
      action: 'Create Account',
      status: 'Failed',
      source: `${ipResults.clientIp}`,
      message: `${ipResults.clientIp} is attempting to create an account (${username}) from an embargoed country - ${ipResults.country} (${ipResults.countryCode})`,
    })
    throw new Error(
      `Access Denied. You are attempting to create an account from an embargoed country - ${ipResults.country} (${ipResults.countryCode})`
    )
  } else {
    audit.log({
      actor: username,
      action: 'Create Account',
      status: 'Success',
      source: `${ipResults.clientIp}`,
      message: `${ipResults.clientIp} created an account (${username})`,
    })
  }
  return db.user.create({
    data: {
      email: username,
      hashedPassword: hashedPassword,
      salt: salt,
      // name: userAttributes.name
    },
  })
},
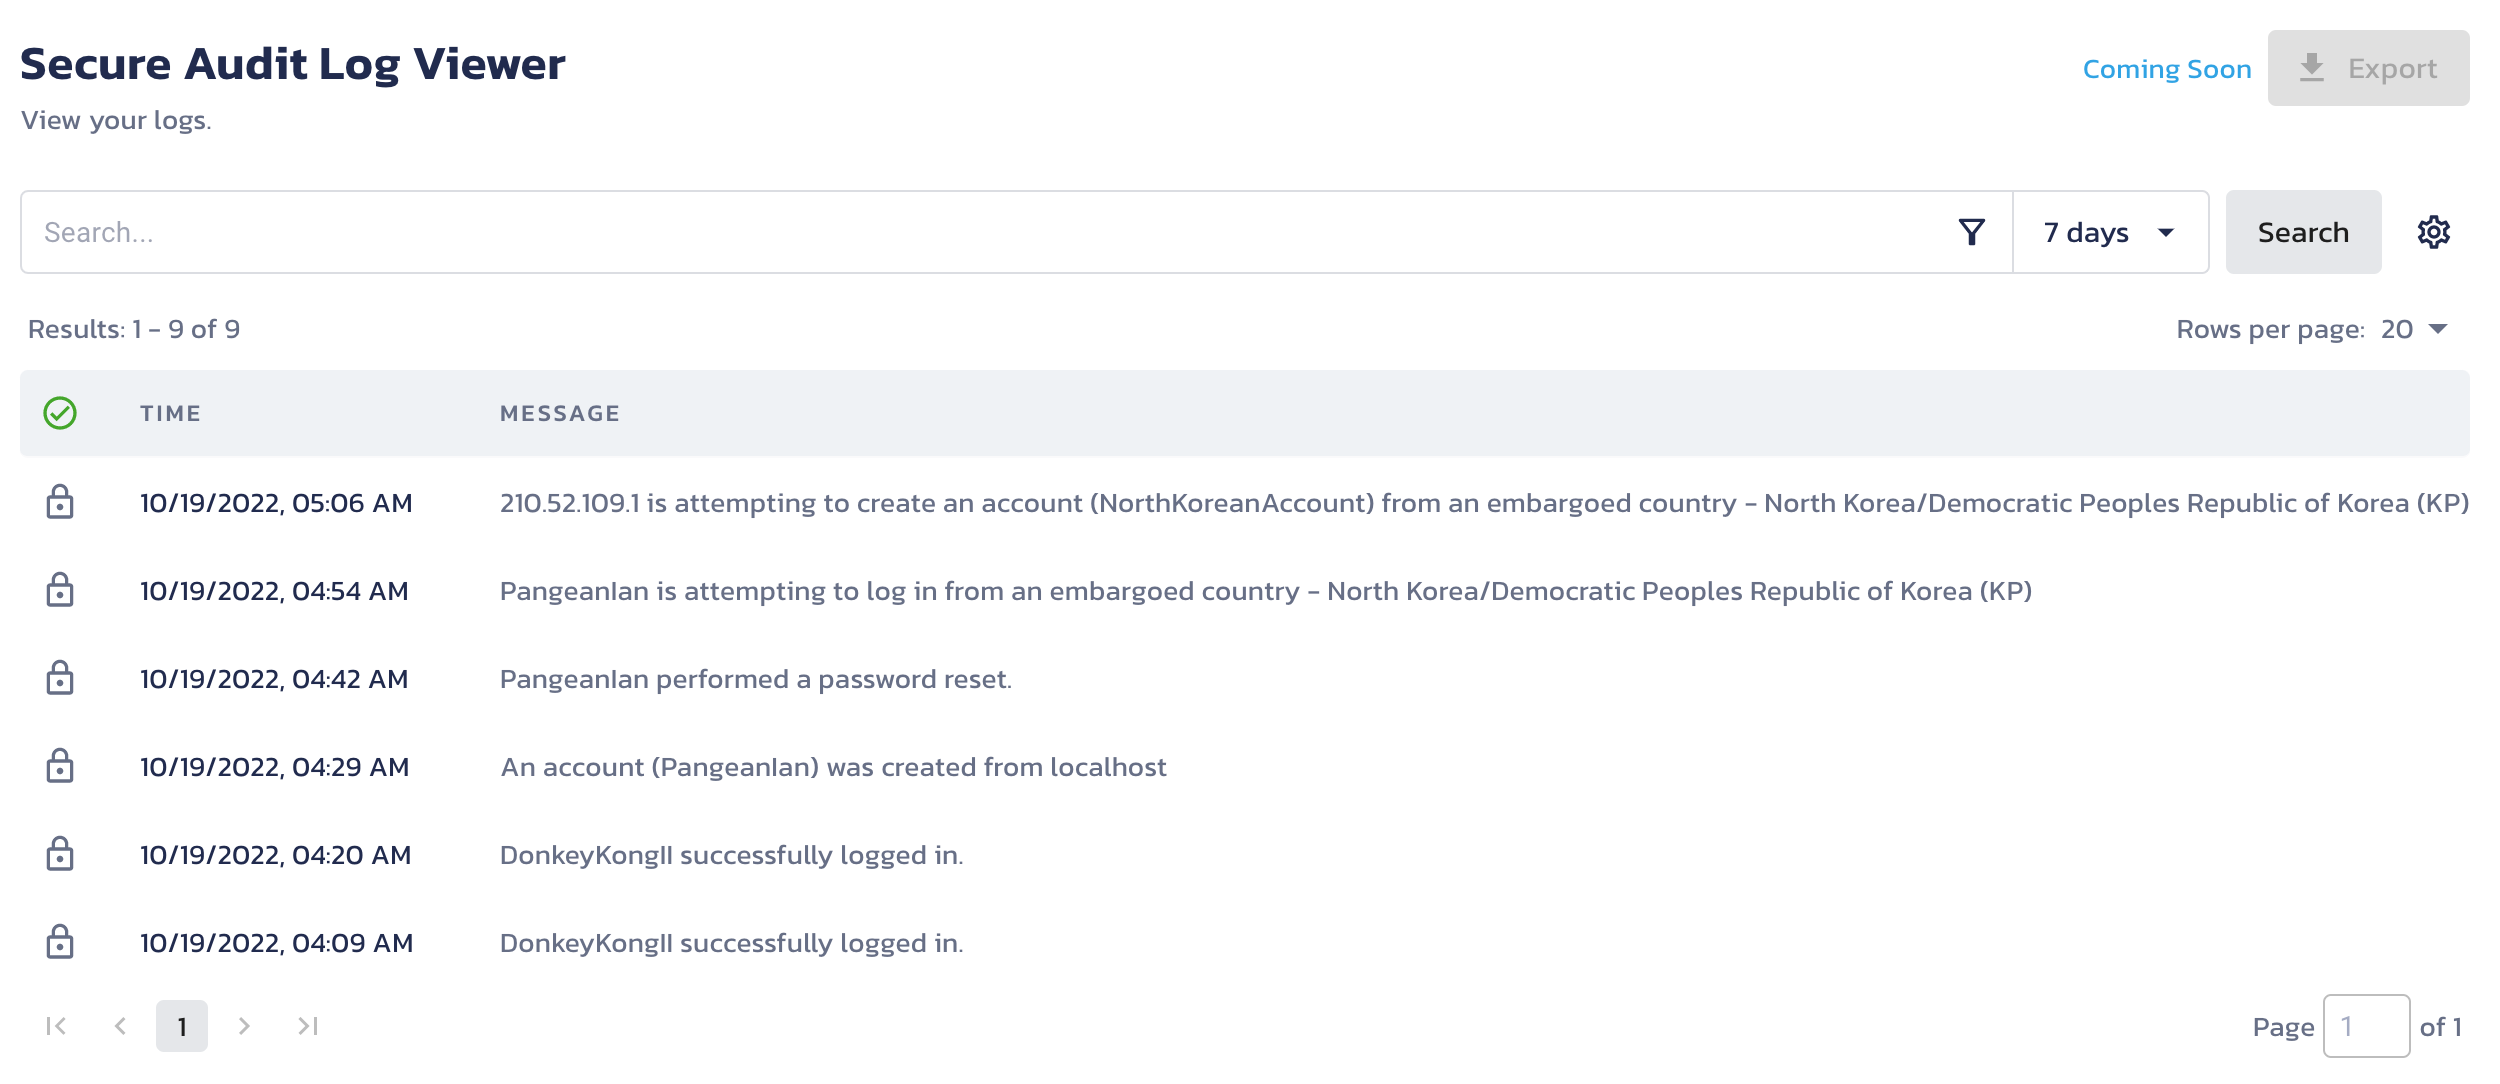
Try out the code one last time, and validate that it worked. You should see that you are unable to create an account.

Finish Line
Congratulations! You made it. You've successfully added Audit and Embargo checks to the RedwoodJS sample app. Along the way, you created a Pangea TypeScript module that you can use in ANY TypeScript app. You learned about why you should audit AuthN activity. You learned how to block logins and account creations by embargoed countries. Most importantly, though, you had a great time doing it.... I hope.
If you liked this tutorial, please share it with your friends. If you see room for improvement or even more Pangea integrations, let us know so we can collaborate.