Secure Cloudflare RAG Chatbot App on Cloudflare Pages, Workers AI, and Vectorize
The full code for this tutorial is available on
GitHub .In this tutorial, you will learn how to deploy a secure Cloudflare Pages RAG (Retrieval-Augmented Generation) chatbot application. The application is built using Cloudflare Workers AI and Vectorize, LangChain, and Next.js, with AI security provided by Pangea services.
The application implements a broad set of security controls leveraging the following Pangea capabilities:
- LLM prompt and response protection - User interactions are safeguarded by Pangea's Prompt Guard and AI Guard services to protect against prompt injection attacks, confidential information leakage, PII disclosure, and to apply content moderation based on user-defined recipes.
- Authorization for RAG - Pangea's AuthZ service enables chunk-level granular access control for files, objects, and documents stored in Cloudflare Vectorize based on user identity to avoid oversharing in the context passed to the Workers AI LLM.
- Attribution and audit logging - AI-specific and application security event data is recorded in an tamperproof AI-specific audit trail provided by Pangea's Secure Audit Log .
- Authentication - Application login is implemented using Pangea's AuthN . User identity is passed through the application to enforce authorization policies on Vectorize during RAG queries.
During ingestion, proprietary documents are embedded into the application's vector store (Cloudflare Vectorize) to enable efficient semantic search and tagged with their unique IDs in the vector metadata. Document permissions are converted into tuples and stored in AuthZ policies.
At inference time, the user’s prompt is dynamically augmented only with the context they are authorized to access. Centralizing authorization policies in this setup enables consistent access control to vectorized data across different sources and applications for all users. Capturing these policies during ingestion helps reduce latency during inference, improving the overall user experience.
Follow this tutorial to understand the application structure, prepare data, configure services, and run the example. Use the table of contents on the right to skip the steps you’ve completed.
Application architecture
The LangChain application uses Google APIs and an OAuth client to access data from Google Drive, serving as an example of an external data source.
Cloudflare's Vectorize and Workers AI are utilized to embed documents for RAG and to power the chat functionality.
Pangea's services are integrated to secure various aspects of the application's functionality. For simplicity, the following diagrams focus on the authentication and authorization components of the application security, provided by Pangea's AuthN and AuthZ.
Ingestion
Documents from a specified Google Drive folder are ingested into Cloudflare's Vectorize (the vector store), with each document's identifier stored in the vector metadata. During ingestion, permissions associated with each Google document are extracted and converted into AuthZ tuples, referencing the document and user IDs.
Inference
To use the application, users sign in through Pangea’s AuthN-hosted login page using either the Google social login option or their Google email as a username. At inference time, user questions are processed to retrieve relevant context from the vector store via semantic search on the embedded data. The results are filtered based on the permission assignments stored in AuthZ for the authenticated user.
The application administrator can optionally expand access to the embedded data by creating additional AuthZ policies based on the same document IDs, as reflected in the first step. This allows permissions to be granted to users who do not have direct access to the Google Drive data or even a Google account. Furthermore, the application can enforce rules beyond those in the original data source by leveraging inherited permissions and implementing RBAC, ReBAC, and ABAC policies defined in the authorization schema.
Prerequisites
Node.js
Project code
-
Clone the project repository from GitHub.
git clone https://github.com/pangeacyber/pangea-ai-chat-cloudflare.git
cd pangea-ai-chat-cloudflare -
Install the required packages.
npm install -
Create a
.dev.varsfile to store the API credentials required by the application. Use the included.dev.vars.exampletemplate as a starting point.Create a .dev.vars filecp .dev.vars.example .dev.vars -
The application allows scheduling ingestion or running it on demand using its
/api/ingestroute. To prevent potential abuse, requests to this endpoint must be authorized with a bearer token that matches the random value stored in the application'sINGEST_TOKENenvironment variable.For example:
Generate random 16-byte stringopenssl rand -hex 16Example output183a827749c4684178a80acb4ef957a8Update .dev.vars file...
INGEST_TOKEN="183a827749c4684178a80acb4ef957a8"
Cloudflare
The application uses Cloudflare Workers AI LLM for inference and embedding, with Cloudflare Vectorize serving as the vector store.
Create account
To use its Pages and AI features, create a Cloudflare account if you don’t already have one.
Sign in to your account using the Wrangler CLI:
npx wrangler login
This will redirect you to the Cloudflare login screen in your browser. Sign in and allow Wrangler to make changes to your Cloudflare account on the consent screen.
Create an index in Vectorize
Create a new index in the Vectorize vector database to store embeddings for the Google Drive documents.
npx wrangler vectorize create pangea-ai-chat --dimensions=768 --metric=cosine
The vector dimensions and distance metric parameters align with the bge-base-en-v1.5 text embedding model used by the application.
Save API credentials
The application uses Cloudflare Vectorize and Workers AI APIs to embed custom data and query the chat LLM. To authorize API requests, create an API token and save it along with your Cloudflare account ID in the environment variables.
- Navigate to the Workers AI REST API page in your Cloudflare Dashboard.
- Copy the Account ID value and assign it to the
CLOUDFLARE_ACCOUNT_IDvariable in the.dev.varsfile. - Click Create a Workers AI API Token.
- On the Create a Workers AI API Token page, under the Permissions section, click +Add and select the following for the new permission:
- Account | Vectorize | Edit
- Optionally, select your account under Account Resources.
- Click Create API Token.
- Copy the new token value and assign it to the
CLOUDFLARE_API_TOKENvariable in the.dev.varsfile.
...

CLOUDFLARE_ACCOUNT_ID="5e32c6...d6e46f"
CLOUDFLARE_API_TOKEN="DlV6ed...ZK4rWr"

...
Google Cloud project
To get started, you'll need a Google account to create a Google Cloud project with both the Google Drive and Google Sheets APIs enabled. This project also requires a service account to grant your LangChain application access to these APIs. Using this Google account, you can create a folder in Google Drive that your application will read from and use to ingest example data.
If your organizational Google account does not allow setting up a Google Cloud project this way, you can use a personal Google account instead.
Additionally, you’ll need a separate Google account to test restricted access to the files stored in this folder.
To set up a Google Cloud project, you can follow the official Google documentation:
-
Follow the Creating and managing projects guide in the Google Resource Manager documentation to create your Google Cloud project.
In your Google Cloud project, enable both the Google Drive API and the Google Sheets API .
-
Follow the Create service accounts and Create and delete service account keys guides in the Google IAM documentation to create a service account and save its credentials in your LangChain application folder.
Below, find an example walk-through.
Create a Google Cloud Project
- Go to the Google Cloud Console Manage resources page and sign in to your Google account.
- On the Manage resources page, click + CREATE PROJECT or select an existing project.
- If creating a new project, enter your Project name and click CREATE. Wait for the confirmation in the Notifications panel on the right.
- Once confirmed, click SELECT PROJECT in the Notifications panel.
Enable Google Drive and Google Sheets API
- In the search bar, type
Driveand click the Google Drive API link in the search results. - On the Google Drive API details page, click ENABLE.
- Then, search for
Sheetsand click the Google Sheets API link in the search results. - On the Google Sheets API details page, click ENABLE.
Create a Service Account
- Using the navigation menu in the top left, go to IAM & Admin >> Service Accounts.
- On the Service accounts page, click + CREATE SERVICE ACCOUNT.
- On the Create service account page, under Service account details, fill out the form and click CREATE AND CONTINUE.
- In the Grant this service account access to project (optional) step, click CONTINUE.
- In the Grant users access to this service account (optional) step, click DONE.
- On the Service accounts for project "<your-Google-Cloud-project-name>" page, click on your service account link.
- On the Service account details page, go to the KEYS tab.
- On the Keys page, click ADD KEY and select Create new key.
- In the Create private key for <your-service-account-email> dialog, select JSON and click CREATE.
- You will be prompted to save your key; save it in your LangChain project folder as a
credentials.jsonfile.
Your credentials.json file should look similar to this:
{
  "type": "service_account",
  "project_id": "my-project",
  "private_key_id": "l3JYno7aIrRSZkAGFHSNPcjYS6lrpL1UnqbkWW1b",
  "private_key": "...",
  "client_email": "my-service-account@my-project.iam.gserviceaccount.com",
  "client_id": "1234567890",
  "auth_uri": "https://accounts.google.com/o/oauth2/auth",
  "token_uri": "https://oauth2.googleapis.com/token",
  "auth_provider_x509_cert_url": "https://www.googleapis.com/oauth2/v1/certs",
  "client_x509_cert_url": "https://www.googleapis.com/robot/v1/metadata/x509/my-service-account%40my-project.iam.gserviceaccount.com",
  "universe_domain": "googleapis.com"
}
Note your service account email in the <service-account-ID>@<Google-Cloud-project-ID>.iam.gserviceaccount.com format - you will need it in the next step.
Add example data
-
Create a folder in your Google Drive and note its ID from the URL. For example, if the folder URL is
https://drive.google.com/drive/folders/1MPqBul...m3yWO4, the folder ID is1MPqBul...m3yWO4. You’ll provide this ID to the LangChain application to access data in the folder. -
Share this folder with the service account’s email, granting it Editor access to query permissions for the files stored in it.
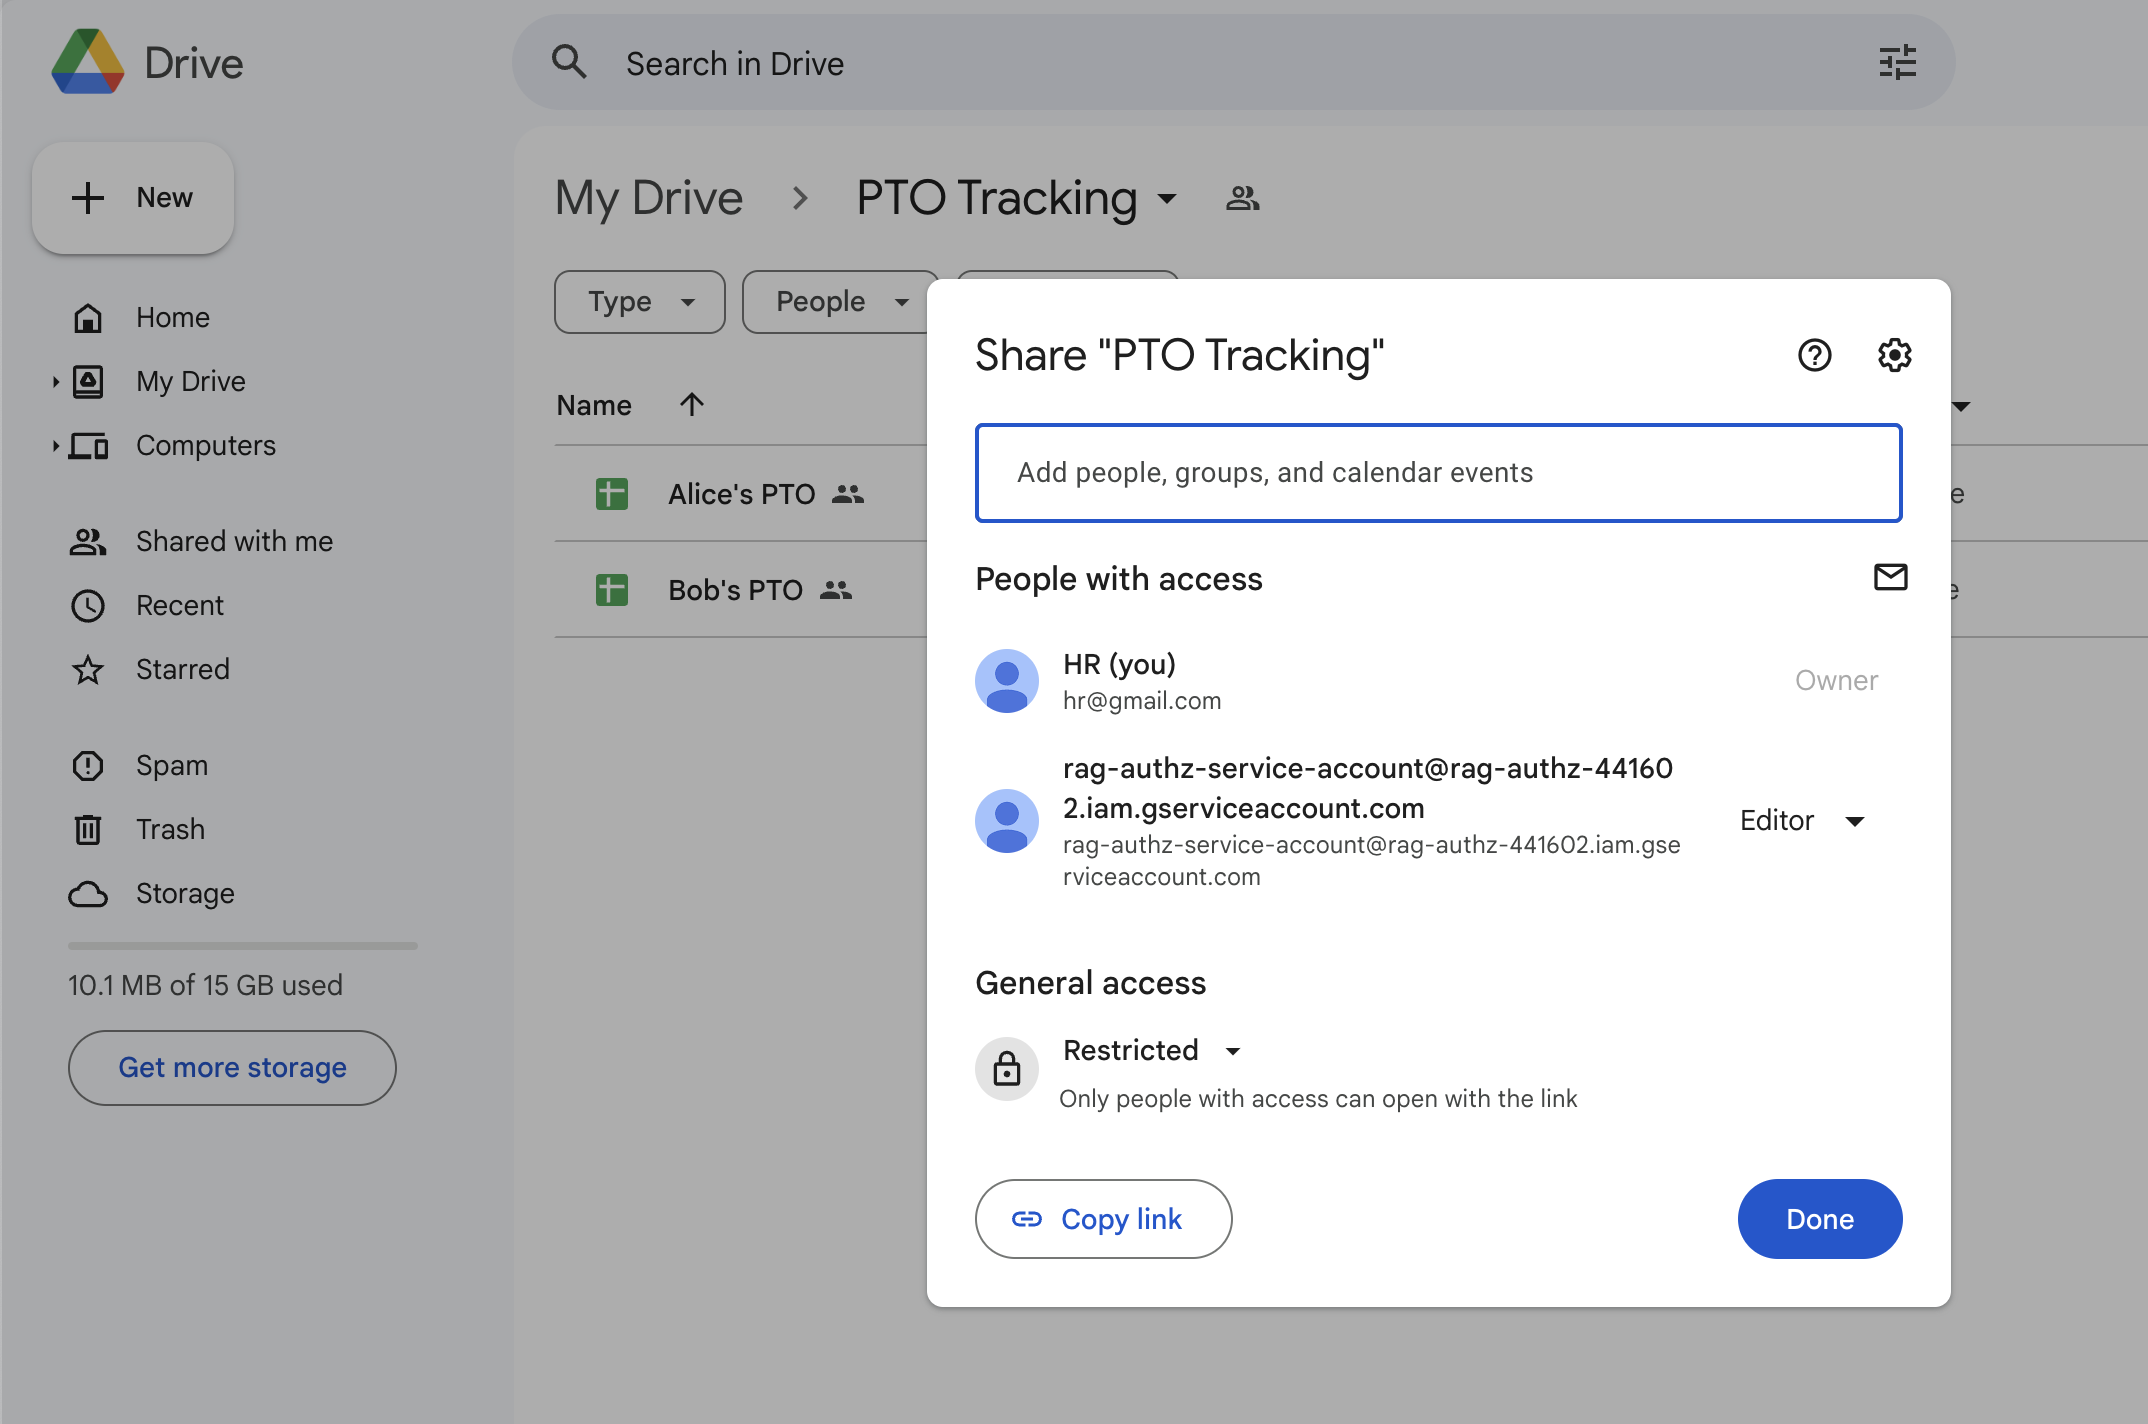
Google Drive Folder Sharing -
In the folder, create a spreadsheet for each fictitious employee account you’ll use to test the application. For each spreadsheet:
-
Add some employee-specific information, such as PTO balance.
For example:
Employee PTO balance, hours Alice 128 For simplicity, the employee's name is added directly to the document content. However, it could also be derived from the file permissions read by the application and included in the user prompt context at inference time.
Currently, the GoogleDriveRetriever class used in this tutorial assumes the first row of a spreadsheet is a header and processes data starting from the second row. If you only populate the first row, it won’t return a document. To ensure data is loaded, include a header row and place your data starting from the second row.
-
Share the spreadsheet with the employee's Google account (the account you’ll use to test restricted access to the files in this folder), granting it at least Viewer access.
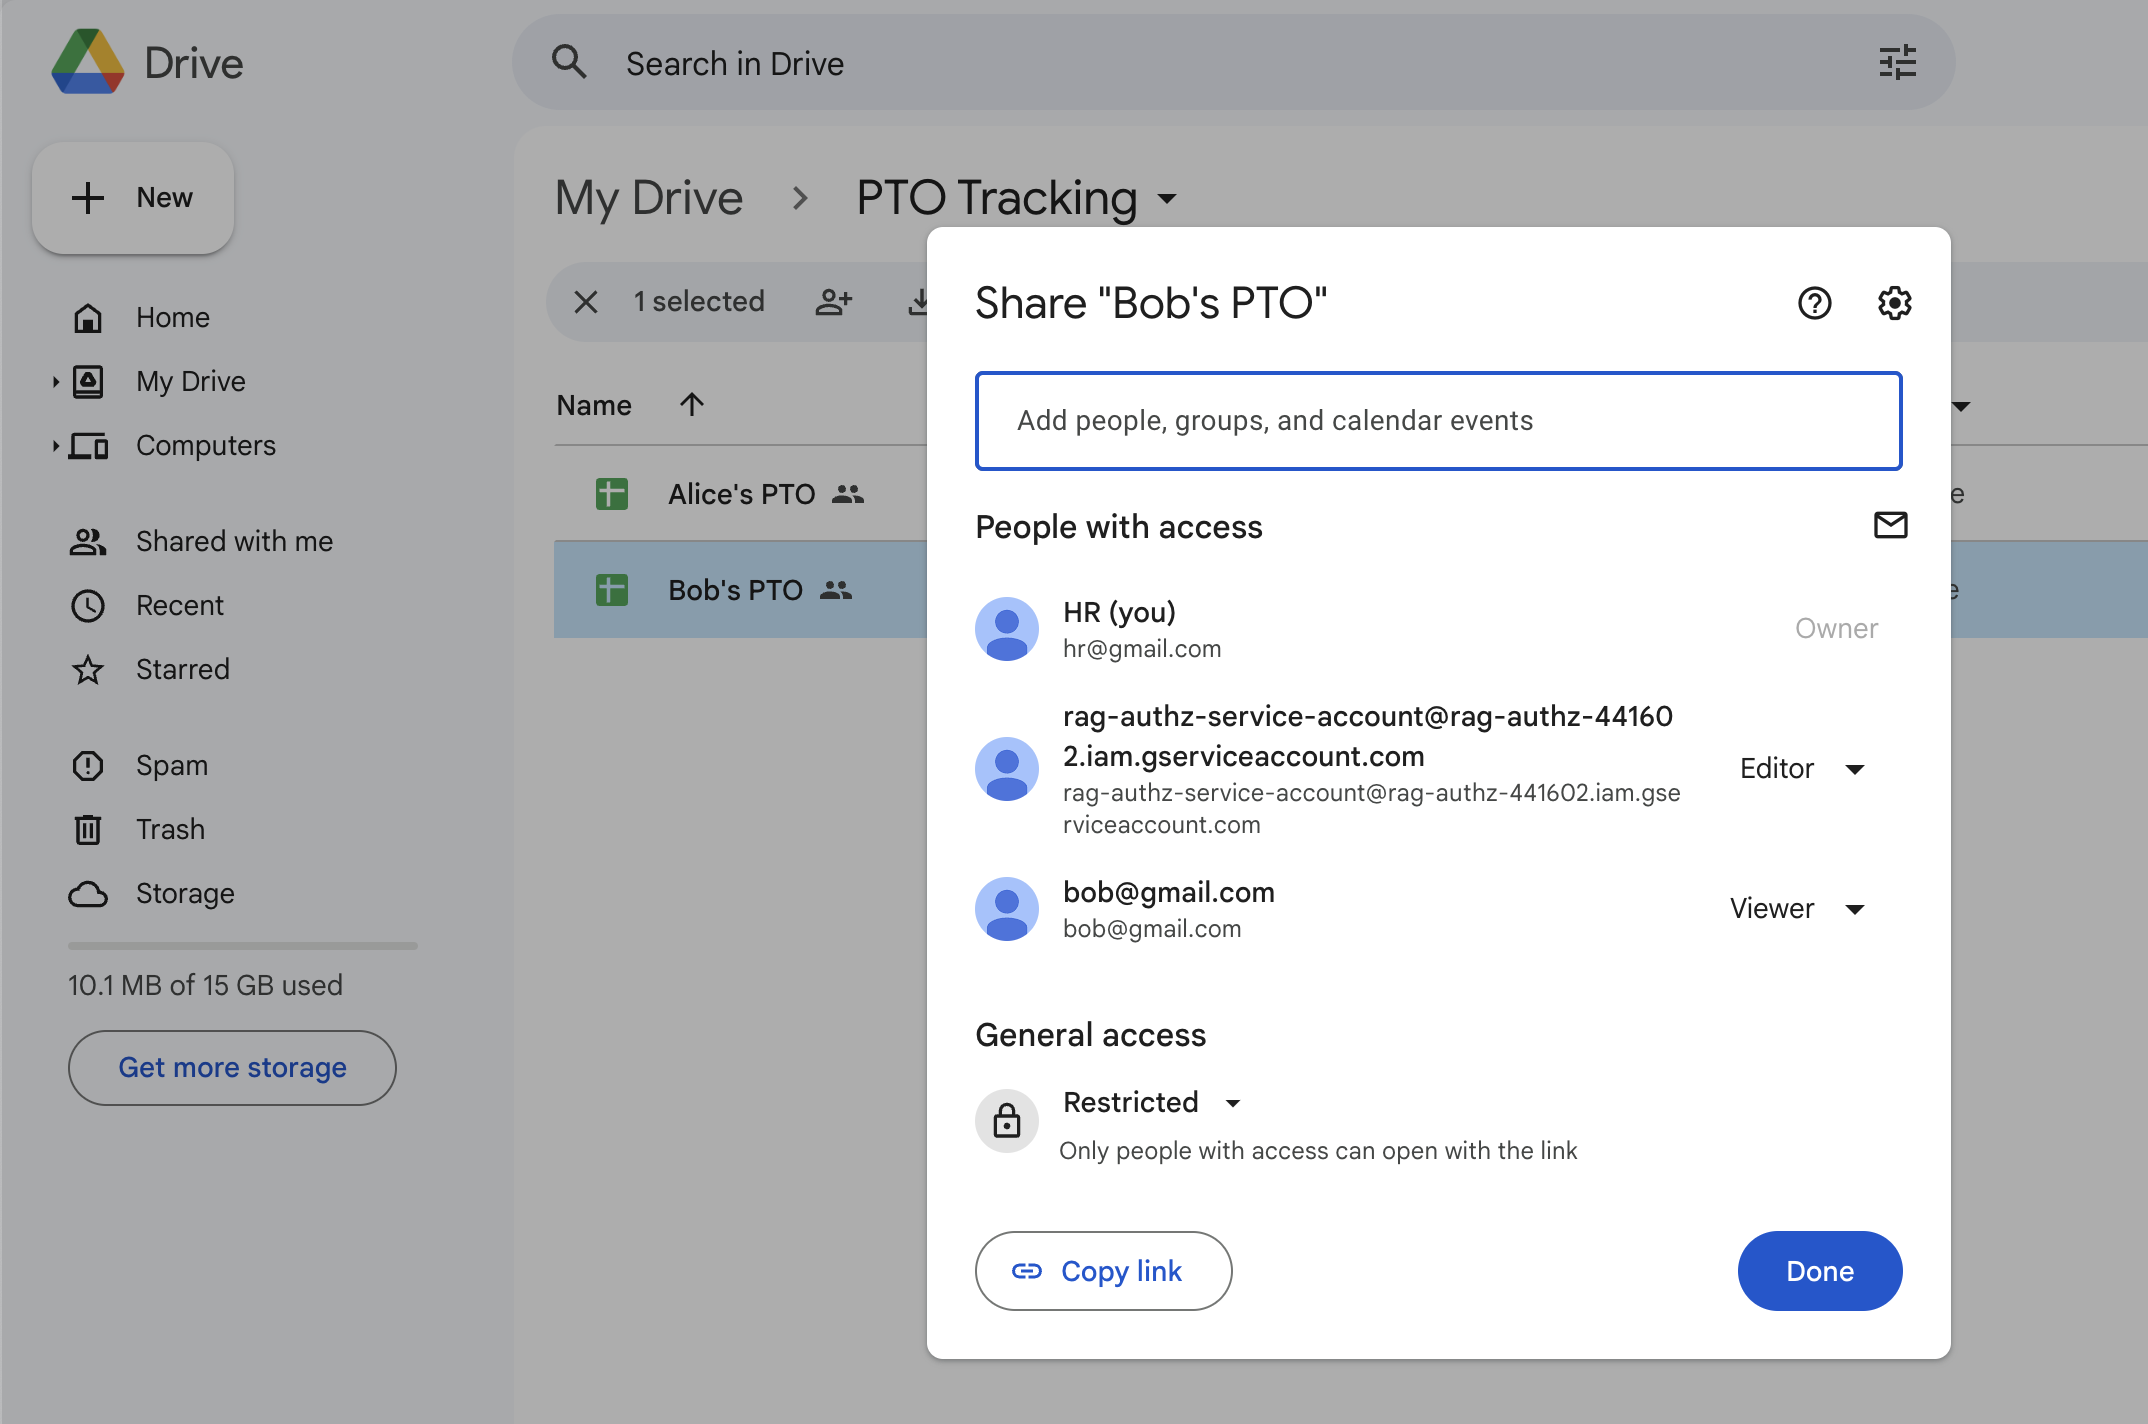
Google Drive File Sharing
-
Save API credentials
Assign the Google Drive folder ID to the GOOGLE_DRIVE_FOLDER_ID environment variable saved in the .dev.vars file.
Convert the service account credentials into a single-line JSON value and assign it to the GOOGLE_DRIVE_CREDENTIALS variable. You can use a tool like jq to compact JSON. For example:
jq -c . credentials.json
...

GOOGLE_DRIVE_CREDENTIALS='{"type":"service_account","project_id":"my-project","private_key_id":"l3JYno7aIrRSZkAGFHSNPcjYS6lrpL1UnqbkWW1b","private_key":"...","client_email":"my-service-account@my-project.iam.gserviceaccount.com","client_id":"1234567890","auth_uri":"https://accounts.google.com/o/oauth2/auth","token_uri":"https://oauth2.googleapis.com/token","auth_provider_x509_cert_url":"https://www.googleapis.com/oauth2/v1/certs","client_x509_cert_url":"https://www.googleapis.com/robot/v1/metadata/x509/my-service-account%40my-project.iam.gserviceaccount.com","universe_domain":"googleapis.com"}'
GOOGLE_DRIVE_FOLDER_ID="1MPqBulasU27b2bq61l_tBwwF2jm3yWO4"

...
Remove the credentials.json file from your file system or store it securely in a safe location.
Pangea services
To use Pangea services to secure your LangChain app, start by creating a free Pangea account . After creating your account, click Skip on the Get started with a common service screen. This will take you to the Pangea User Console home page, where you can enable the required services.
If you end up on a different service page in the Pangea User Console, navigate to the list of services by clicking Back to Main Menu in the top left corner.
Requests to Pangea services must be authorized with an API token, which can be either service-specific or provide access to multiple services. We will create a token for all required services later in this tutorial.
Enable Prompt Guard
The example chat application includes protection against prompt injection attacks using Pangea's Prompt Guard .
To enable the service, navigate to the Pangea User Console home page. Under the AI SECURITY category, click Prompt Guard in the left-hand sidebar and follow the prompts, accepting all defaults. Once finished, click Done and Finish.
For more information about setting up the service and exploring its capabilities, visit the Prompt Guard documentation .
Enable AI Guard
You can identify and redact sensitive information and block or remove malicious content from the prompts sent to your application's LLM and its responses by enabling Pangea's AI Guard service.
On the Pangea User Console home page, under the AI SECURITY category, click AI Guard in the left-hand sidebar and follow the prompts, accepting all defaults. Once finished, click Done and Finish.
For more information about setting up the service and exploring its capabilities, visit the AI Guard documentation .
Enable AuthZ
The application filters the results of the semantic search in the vector store against authorization policies stored in the AuthZ service. These policies are created or updated during ingestion using permissions from the original data source.
Additionally, AuthZ policies can be explicitly created, updated, or removed by the application administrator using the Pangea User Console , the Pangea SDK , or the AuthZ APIs .
To enable the service, click its name in the left-hand sidebar on the Pangea User Console home page under the ACCESS category, and follow the prompts in the service enablement wizard. Accept the defaults in the first two dialogs.
In the third and final dialog with the Done button, select the File Drive authorization schema - this is the schema expected by the example LangChain application. Click Done.
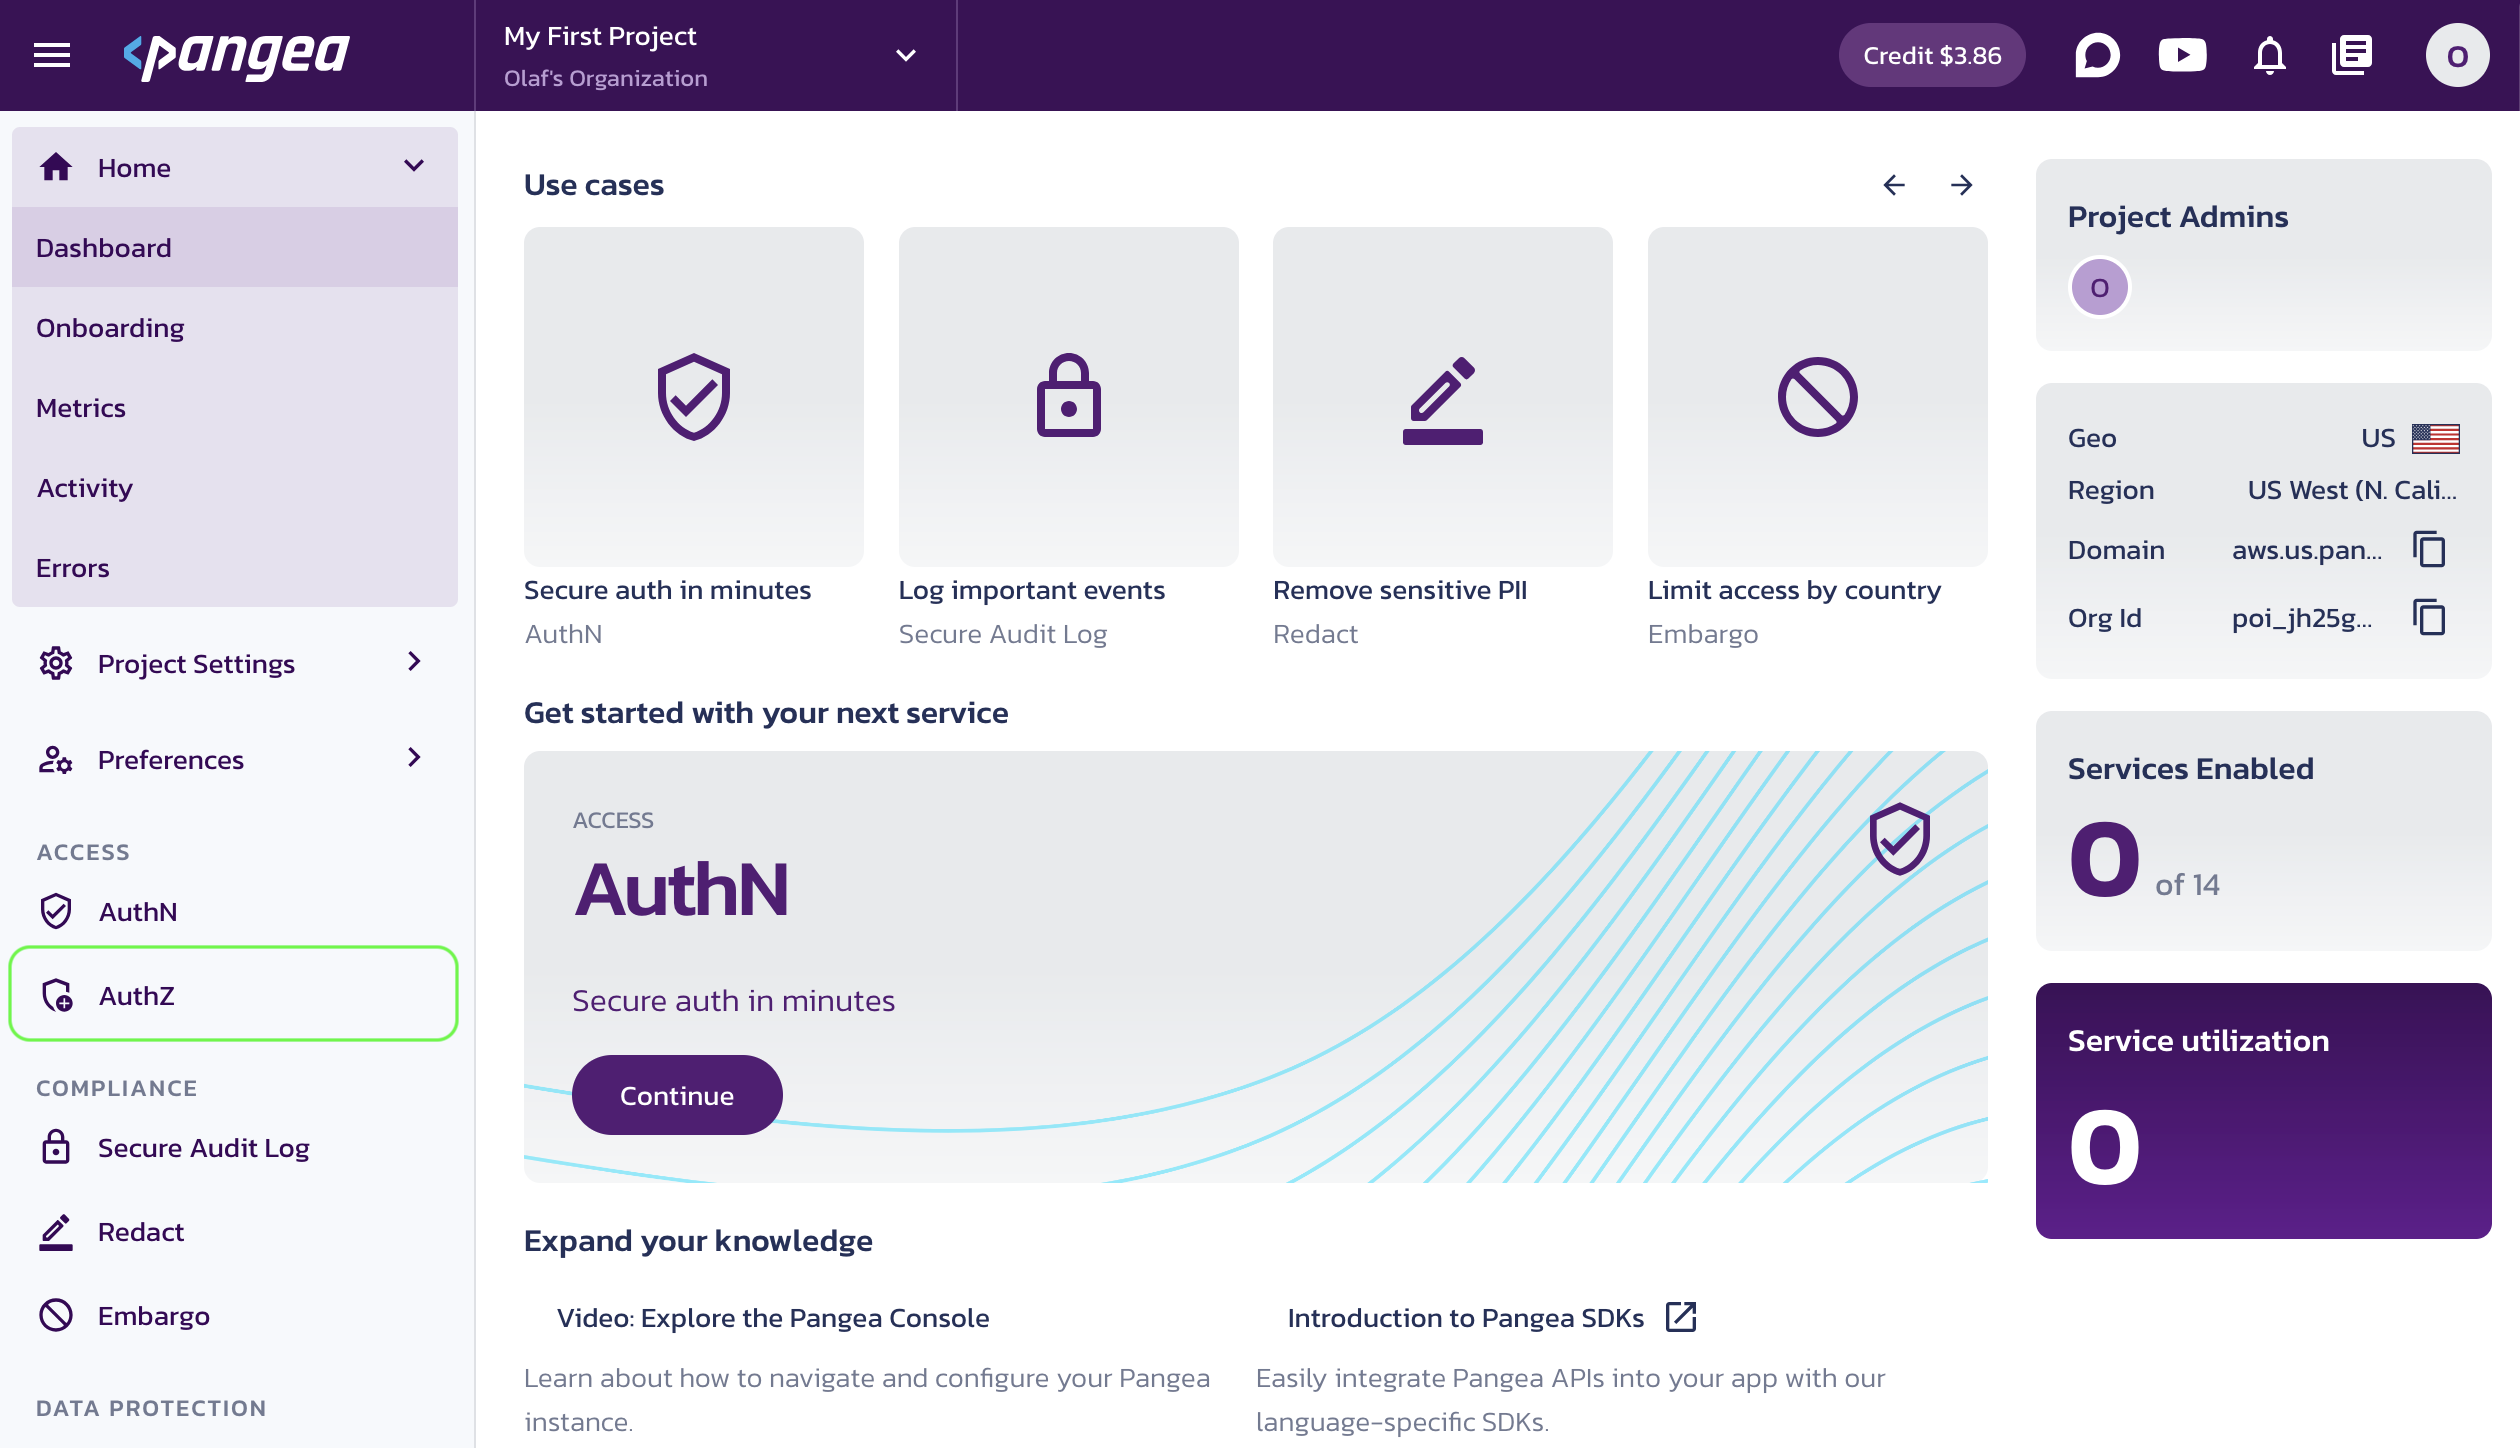
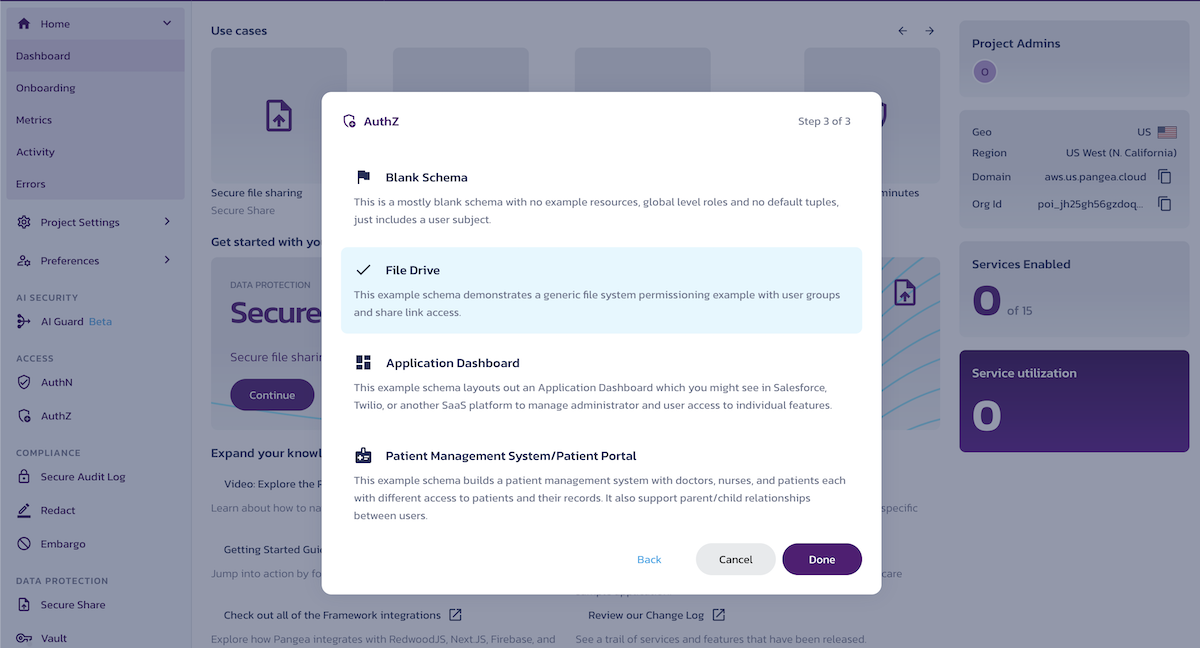
The built-in File Drive authorization schema provides relationship-based access control (ReBAC), which the LangChain application will use to assign user permissions to specific Google documents. You can reset the authorization schema to another built-in example or start fresh with a blank schema at any time.
For more information on setting up the advanced capabilities of the AuthZ service and how to use it, visit the AuthZ documentation .
The application sets and checks permissions in the authorization schema using the Pangea SDK .
Enable Secure Audit Log
Enabling the Secure Audit Log service allows your application to log various types of event data in a tamperproof and cryptographically verifiable manner using customizable audit schemas.
Additionally, enabling AI Guard adds the AI Activity Audit Log Schema configuration to the Secure Audit Log service. This enables tracking of chat history, documents retrieved for each query, user activity, and other AI application event data. To display these logs in the app, you need to activate the service and assign the configuration ID to an application environment variable.
On the Pangea User Console home page, under the Compliance category, click Secure Audit Log in the left-hand sidebar and follow the prompts, accepting all defaults. Once finished, click Done and Finish.
For more information about setting up the service and exploring its capabilities, visit the Secure Audit Log documentation .
You can integrate the Secure Audit Log React UI component into your application for seamless log viewing functionality and displaying application logs. To use this component with the AI Activity Audit Log Schema configuration:
- Navigate to the service Overview page in the Pangea User Console.
- Select
AI Activity Audit Log Schemafrom the drop-down menu at the top of the left-hand sidebar on the service page. - In the Configuration Details section of the overview page, click on the Config ID tile to copy its value and assign it to the
PANGEA_AUDIT_CONFIG_IDvariable in the.dev.varsfile.
...

PANGEA_AUDIT_CONFIG_ID="pci_uo2yiz...g6apjb"

...
Enable AuthN
To reduce risks associated with public access, the application authenticates users using the AuthN service. This service allows users to sign in through the Pangea-hosted page using their browser. Your application will then perform an OAuth Authorization Code flow, using the Pangea SDK to communicate with the AuthN service.
After authentication, the user’s ID can be used to perform authorization checks in AuthZ.
On the Pangea User Console home page, under the ACCESS category, click AuthN in the left-hand sidebar and follow the prompts, accepting all defaults. When finished, click Done and Finish.
An easy and secure way to authenticate your users with AuthN is to use its Hosted Login , which implements the OAuth 2 Authorization Code grant. The Pangea SDK will manage the flow, providing user profile information and allowing you to use the user's login to verify their permissions defined in AuthZ.
- Click General in the left-hand sidebar.
- On the Authentication Settings screen, click Redirect (Callback) Settings.
- In the right pane, click + Redirect.
- Enter
http://localhost:3000in the URL input field. - Click Save in the Add redirect dialog.
- Click Save again in the Redirect (Callback) Settings pane on the right.
For more information on setting up advanced capabilities of the AuthN service (such as sign-in and sign-up options, security controls, session management, and more), visit the AuthN documentation .
Once the service is enabled, you’ll be taken to its Overview page. Capture the following AuthN Configuration Details:
- Client Token - A token that grants partial access to Pangea APIs and is suitable for use in public client applications.
- Hosted Login - The AuthN Hosted Login UI URL that your application will use to redirect users for sign-in.
- Domain - The Pangea project domain, shared across all services within the project.
You can copy these values by clicking on the respective property tiles.
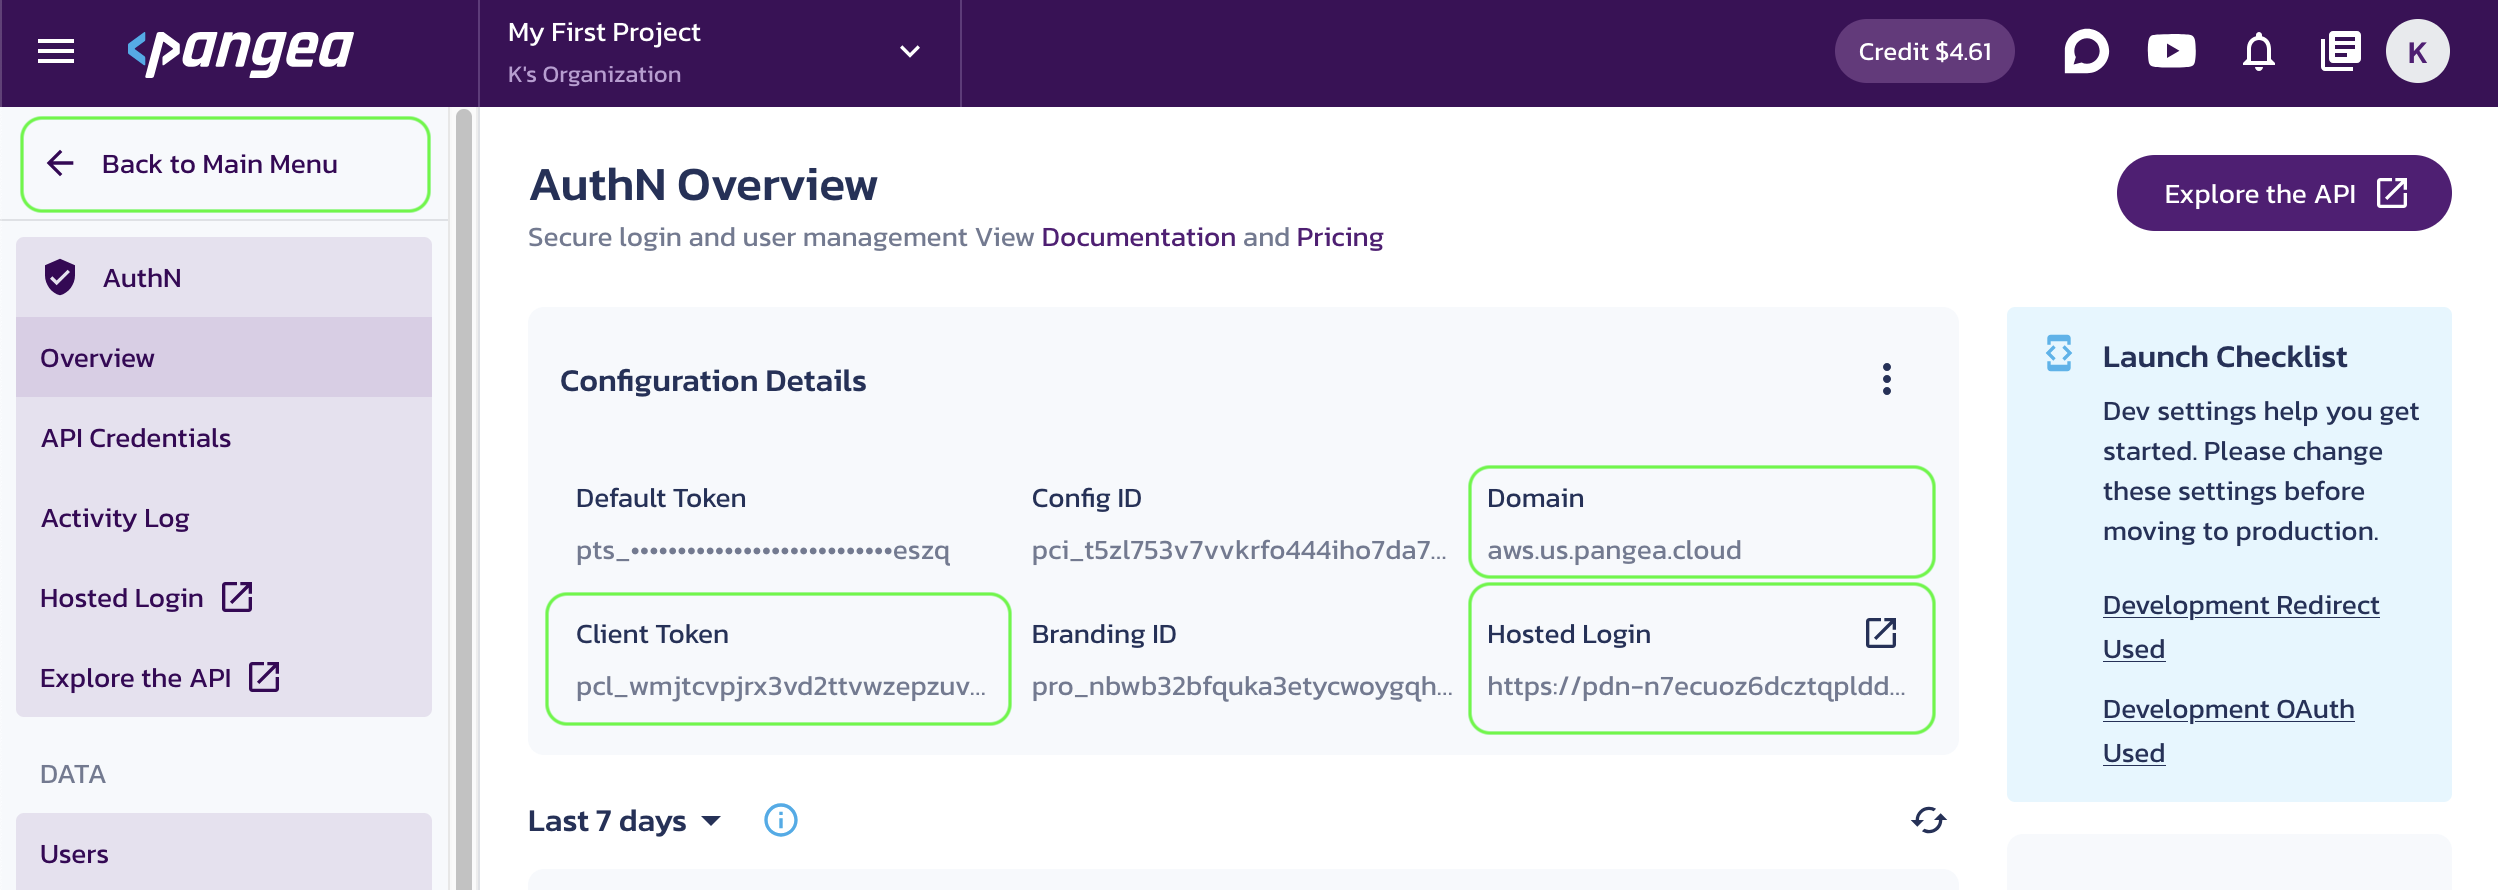
Add the configuration values to your .dev.vars file as the respective NEXT_PUBLIC_... variables:
NEXT_PUBLIC_PANGEA_CLIENT_TOKEN="pcl_wmjtcv...6vdevo"
NEXT_PUBLIC_AUTHN_UI_URL="https://pdn-gqt5ogwel73ysgjdo64mbab3z2ldbcaj.login.aws.us.pangea.cloud"
NEXT_PUBLIC_PANGEA_BASE_DOMAIN="aws.us.pangea.cloud"

...
Save API credentials
For the AuthZ service and any optional services you have enabled, create a service token on the Project Settings >> Tokens page in the Pangea User Console:
-
Click Create token.
-
In the Create a token dialog:
-
Provide a token name.
-
Select the services you enabled, for example: Prompt Guard, AI Guard, Secure Audit Log, and AuthZ.
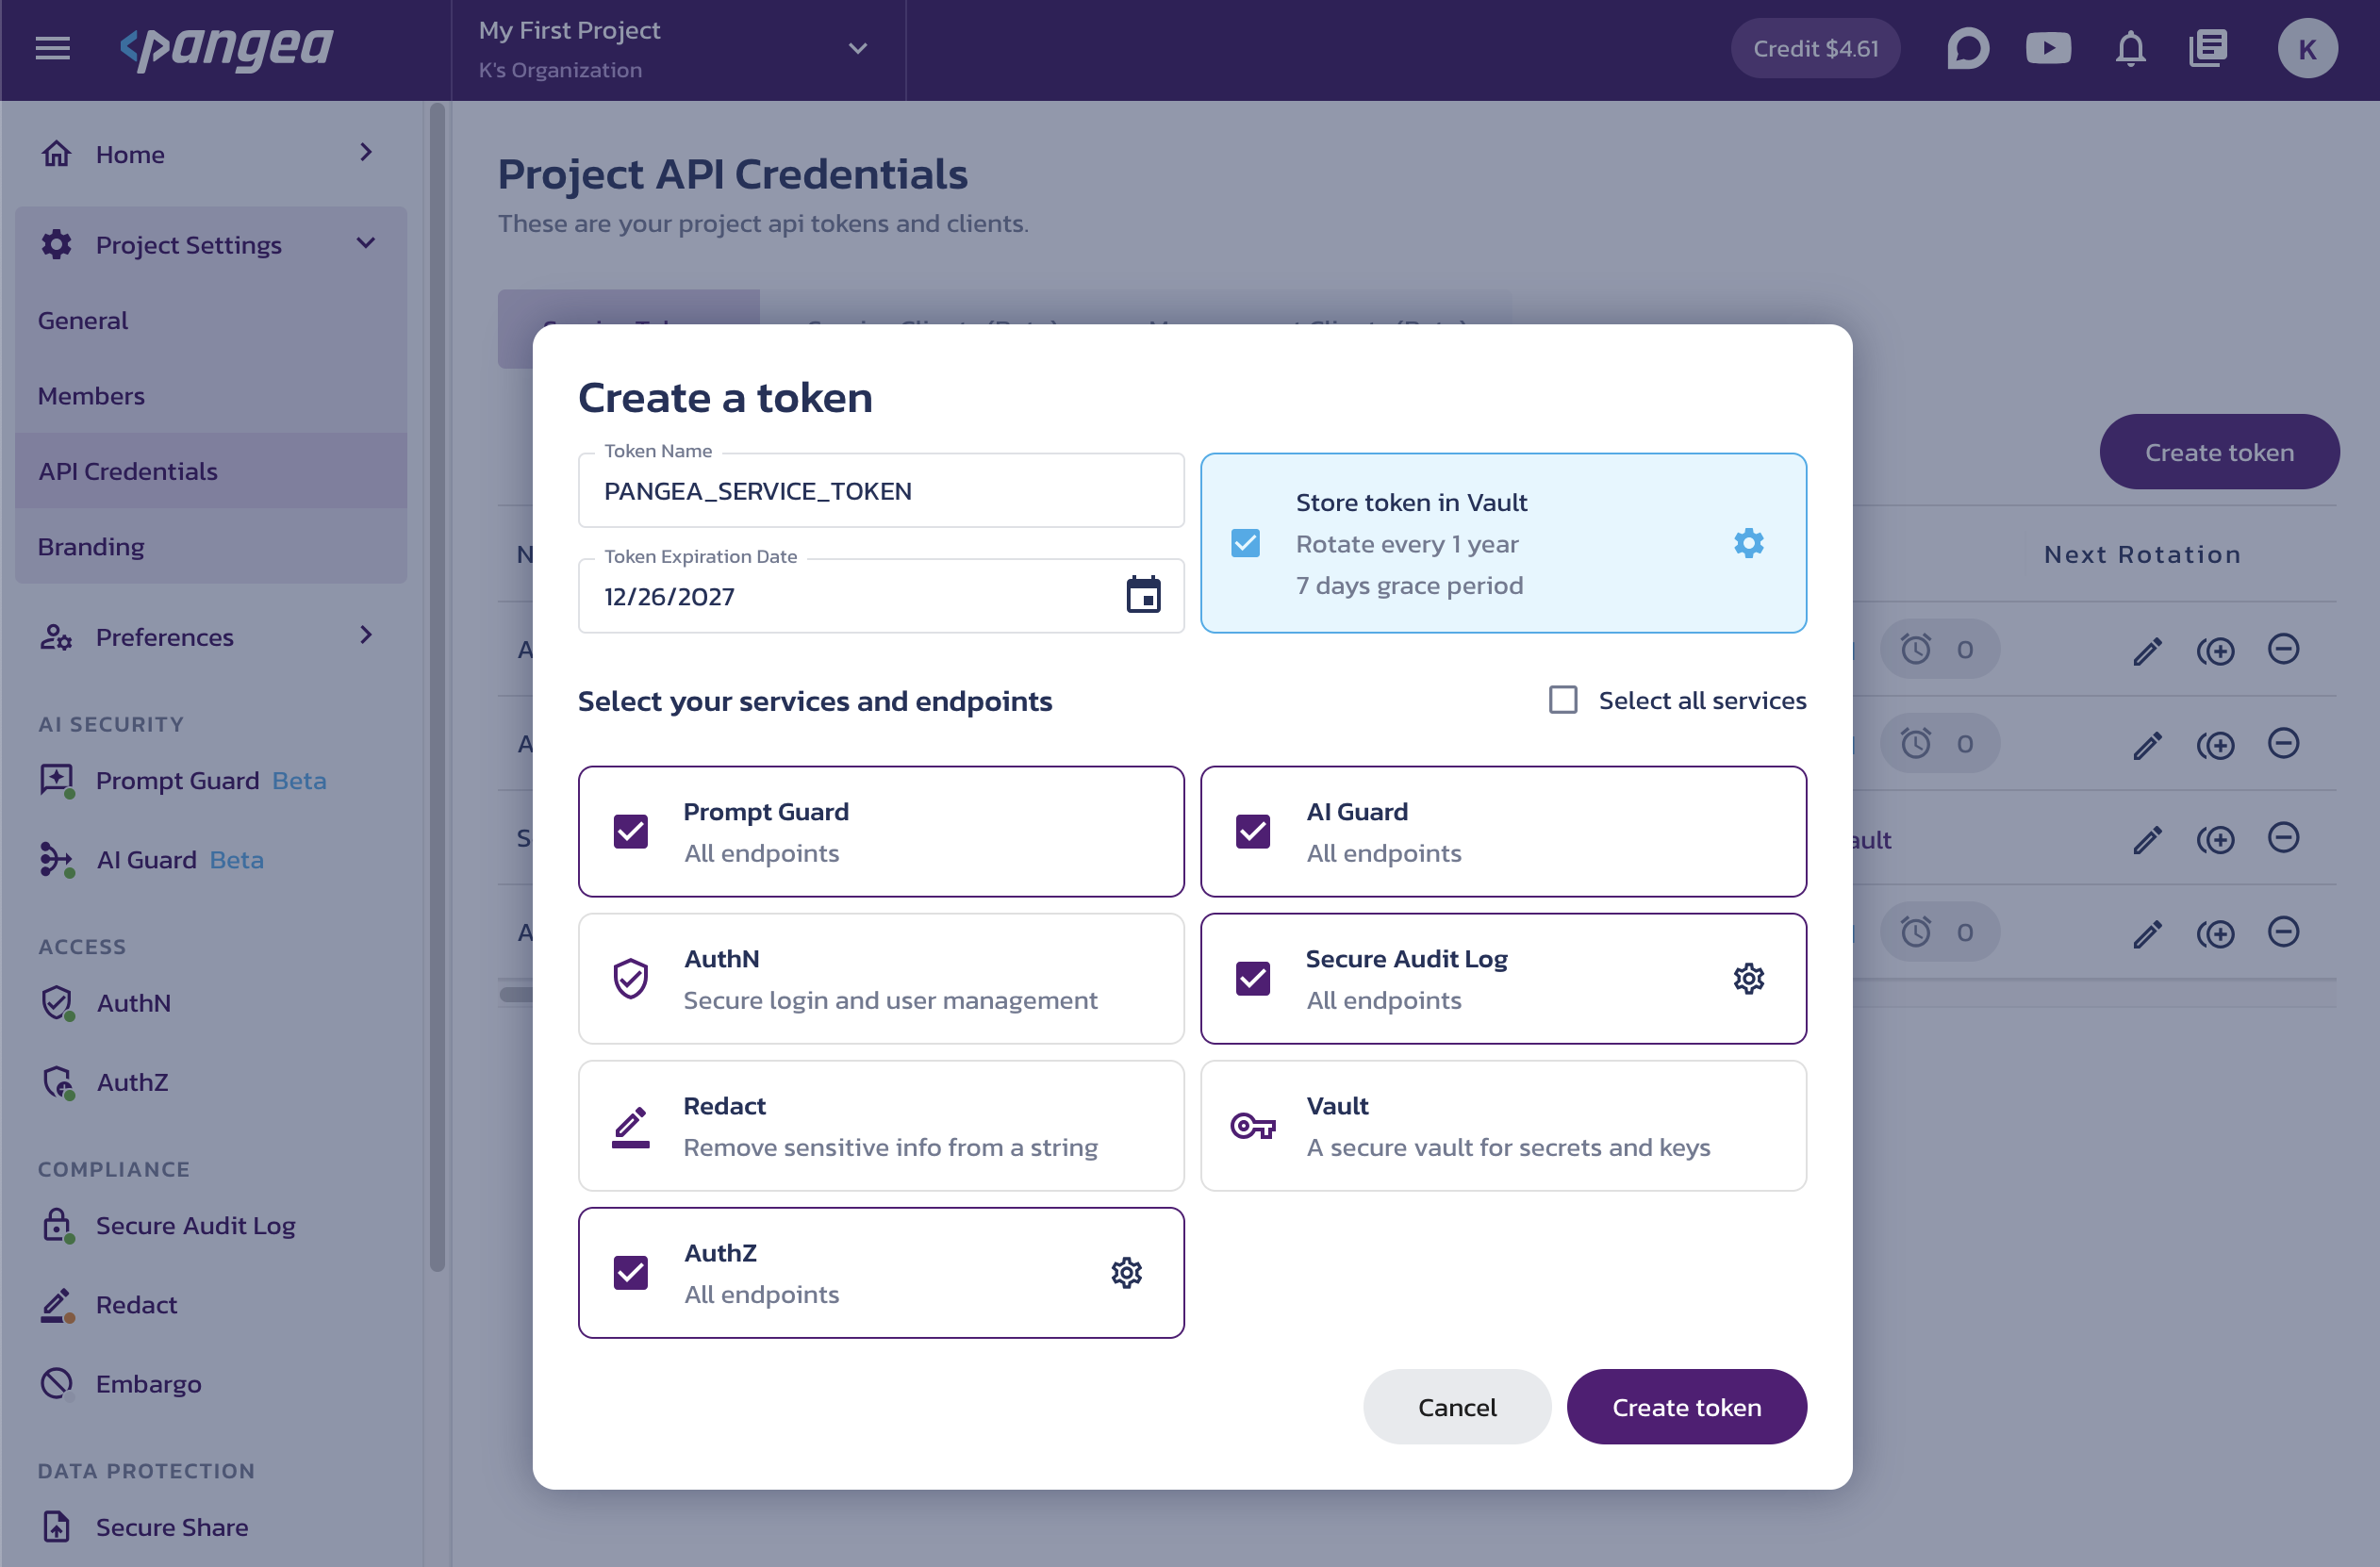
Create service token in Project Settings note:In this application, for authentication, you don’t need service-level access to AuthN and can use the client token saved in the
NEXT_PUBLIC_PANGEA_CLIENT_TOKENvariable. -
Click Create Token.
-
-
In the Project API Credentials list, find the token you just created and click the copy button to save its value to your clipboard. Assign this value to the
PANGEA_SERVICE_TOKENvariable in the.dev.varsfile.
Below is an example of how your final .dev.vars file should look:
# Pangea
NEXT_PUBLIC_PANGEA_CLIENT_TOKEN="pcl_wmjtcv...6vdevo"
NEXT_PUBLIC_AUTHN_UI_URL="https://pdn-gqt5ogwel73ysgjdo64mbab3z2ldbcaj.login.aws.us.pangea.cloud"
NEXT_PUBLIC_PANGEA_BASE_DOMAIN="aws.us.pangea.cloud"

PANGEA_SERVICE_TOKEN="pts_4efx62...33wigf"
PANGEA_AUDIT_CONFIG_ID="pci_uo2yiz...g6apjb"

# Cloudflare
CLOUDFLARE_ACCOUNT_ID="5e32c6...d6e46f"
CLOUDFLARE_API_TOKEN="DlV6ed...ZK4rWr"

# Google
GOOGLE_DRIVE_CREDENTIALS='{"type":"service_account","project_id":"my-project","private_key_id":"l3JYno7aIrRSZkAGFHSNPcjYS6lrpL1UnqbkWW1b","private_key":"...","client_email":"my-service-account@my-project.iam.gserviceaccount.com","client_id":"1234567890","auth_uri":"https://accounts.google.com/o/oauth2/auth","token_uri":"https://oauth2.googleapis.com/token","auth_provider_x509_cert_url":"https://www.googleapis.com/oauth2/v1/certs","client_x509_cert_url":"https://www.googleapis.com/robot/v1/metadata/x509/my-service-account%40my-project.iam.gserviceaccount.com","universe_domain":"googleapis.com"}'
GOOGLE_DRIVE_FOLDER_ID="1MPqBulasU27b2bq61l_tBwwF2jm3yWO4"

# Application
INGEST_TOKEN="183a827749c4684178a80acb4ef957a8"
Run your application locally
-
In the project folder, run the application in the terminal.
npx dotenvx run -f .dev.vars -- npm run dev -
In a separate folder terminal session, set up the environment and run the ingestion script.
npx dotenvx run -f .dev.vars -- npm run ingest -- --chatHost http://localhost:3000The script will:
- Fetch documents from the specified Google Drive folder.
- Read permissions from the fetched documents' metadata.
- Create authorization policies in AuthZ based on each document's ID, the emails the document is shared with, and the roles assigned to each email.
- Call the application's
/api/ingestroute, which embeds the document data into the Cloudflare Vectorize index created earlier. It also saves document IDs in the vector metadata, allowing them to be matched with AuthZ policies during retrieval and inference.
The ingestion script can be scheduled or run on demand to update the vectorized data and permissions stored in AuthZ.
warning:Providing the
--wipeTuplesargument (boolean,falseby default) will delete ALL existing permissions in your AuthZ. -
Navigate to http://localhost:3000.
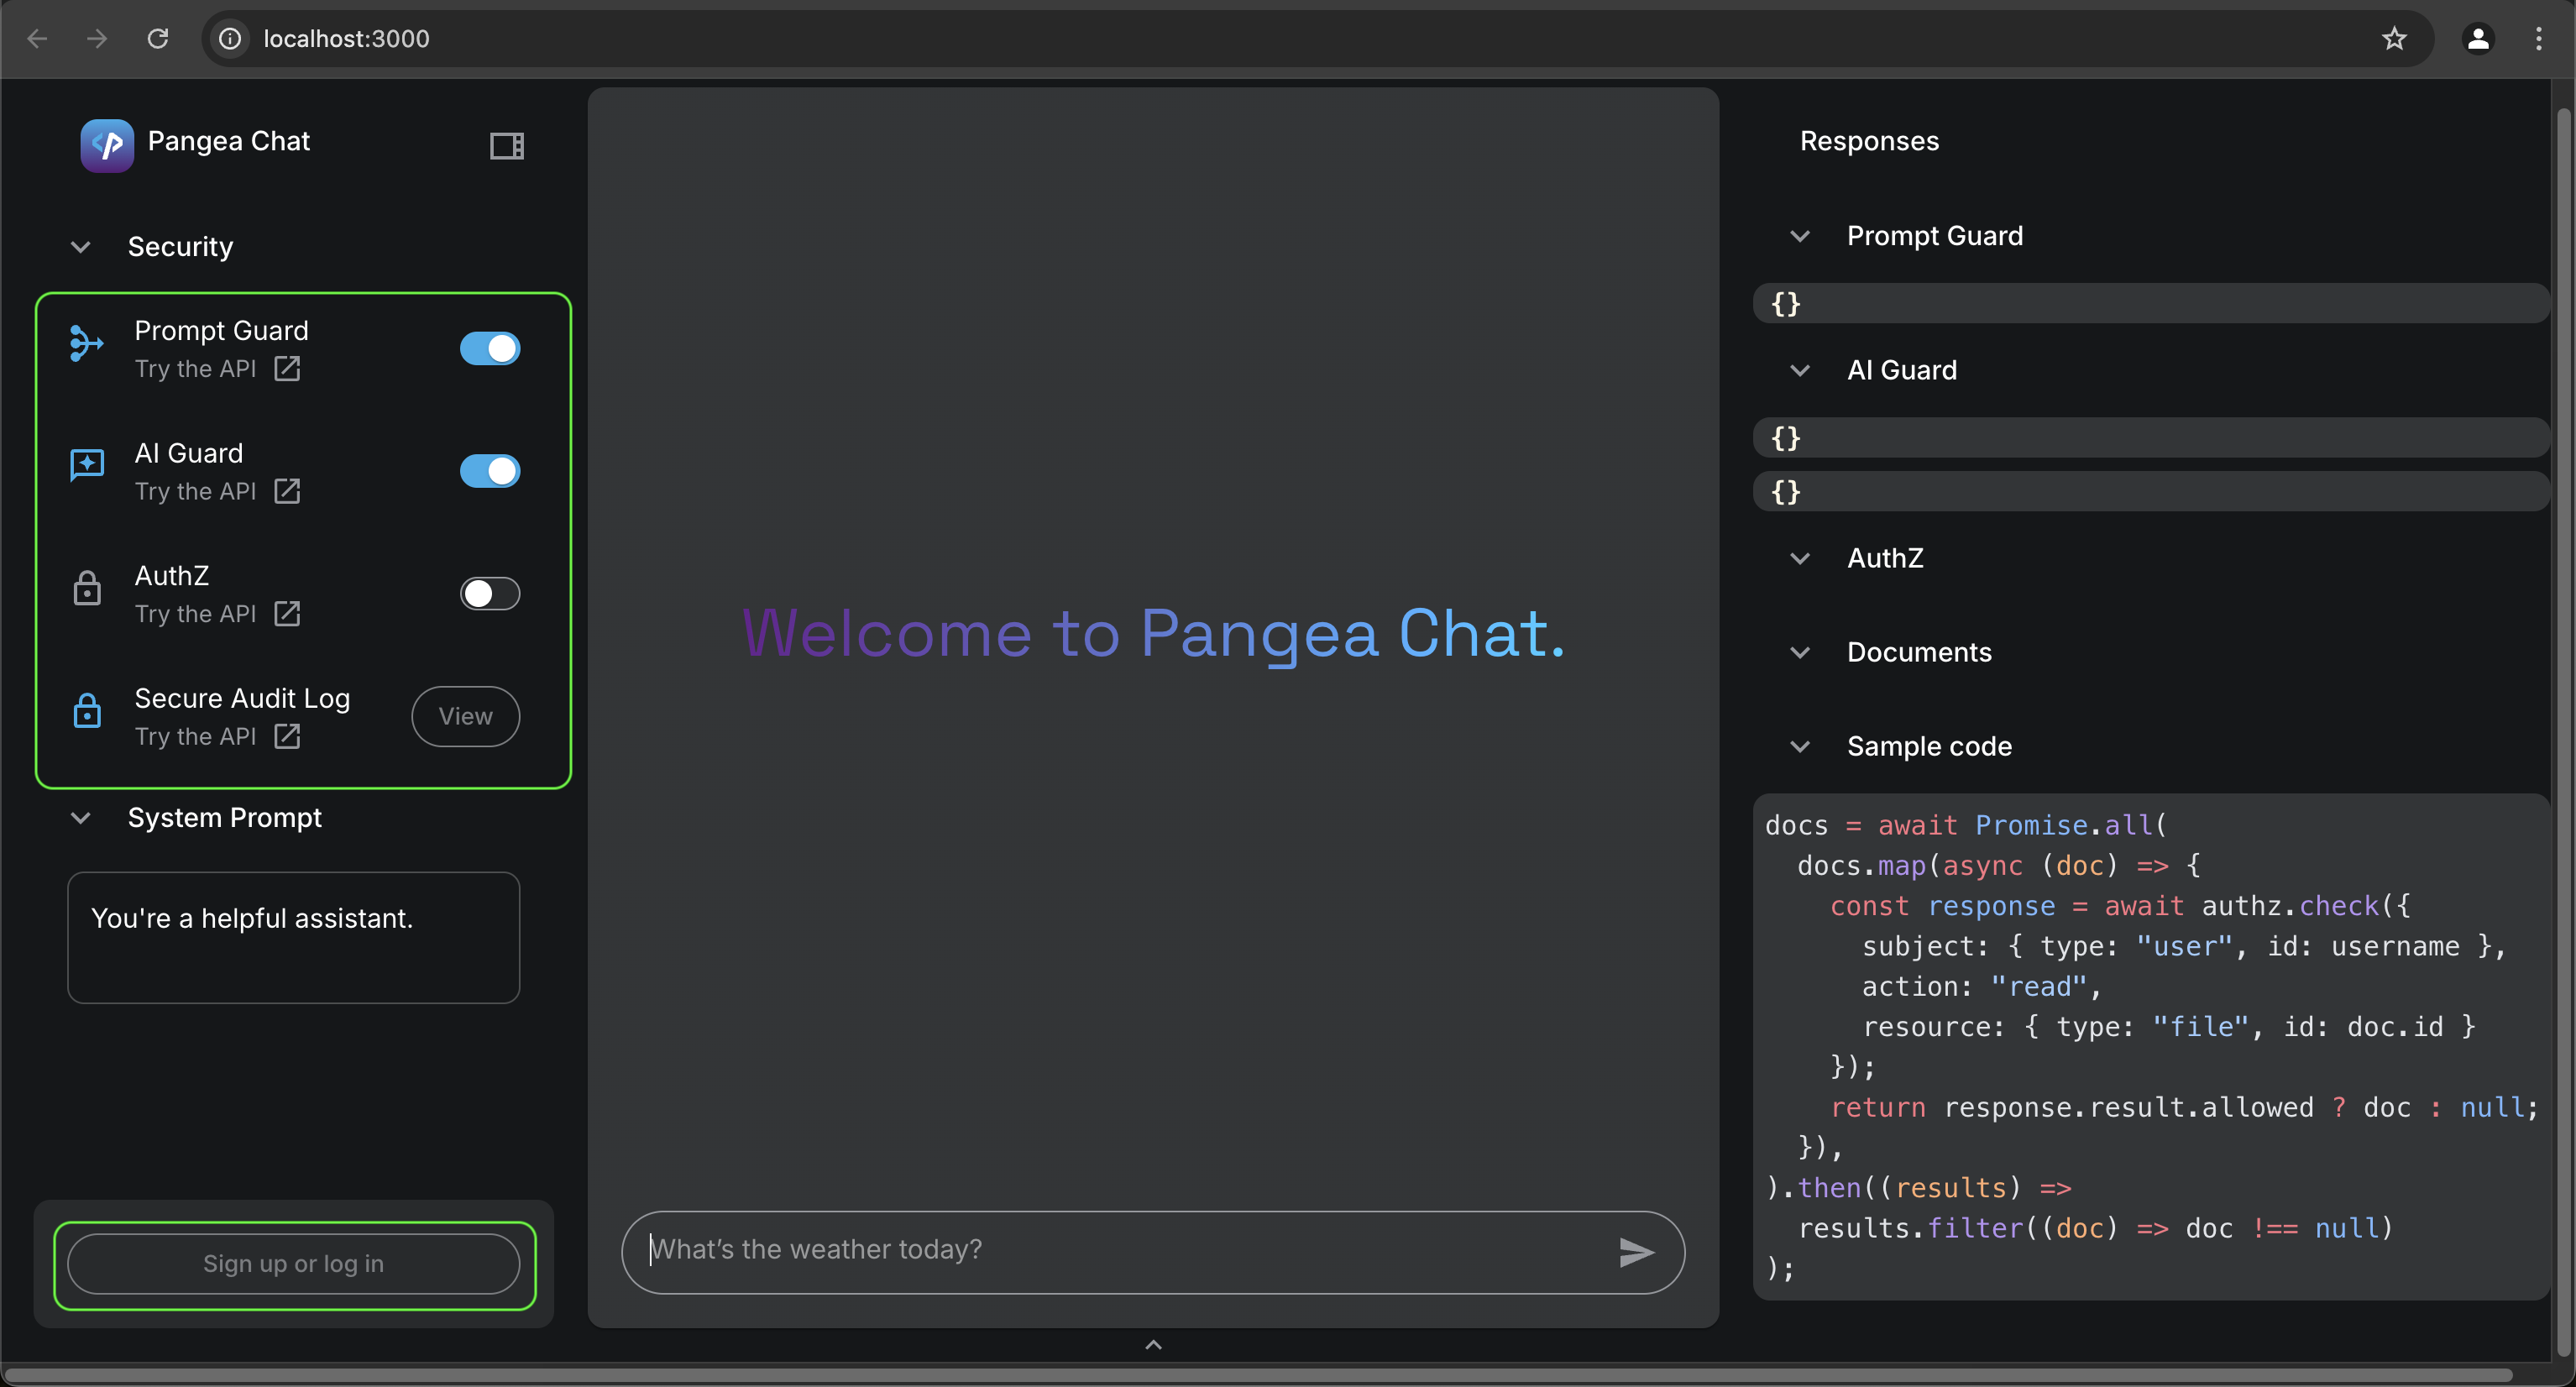
Pangea AI Chat -
Click the Sign up or log in button in the lower-left corner.
-
On the AuthN login screen, select the Continue with Google option and sign in using an email with restricted Viewer access to one of the spreadsheets you created in your Google Drive.
If you don’t have an account, the AuthN service allows users to sign up by default. During sign-up, you’ll need to complete a captcha challenge and select a second authentication factor.
tip:To simplify future sign-ins, enable the Remember My Device setting under Security Controls on the AuthN service page in the Pangea User Console.
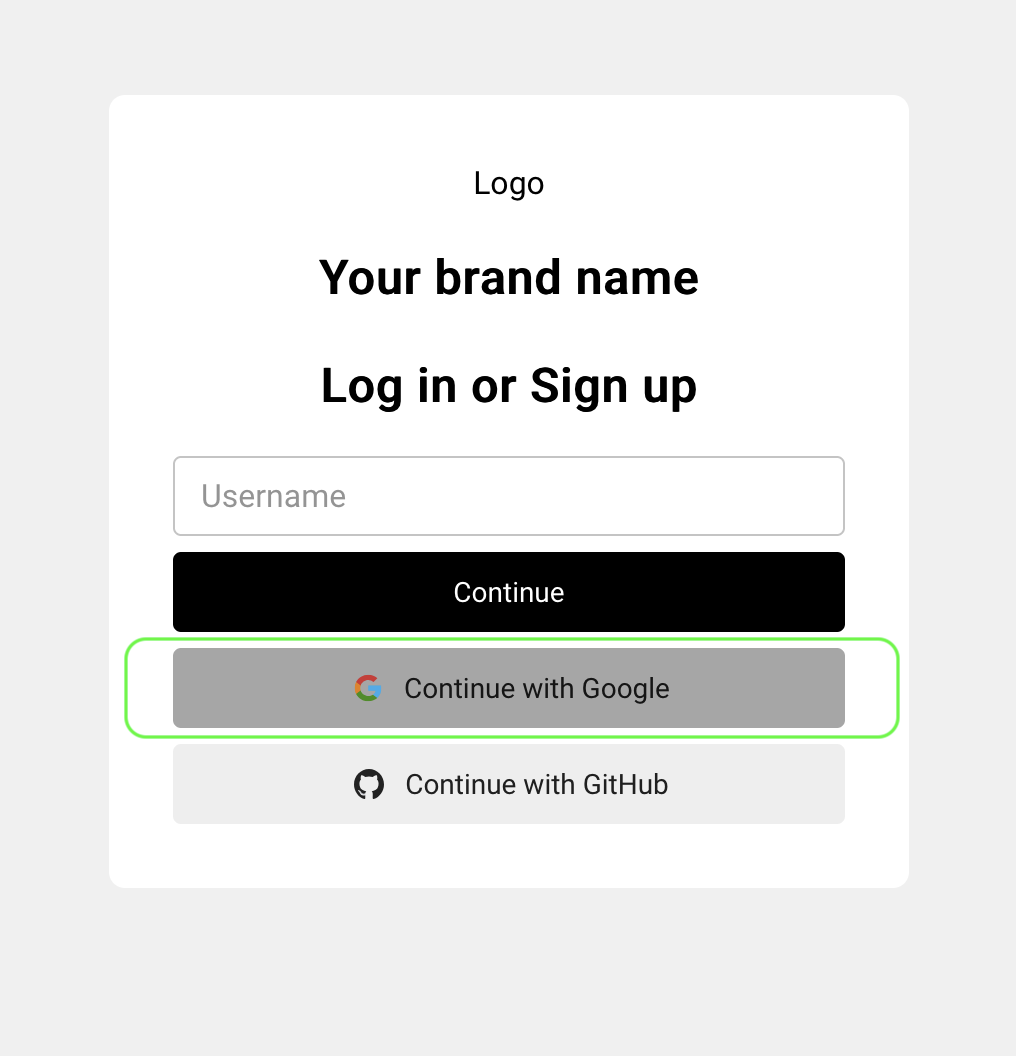
AuthN Sign Up page -
By default, the Prompt Guard and AI Guard services are enabled, but AuthZ is not, meaning the RAG context added to the user's prompt is not filtered against the user's permissions.
note:If you haven't enabled the Prompt Guard and AI Guard services, you can disable them in the UI to avoid errors.
In the chat input at the bottom, enter a question about all data stored in the Google Drive folder, including documents that the current user should not have access to. For example, when signed in as Alice:
User's promptWhat are the available PTO balances?Without enforcement of authorization policies, the response may include all data stored in the Google Drive folder. For example:
ResponseAccording to the table, the available PTO balances are:
* Bob: 256 hours
* Alice: 128 hoursNote that at this point, the informational panel on the right is populated. Under Documents, you can view the retrieved data. For example:
Retrieved Documents| Employee | PTO balance, hours |
| -------- | ------------------ |
| Bob | 256 |
| Employee | PTO balance, hours |
| -------- | ------------------ |
| Alice | 128 | -
Enable AuthZ and repeat the question. The response should now be restricted to the information that the user is authorized to access. If the currently authenticated user has access to any of the spreadsheets in the folder, they can receive information about the document content in the application response. For example:
ResponseAccording to our record, the available PTO balance for Alice is 128 hours.Note that the Documents content in the informational panel is now limited to only the records the current user is authorized to read. For example:
Retrieved Documents| Employee | PTO balance, hours |
| -------- | ------------------ |
| Alice | 128 | -
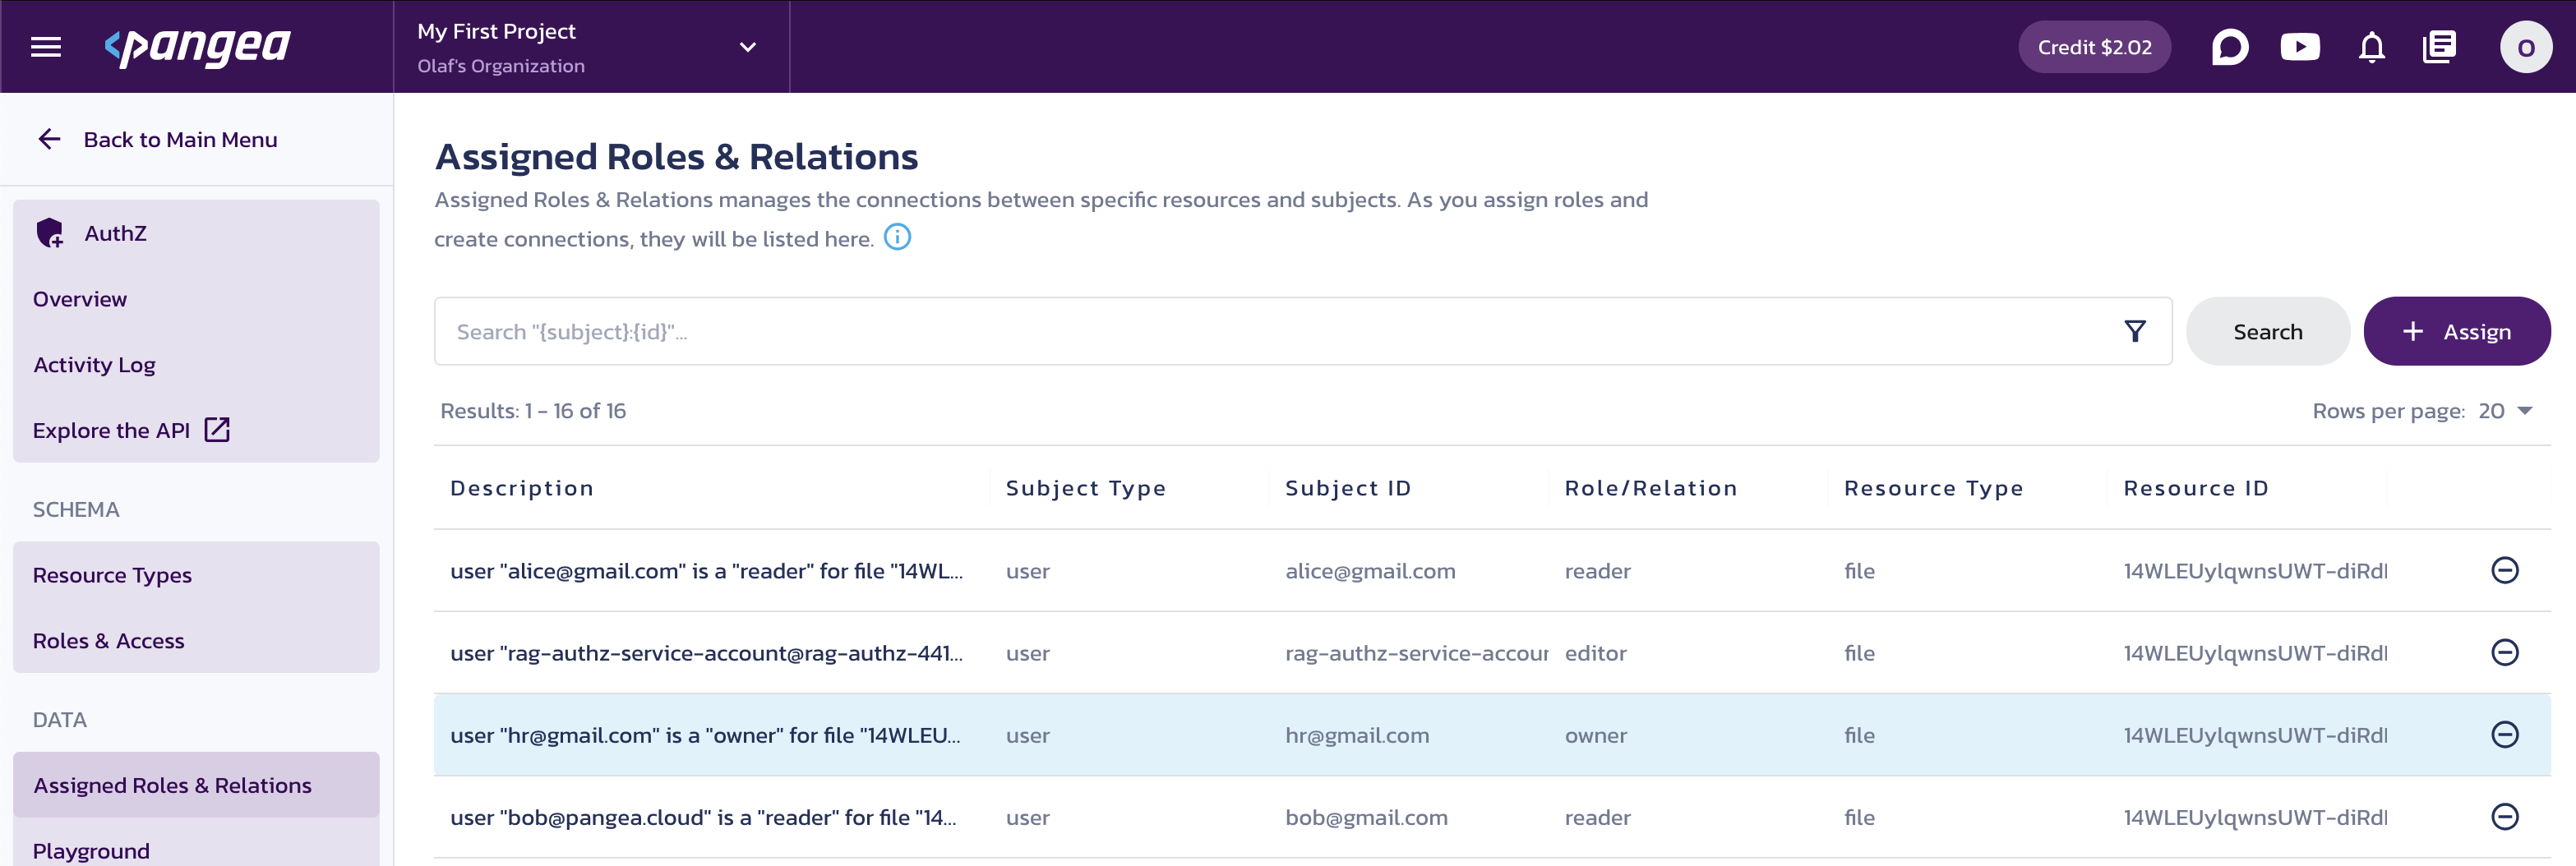
(optional) View the authorization policies created in AuthZ.
Navigate to the Assigned Roles & Relations page in your Pangea User Console to review the permission assignments your application created from the Google data. For example:
AuthZ Assigned Roles & Relations -
(optional) Add authorization policies.
AuthZ can abstract access control from the original data sources. To demonstrate this:
-
Click + Assign and add permission, such as the one shown below:
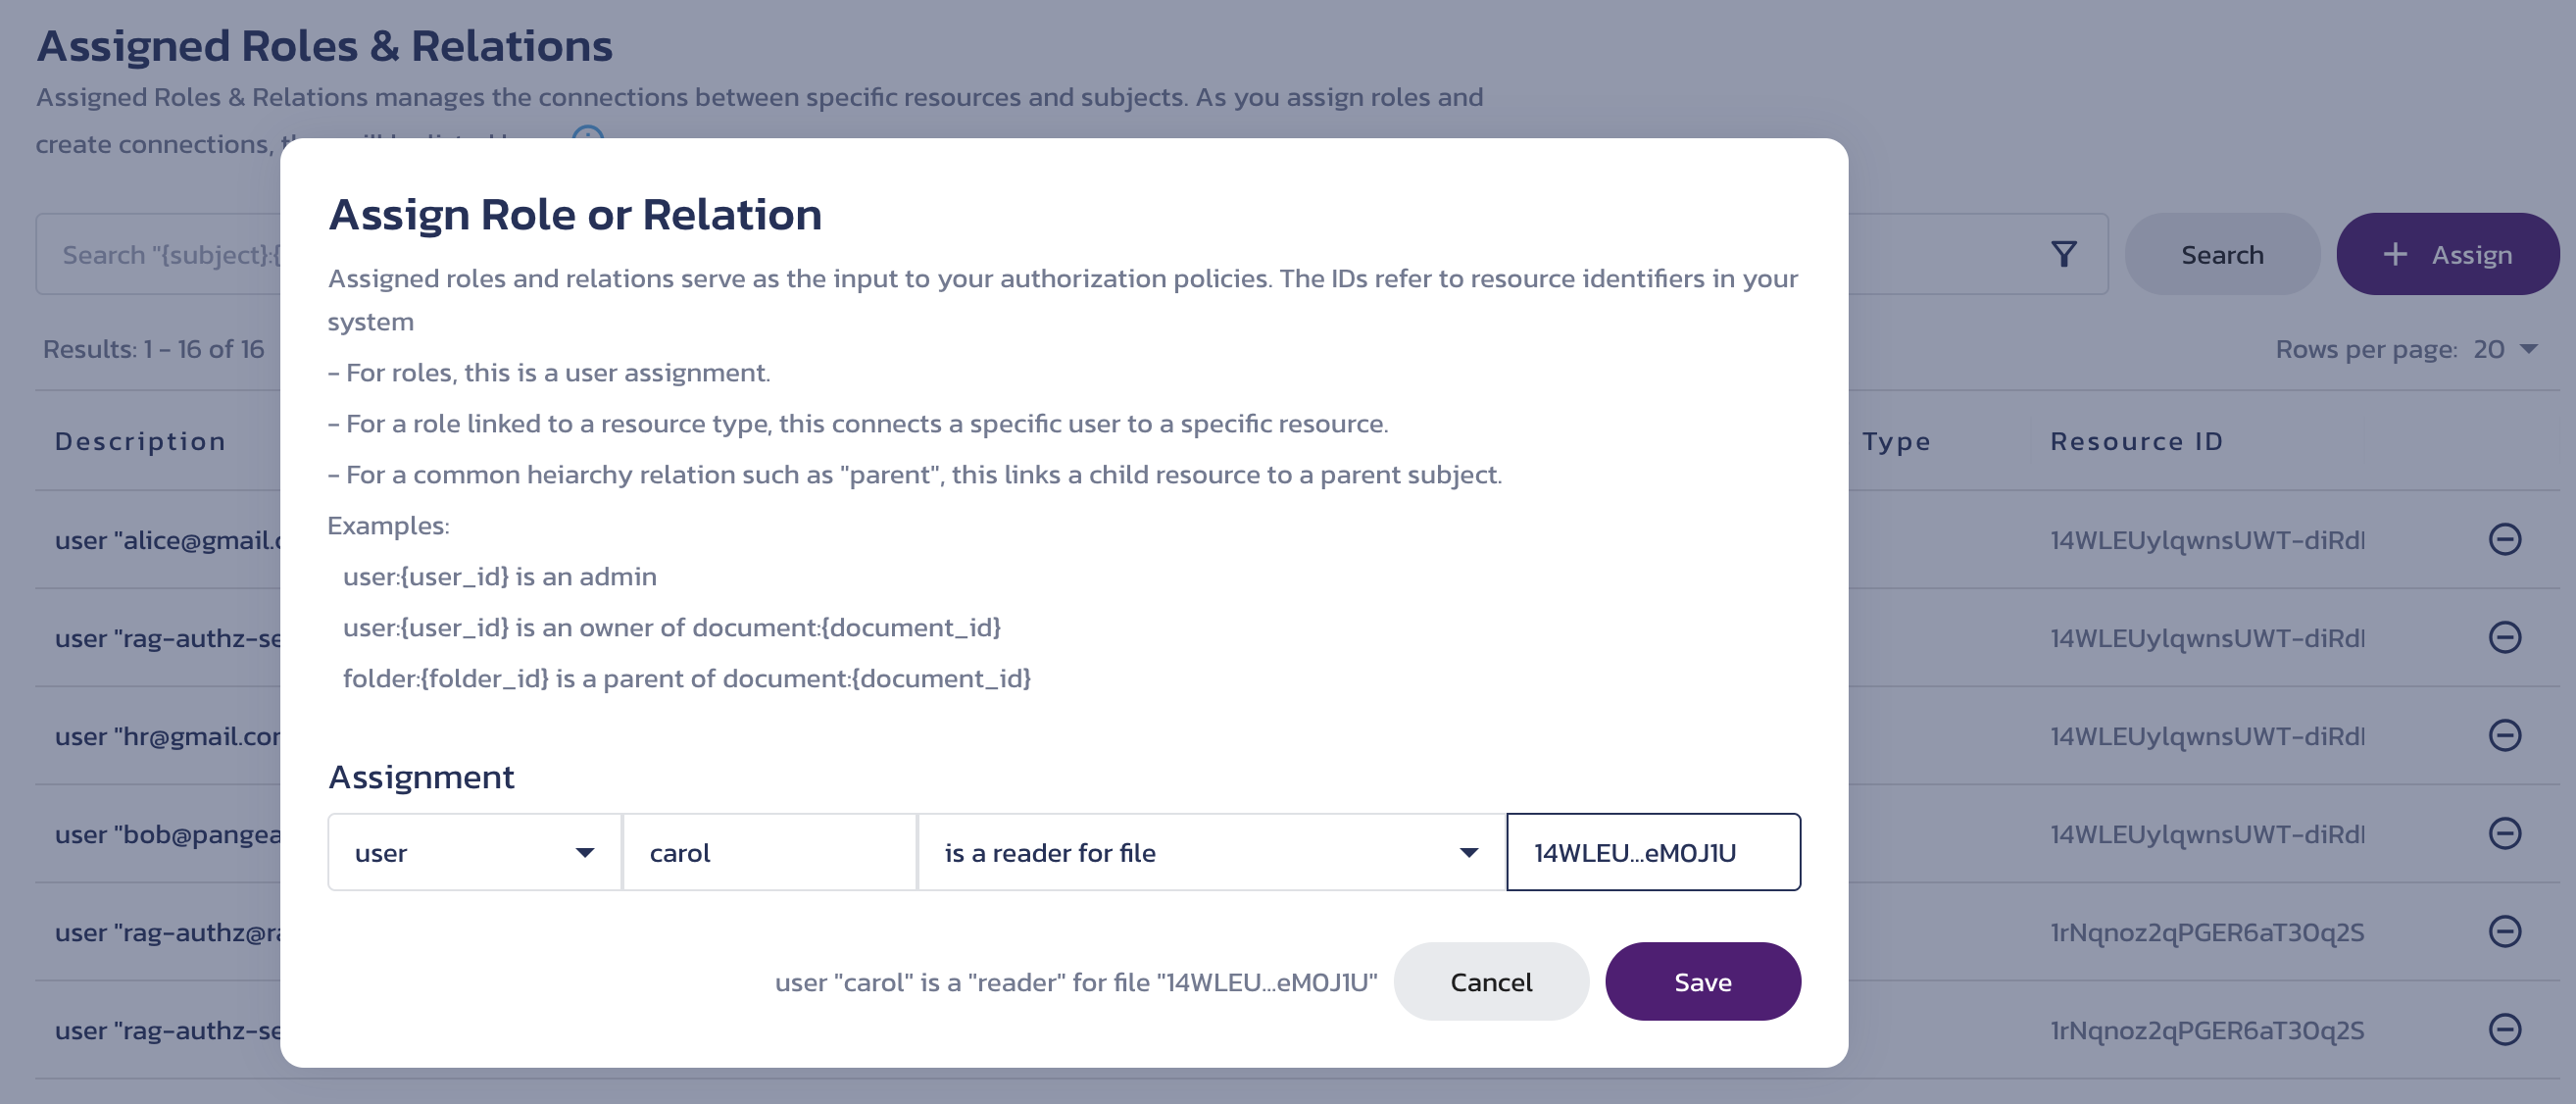
AuthZ Assigned Roles & Relations -
Click Save.
-
Sign out and sign in using the username
carol. During sign-up, provide an email of your choice. -
Ask a question about the information in the referenced Google Drive file, and it should return the appropriate answer. For example, asking "What is Alice's PTO balance?" could return:
Carol J! You're referring to the PTO balances of an employee. According to the records, Alice's PTO balance stands at 128 hours.
This approach allows the application admin to share context data with users who don't have direct access to it through other systems.
-
Deploy your application to Cloudflare Pages
-
Authorize your Cloudflare token to deploy on Cloudflare Pages.
- Navigate to your Cloudflare profile User API Tokens page.
- Click the triple-dot menu button next to your Workers AI token (created earlier for Workers AI and Vectorize) and select Edit.
- On the token edit page, under Permissions, add the following permissions:
- Account | Cloudflare Pages | Edit
- User | User Details | Read
- Click Continue to summary.
- On the summary page, click Update token.
-
Run the deployment script in the project folder terminal.
Deploy to Cloudflare Pagesnpx dotenvx run -f .dev.vars -- npm run deployA successful deployment should result in a final output line similar to the following:
🌎 Deploying...
✨ Deployment complete! Take a peek over at https://05c73cea.pangea-ai-chat-839.pages.dev
Before visiting the deployment URL, ensure you copy your environment variables to the Cloudflare Pages deployment.
-
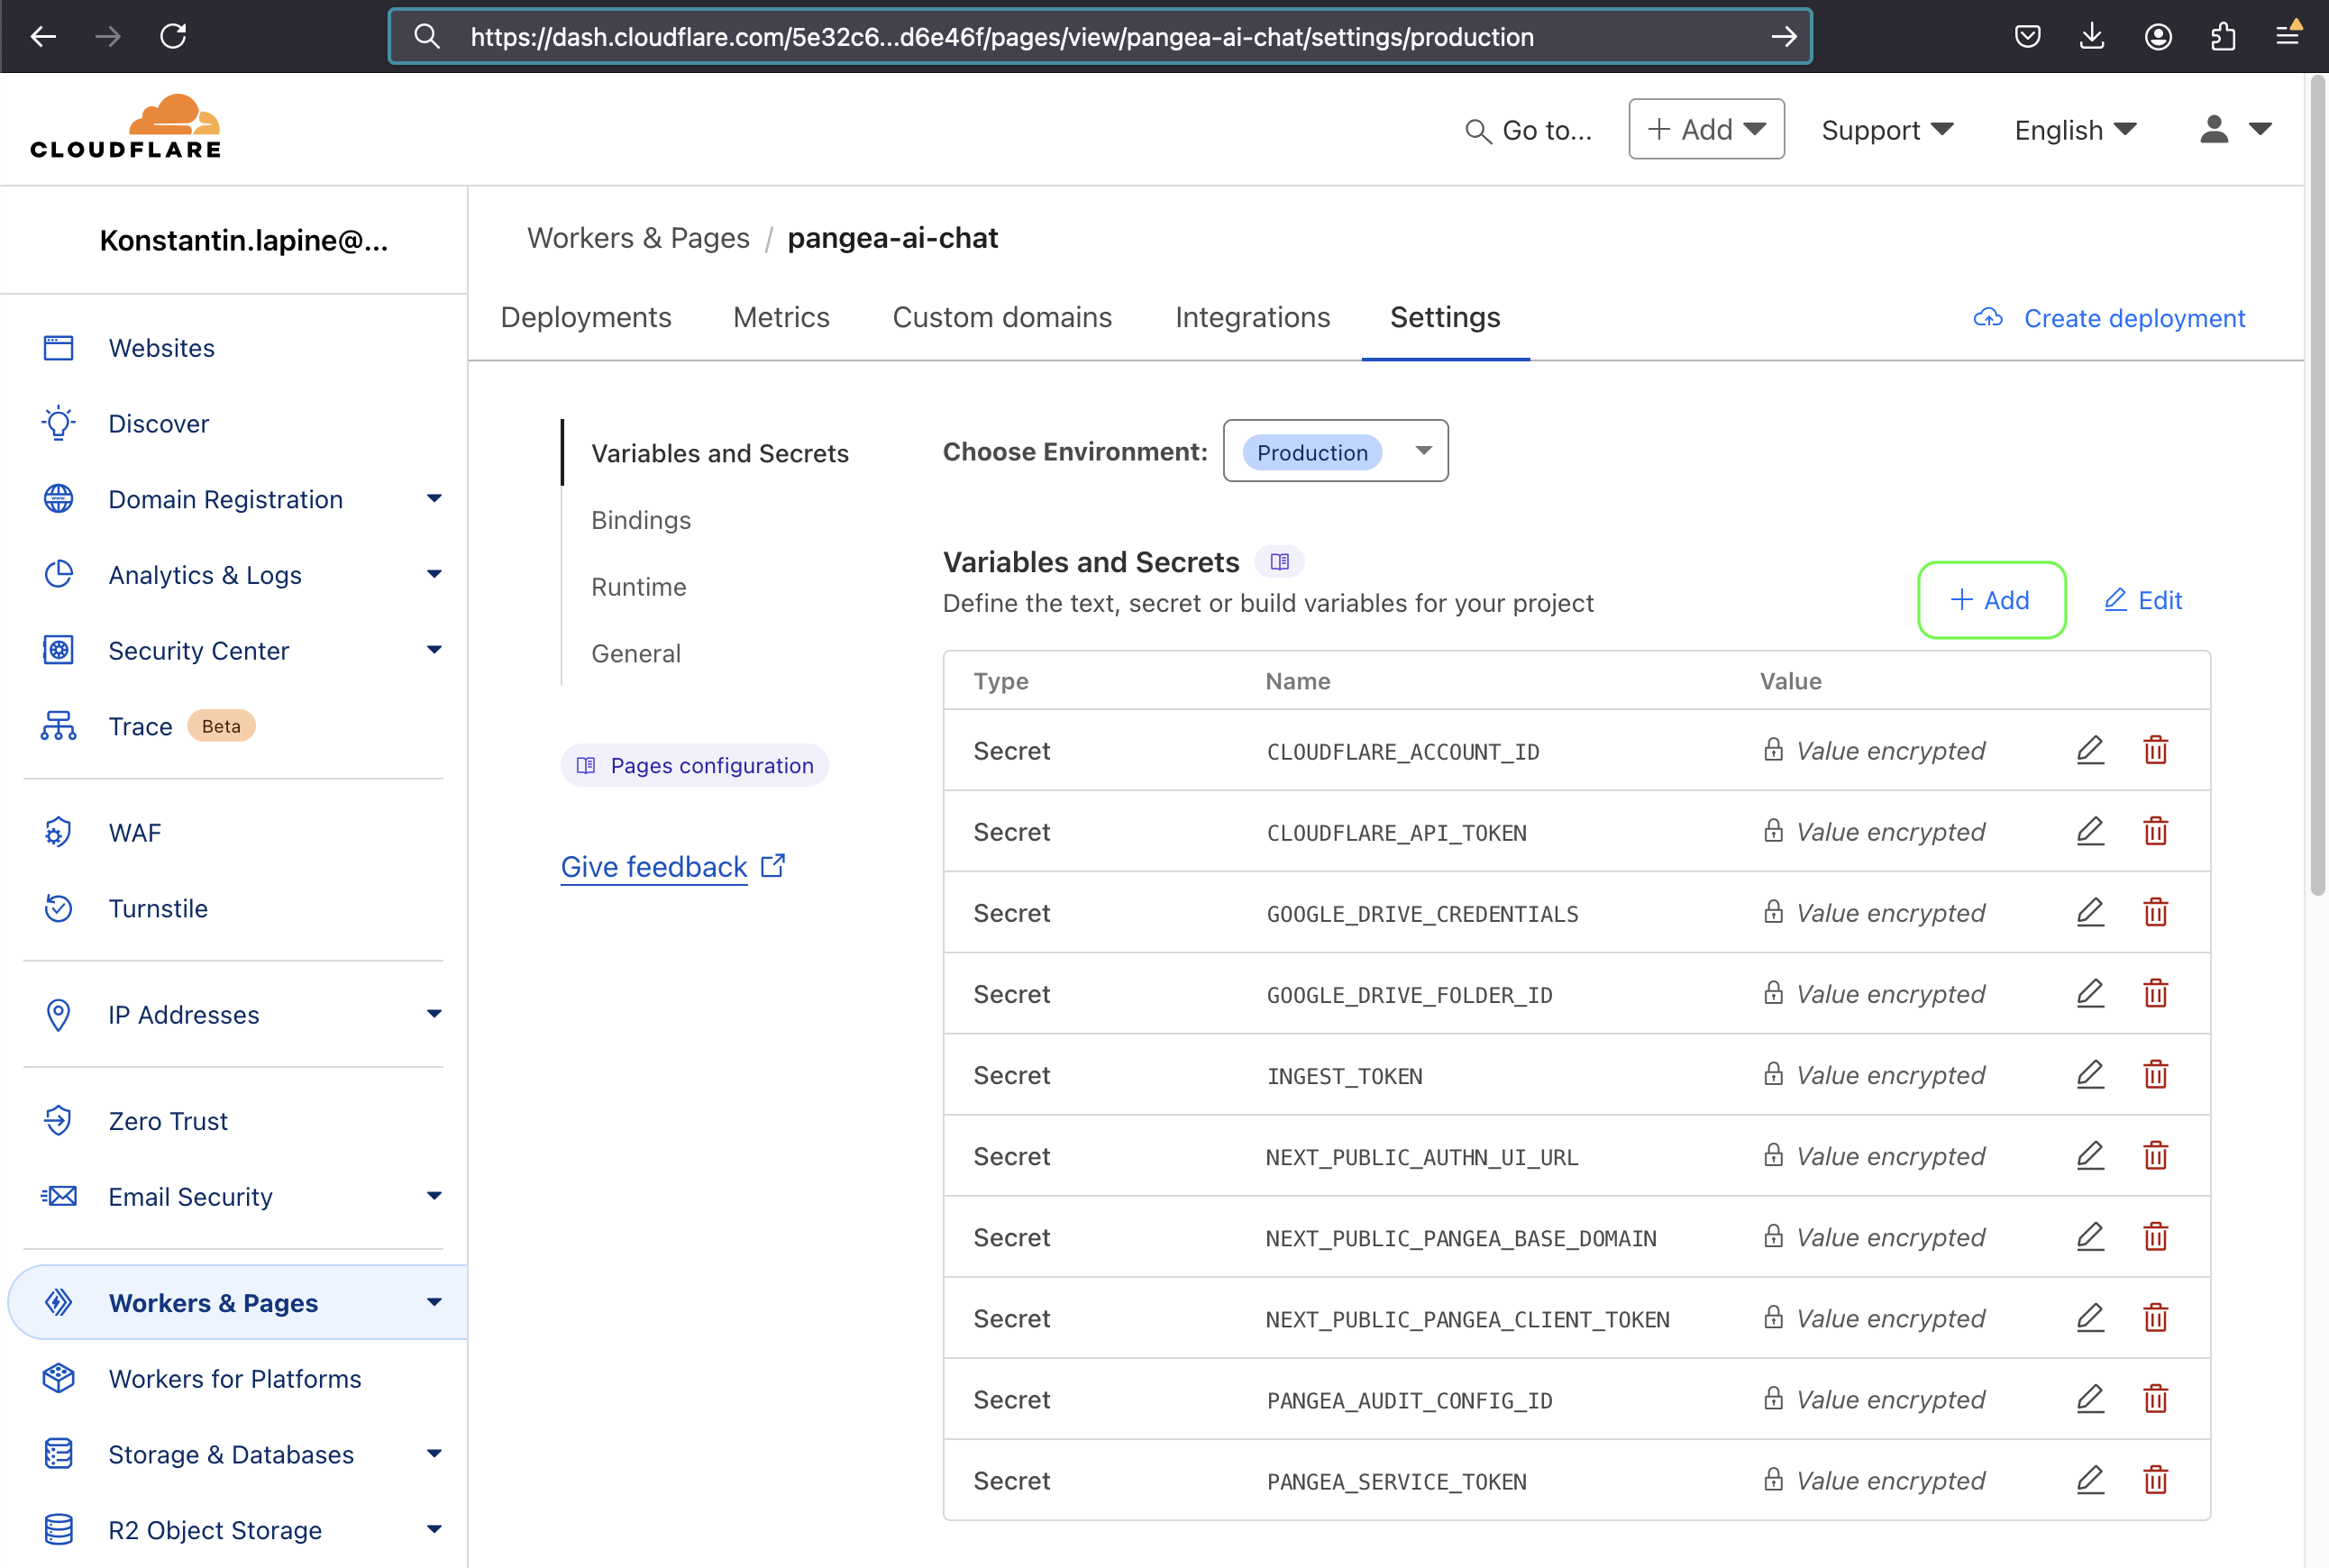
Set up the application environment in your Cloudflare Pages deployment.
- In your Cloudflare Dashboard, navigate to Workers & Pages >> pangea-ai-chat >> Settings .
- Under Variables and Secrets, click + Add.
- Copy the content of your
.dev.varsfile and paste it into the Variable Name input. This will automatically create all environment variable entries for your deployment. - Click Save.
Cloudflare Pages deployment Settings -
Navigate to your deployment URL, and it should provide a similar experience to the locally-run application.
Conclusion
In this example, a RAG application deployed to Cloudflare Pages uses data from a Google Drive folder embedded and stored in Cloudflare Vectorize, making it easily accessible for use in an AI application. The share permissions for documents in the folder were converted into authorization policies stored in Pangea's AuthZ service, enabling user permissions to be checked at inference time when adding Google Drive data to the context of a user's request to the Cloudflare Workers AI LLM. The application code includes a script to automate the Google Drive data ingestion process or run it on demand.
Similarly, data from other sources can be vectorized, tagged with original document IDs in the vector metadata, and referenced in authorization policies within AuthZ. This approach enables flexible user access, supports sharing the same policies across multiple applications, and facilitates RBAC, ReBAC, and ABAC authorization schemas for a wide range of use cases.
Additionally, the example application provides LLM prompt and response protection via Pangea's Prompt Guard and AI Guard services, and saves important data from application events in an audit trail provided by Pangea's Secure Audit Log service.
For additional examples of access control implementation in AI apps, explore the following resources:
- pangea-ai-chat-cloudflare (this repository)
- Centralized Access Management in RAG Apps (Python, LangChain)
- Identity and Access Management in LLM Apps (Python, LangChain)
- Attribution and Accountability in LLM Apps (Python, LangChain)
Was this article helpful?