Identity and Access Management in LLM Apps
To try this tutorial interactively, clone its Jupyter Notebook version from
GitHub .In this tutorial, we will demonstrate how to implement Identity and Access Management (IAM) in a retrieval-augmented generation (RAG) application built with LangChain and Python, using Pangea security services.
Integrating enterprise data into your generative AI app adds significant value. To use this information effectively, it must be embedded in vectors for semantic comparison. However, without clearly defined, deterministic security boundaries in the vectorized data and robust authorization controls, sensitive or restricted information may be inadvertently exposed. This can lead to risks outlined in OWASP's Top 10 for LLMs and Generative AI Apps, including LLM06: Sensitive Information Disclosure and LLM10: Model Theft . Additionally, a lack of user authentication can hinder tracking, analyzing, and preventing malicious attempts to manipulate LLM behavior through unregulated and unaccountable queries, as described in LLM01: Prompt Injection .
You will add authentication and authorization to a LangChain app, enabling the following capabilities:
- Identify users and restrict access to the app and its resources.
- Implement access control in a retrieval system by tagging vectors with resource-specific metadata at ingestion time and enforcing authorization policies aligned with this metadata.
- Apply filtering logic to ensure only vectors matching the user’s permissions are retrieved at inference time.
This, in turn, provides the following controls:
- Enables tracking of user activity for monitoring, auditing, compliance, and forensic analysis (OWASP LLM01, LLM10)
- Enhances privacy and prevents accidental data leakage (OWASP LLM06)
Prerequisites
Python
- Python v3.10 or greater
- pip v23.0.1 or greater
OpenAI API key
In this tutorial, we use OpenAI models. Get your OpenAI API key to run the examples.
Set up the LangChain project
-
Create a folder for your project to follow along with this tutorial. For example:
Create project foldermkdir -p <folder-path> && cd <folder-path> -
Create and activate a Python virtual environment in your project folder. For example:
python -m venv .venv
source .venv/bin/activate -
Install the required packages.
The code in this tutorial has been tested with the following package versions:
requirements.txt# Manage secrets.
python-dotenv==1.0.1
# Build an LLM app.
langchain==0.3.4
langchain-openai==0.2.3
langchain-community==0.3.3
# Add context from a vector store.
faiss-cpu==1.9.0
unstructured[md]==0.16.0
# Secure the app with Pangea.
pangea-sdk==5.1.0
# Enable Authorization Code flow.
Flask==3.0.3Add a
requirements.txtfile with the above content to your project folder, then install the packages with the following command:pip install -r requirements.txt -
Save credentials and environment-specific settings as environment variables.
Create a
.envfile and add your OpenAI API key. For example:.env file# OpenAI
OPENAI_API_KEY="sk-proj-54bgCI...vG0g1M-GWlU99...3Prt1j-V1-4r0MOL...X6GMA"
LangChain application architecture
The example application will accept a user prompt and answer the query based on additional context from simulated enterprise data.
The secured LangChain application will use Pangea's AuthN service to authenticate users in their browser via its hosted login flow, providing a simple and secure way to add login functionality to your application.
Once authenticated, the user's identity will be used to retrieve the authorization policy associated with their login, as defined in Pangea's AuthZ service.
You can integrate each service into your application with simple setup steps and a few lines of code, which will be covered later in this tutorial.
The application will check which resources the user is allowed to access before adding them to the context of the prompt submitted to the LLM. This will enable users to ask questions related to enterprise data while ensuring secure access.
Build your secure LangChain app
In the following example, code from consecutive sections can be appended to a Python script sequentially, similar to a Jupyter Notebook.
Create a context-based chain for answering questions
Write a Python script using the code below. This script defines a simple chain that adds extra information to the context of the user prompt before generating a response.
import os
from dotenv import load_dotenv
from langchain_openai import ChatOpenAI
from langchain_core.prompts import ChatPromptTemplate
from langchain.chains.combine_documents import create_stuff_documents_chain
load_dotenv()
model = ChatOpenAI(model_name="gpt-4o-mini", openai_api_key=os.getenv("OPENAI_API_KEY"), temperature=0.0)
prompt = ChatPromptTemplate.from_messages([
("system", "You are a helpful assistant answering questions based on the provided context: {context}. Be concise. If you don't find relevant information, say: I can't tell you."),
("human", "Question: {input}"),
])
qa_chain = create_stuff_documents_chain(model, prompt)
The create_stuff_documents_chain function returns a runnable that accepts a context argument, which should be a list of document objects. You can manually build this context; for example, add the following code to your script:
from langchain.schema import Document
docs = [
Document(page_content="""
To enter Wonderland, follow the White Rabbit down the rabbit hole.
""")
]
You can now test your enhanced chain with the added context by adding a query like this:
print(qa_chain.invoke({"input": "Which entrance should I use?", "context": docs}))
When you run the updated code, you should see the response from LLM. For example:
python langchain-python-rag-iam.py
You should follow the White Rabbit down the rabbit hole to enter Wonderland.
Repeat this step whenever you want to view the output from your script.
Store context in a vector store
To efficiently search for relevant information within a large volume of application-specific data based on its semantic meaning, the data must be embedded and represented as vectors.
In the following example, we obtain context data from the local file system, organized by resource type, represented by folder names. We use an OpenAI model to embed this data and store the embeddings in a FAISS vector database. To maintain clear security boundaries, each vector is labeled with its corresponding resource type in the embedding metadata.
Add data to your project folder
You can add text files to the suggested folder structure, using folder names as resource type identifiers. The examples in this tutorial are based on the following content:
├── engineering
│ └── patents.md
├── finance
│ └── expenses.md
└── public
└── public-events-coc.md
# Patents
## White Knight's Inventions
| Invention Name | Patent Number |
|------------------------------|----------------------|
| Rain-Proof Deal Box | Patent #11223 |
| Tears-bringing tune | Pending |
| Portable Bee-Hive | Patent #55678 |
| Mobile Mouse Traps | Patent #44556 |
# Expenses
### Tea Party
| Expense Category | Cost | Frequency |
|------------------------|------|------------|
| Tea Leaves | £50 | weekly |
| Cups and Saucers | £20 | monthly |
| Table Maintenance | £15 | weekly |
| Sugar Cubes | £5 | daily |
| Butter for Watches | £10 | monthly |
| Nap Cushions | £40 | annually |
| Wine | £0 | not served |
# Code of Conduct for Public Events
## Croquet-Ground Rules
1. The Queen Always Wins - It's the Queen's game.
1. The Queen Never Loses - If the Queen loses, see Rule #1.
1. Use Flamingos as Mallets - No exceptions. Flamingos must be treated properly; if they refuse, it's your fault.
1. Hedgehogs as Balls - Hedgehogs are to be rolled gently, or else.
1. No Cats Allowed - Any cats, particularly the Cheshire Cat, are strictly forbidden as they disrupt gameplay with their vanishing and reappearing antics.
1. "Off with Their Heads!" Applies - Any form of disobedience or error may lead to immediate execution. Stay alert!
Embed data
Add the following code to your script.
from langchain_community.document_loaders import DirectoryLoader
from langchain.text_splitter import CharacterTextSplitter
from langchain_community.vectorstores import FAISS
from langchain_openai import OpenAIEmbeddings
# Use the current working directory
data_path = os.path.join(os.getcwd(), "data")
docs_loader = DirectoryLoader(data_path, show_progress=True)
docs = docs_loader.load()
for doc in docs:
assert doc.metadata["source"]
doc.metadata["resource_type"] = os.path.basename(os.path.dirname(doc.metadata["source"]))
text_splitter = CharacterTextSplitter(chunk_size=200, chunk_overlap=20)
text_splits = text_splitter.split_documents(docs)
embeddings = OpenAIEmbeddings(api_key=os.getenv("OPENAI_API_KEY"))
vectorstore = FAISS.from_documents(documents=text_splits, embedding=embeddings)
Running your script after adding this code should display a progress bar and report 100% when the data has been processed.
100%|██████████| 3/3 [00:00<00:00, 3.44it/s]
You can also check which resource types were saved in the metadata.
print("\n".join([str(x.metadata["resource_type"]) for x in docs]))
public
finance
engineering
Create a retrieval chain
Now, you can use the vector store to retrieve context relevant to the user's query. Use the create_retrieval_chain function to build a retrieval chain. When invoked, this chain will pass the additional context to the question-answering chain and return an object containing the original input, context, and answer.
from langchain.chains import create_retrieval_chain
retriever = vectorstore.as_retriever()
retrieval_chain = create_retrieval_chain(retriever, qa_chain)
At this point, there are no restrictions on the context data that can be added to the user's prompt. To verify this, let's submit questions that draw information from different resources.
def get_answers():
question = "Do we have any inventions that don't have a patent yet?"
retrieval = retrieval_chain.invoke({"input": question})
print(f"\nQuestion: {question}\nAnswer: {retrieval['answer']}")
question = "Can I bring a pet to public events?"
retrieval = retrieval_chain.invoke({"input": question})
print(f"\nQuestion: {question}\nAnswer: {retrieval['answer']}")
question = "What is our biggest cumulative expense?"
retrieval = retrieval_chain.invoke({"input": question})
print(f"\nQuestion: {question}\nAnswer: {retrieval['answer']}")
get_answers()
Question: Do we have any inventions that don't have a patent yet?
Answer: Yes, the "Tears-bringing tune" is currently pending a patent.
Question: Can I bring a pet to public events?
Answer: No cats are allowed at public events, as they disrupt gameplay. Other pets are not mentioned, so I can't tell you.
Question: What is our biggest cumulative expense?
Answer: The biggest cumulative expense is for Tea Leaves, which costs £50 weekly. Over a year, this amounts to £2,600 (£50 x 52 weeks).
Different models, content sources, and text splitters can yield varying results.
Add access control
To implement authorization during the retrieval process, we will create a custom VectorStoreRetriever . The custom retriever will call the
AuthZ service to filter the vector search results based on the policies defined in the service.Enable AuthZ
To host AuthZ and other Pangea services securing your chain, you'll need a free Pangea account . After creating your account, click Skip on the Get started with a common service screen. This will take you to the Pangea User Console, where you can enable the service.
To enable the service, click its name in the left-hand sidebar and follow the prompts, accepting all defaults. When you’re finished, click Done.
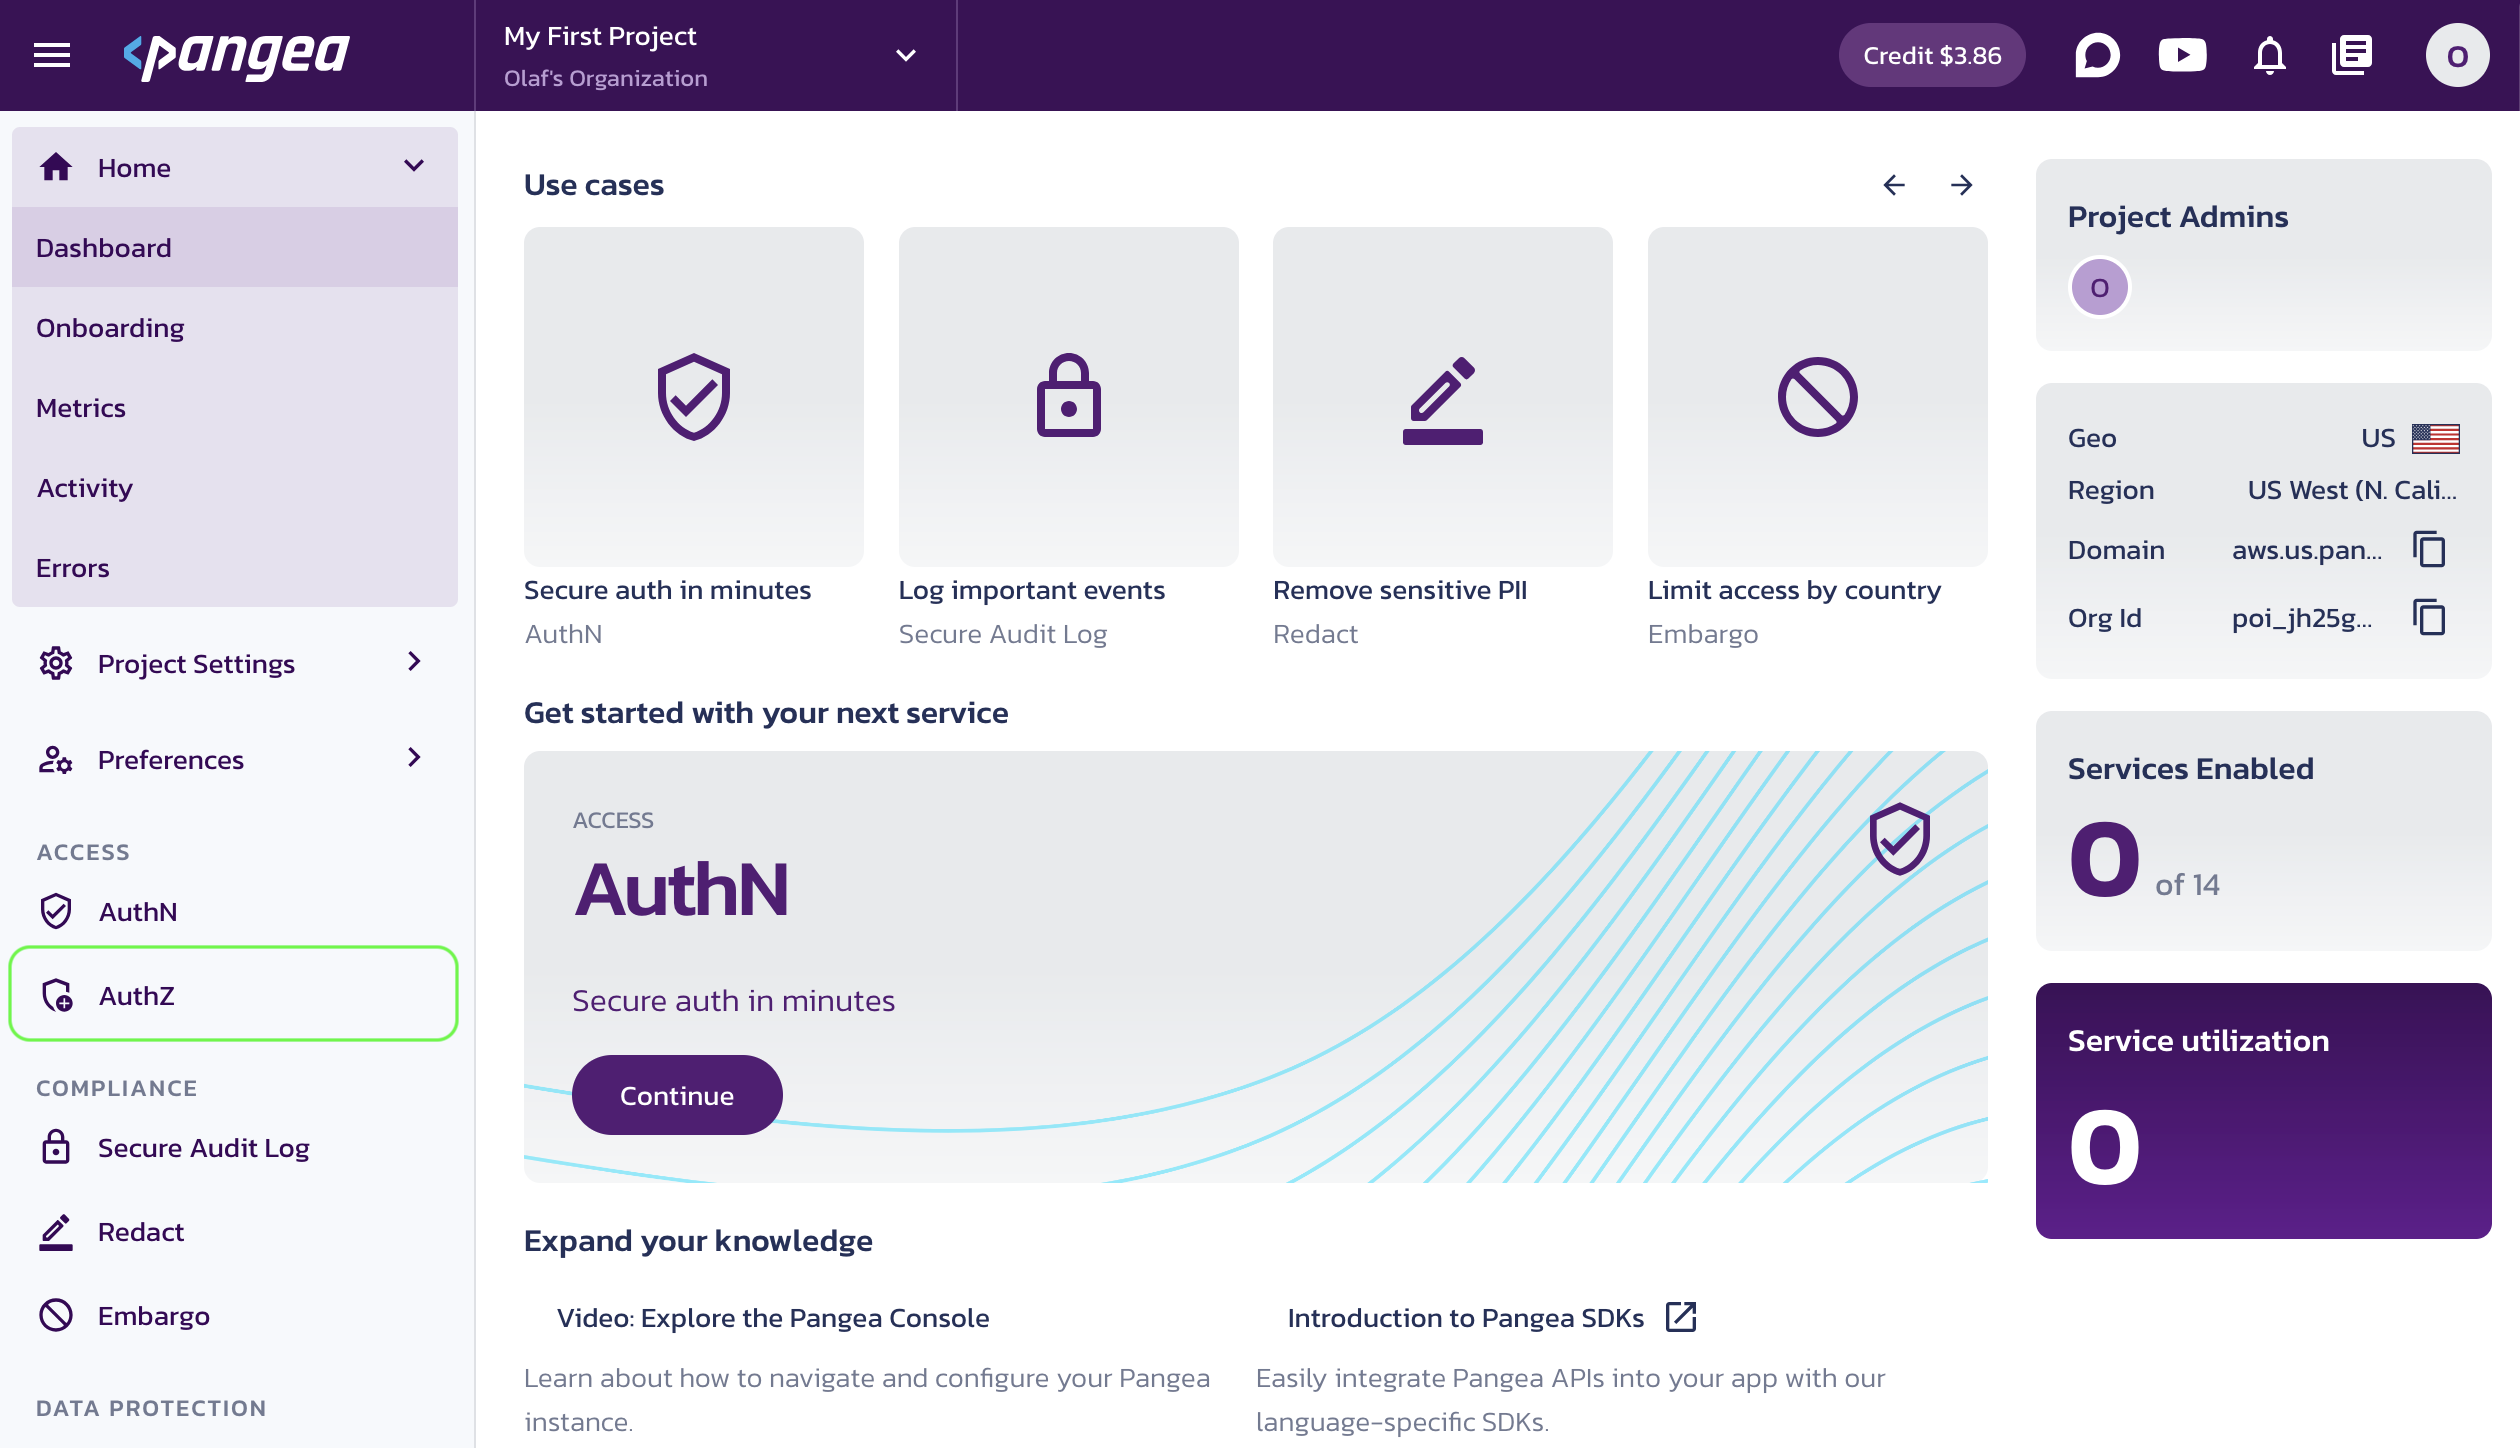
Once the service is enabled, you will be taken to its Overview page. Capture the Configuration Details:
- Domain (shared across all services in the project)
- Default Token (a token provided by default for each service)
You can copy these values by clicking on the respective property tiles.
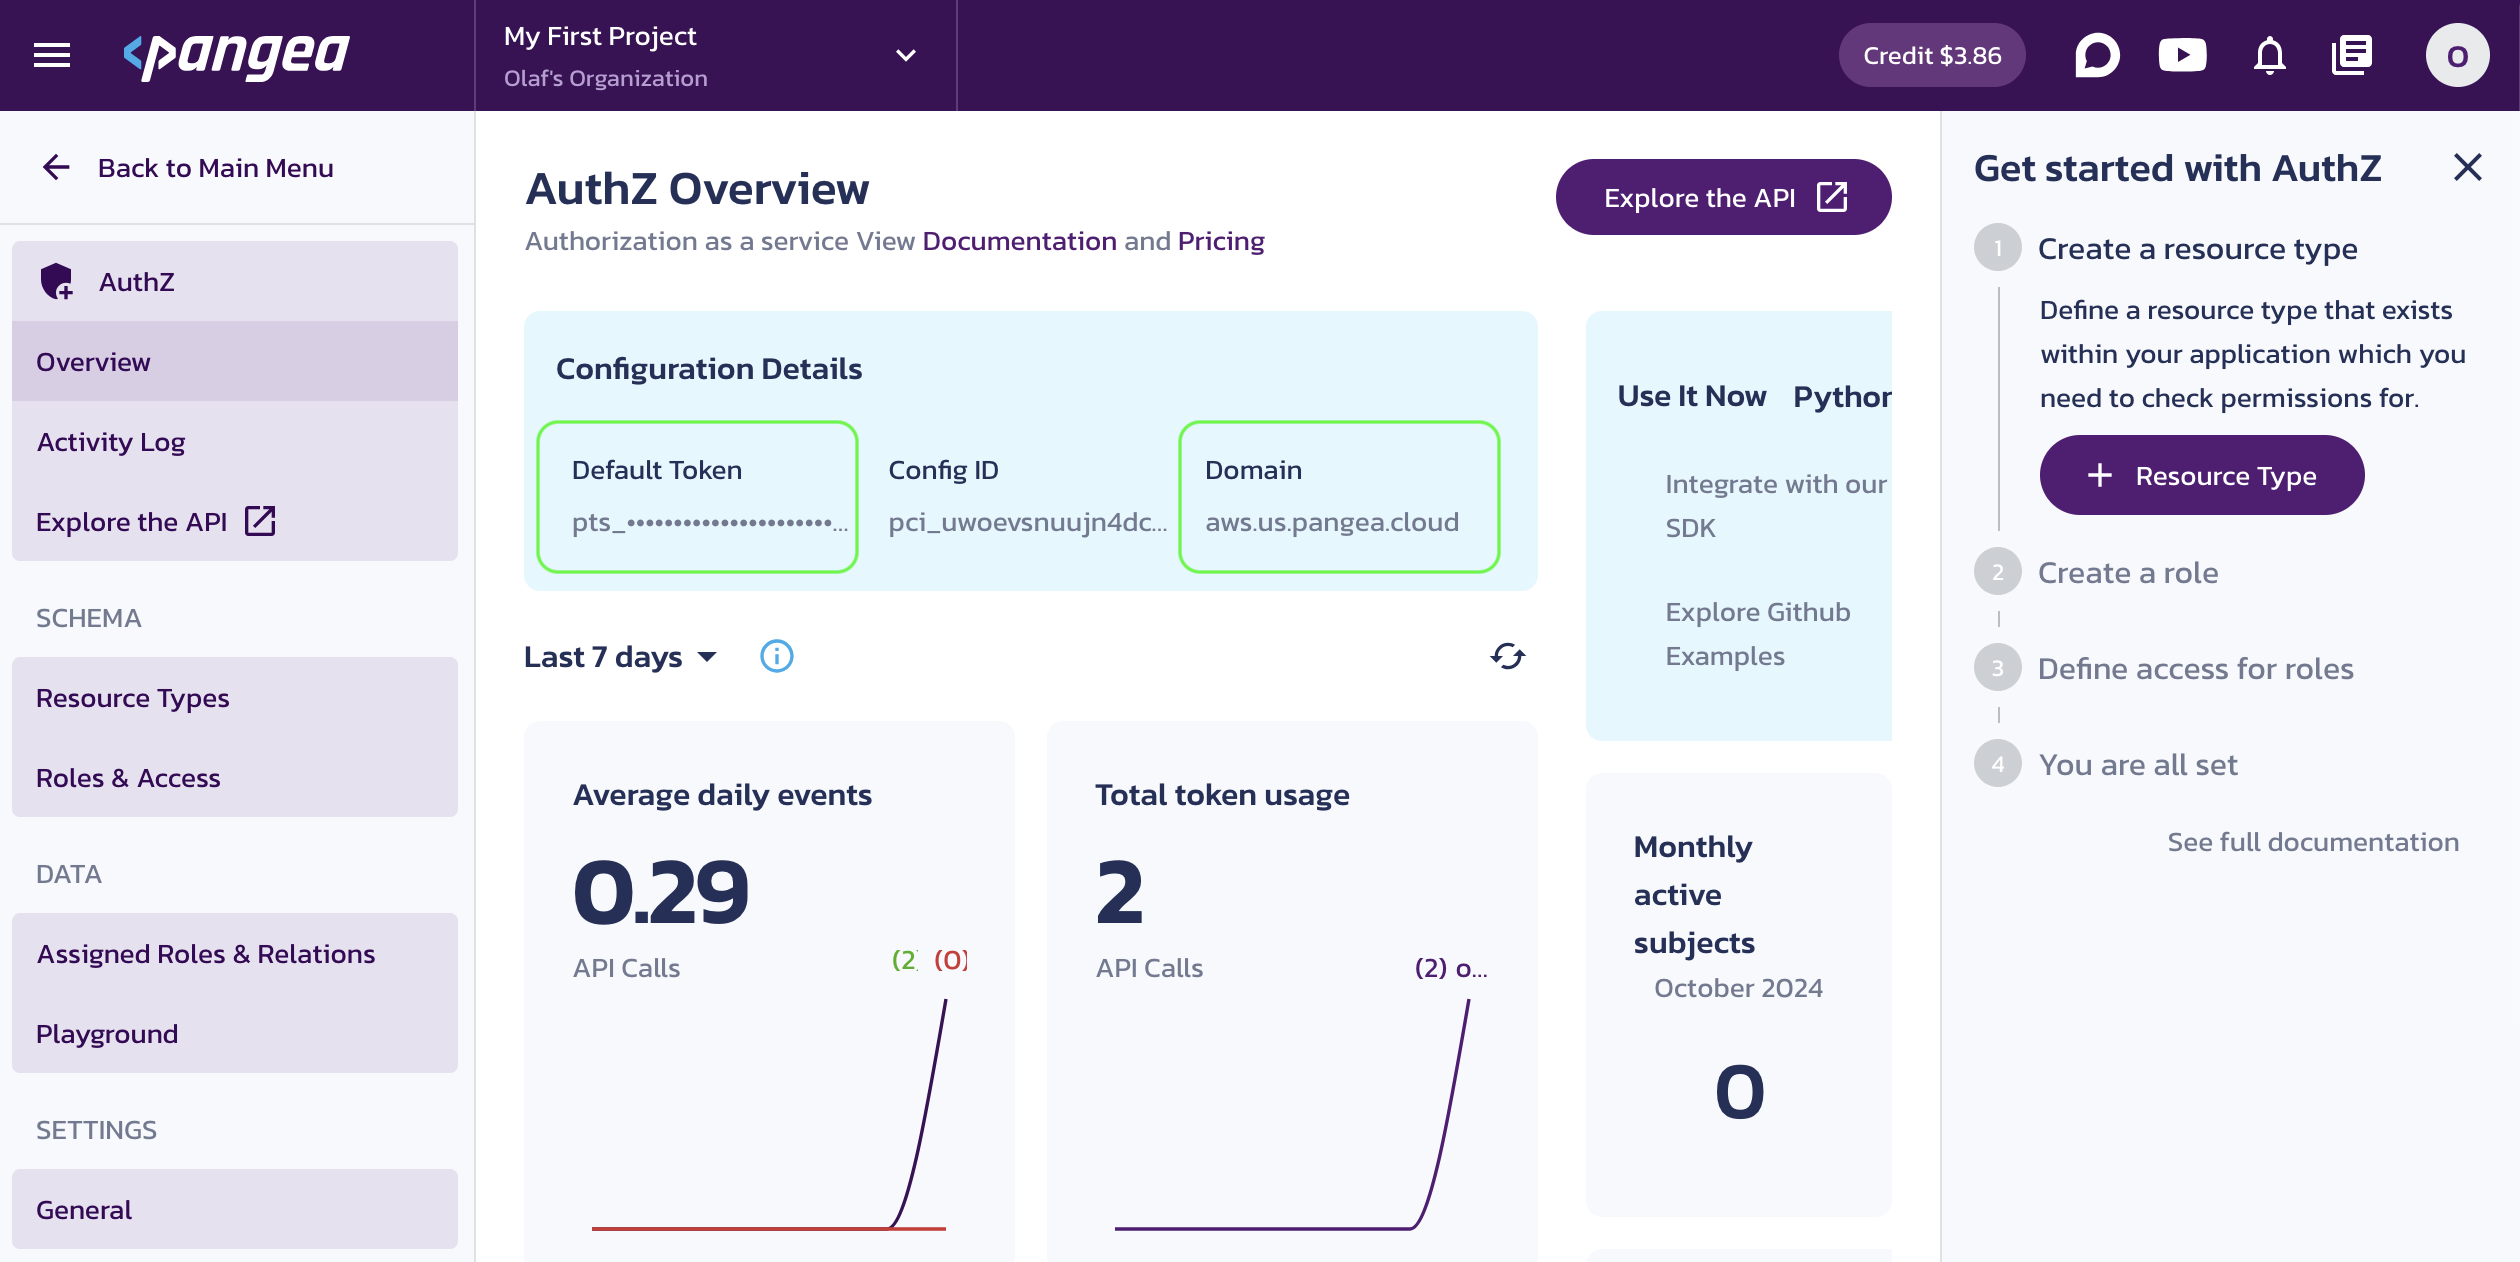
Save the configuration values in your .env, for example:
# OpenAI
OPENAI_API_KEY="sk-proj-54bgCI...vG0g1M-GWlU99...3Prt1j-V1-4r0MOL...X6GMA"
# Pangea
PANGEA_DOMAIN="aws.us.pangea.cloud"
PANGEA_AUTHZ_TOKEN="pts_kwaun3...jhpqzf"
Instead of storing secrets locally and potentially exposing them to the environment, you can securely store your credentials in Vault , optionally enable rotation, and retrieve them dynamically at runtime. Enable Vault the same way you enabled other services by selecting it in the left-hand sidebar of the Pangea User Console. The Manage Secrets documentation provides guidance on storing and using secrets in Vault.
For example, you can store your OpenAI key in Vault and retrieve it using the Vault APIs . When you enable a new Pangea service, its default token is stored in Vault automatically.
Set authorization policies
The AuthZ service enables access control based on roles (RBAC), relationships (ReBAC), and attributes (ABAC). In this tutorial, we will use a simple RBAC authorization schema to control access to data stored in the vector database, categorized by resource type.
Centralizing the authorization policy allows real-time updates and enables all your apps to access the same policy dynamically.
-
Click Resource Types in the left-hand sidebar, type
engineeringinto the Name input for your first resource type, and click Save. -
Click + Resource Type in the top right, and add another resource type named
finance.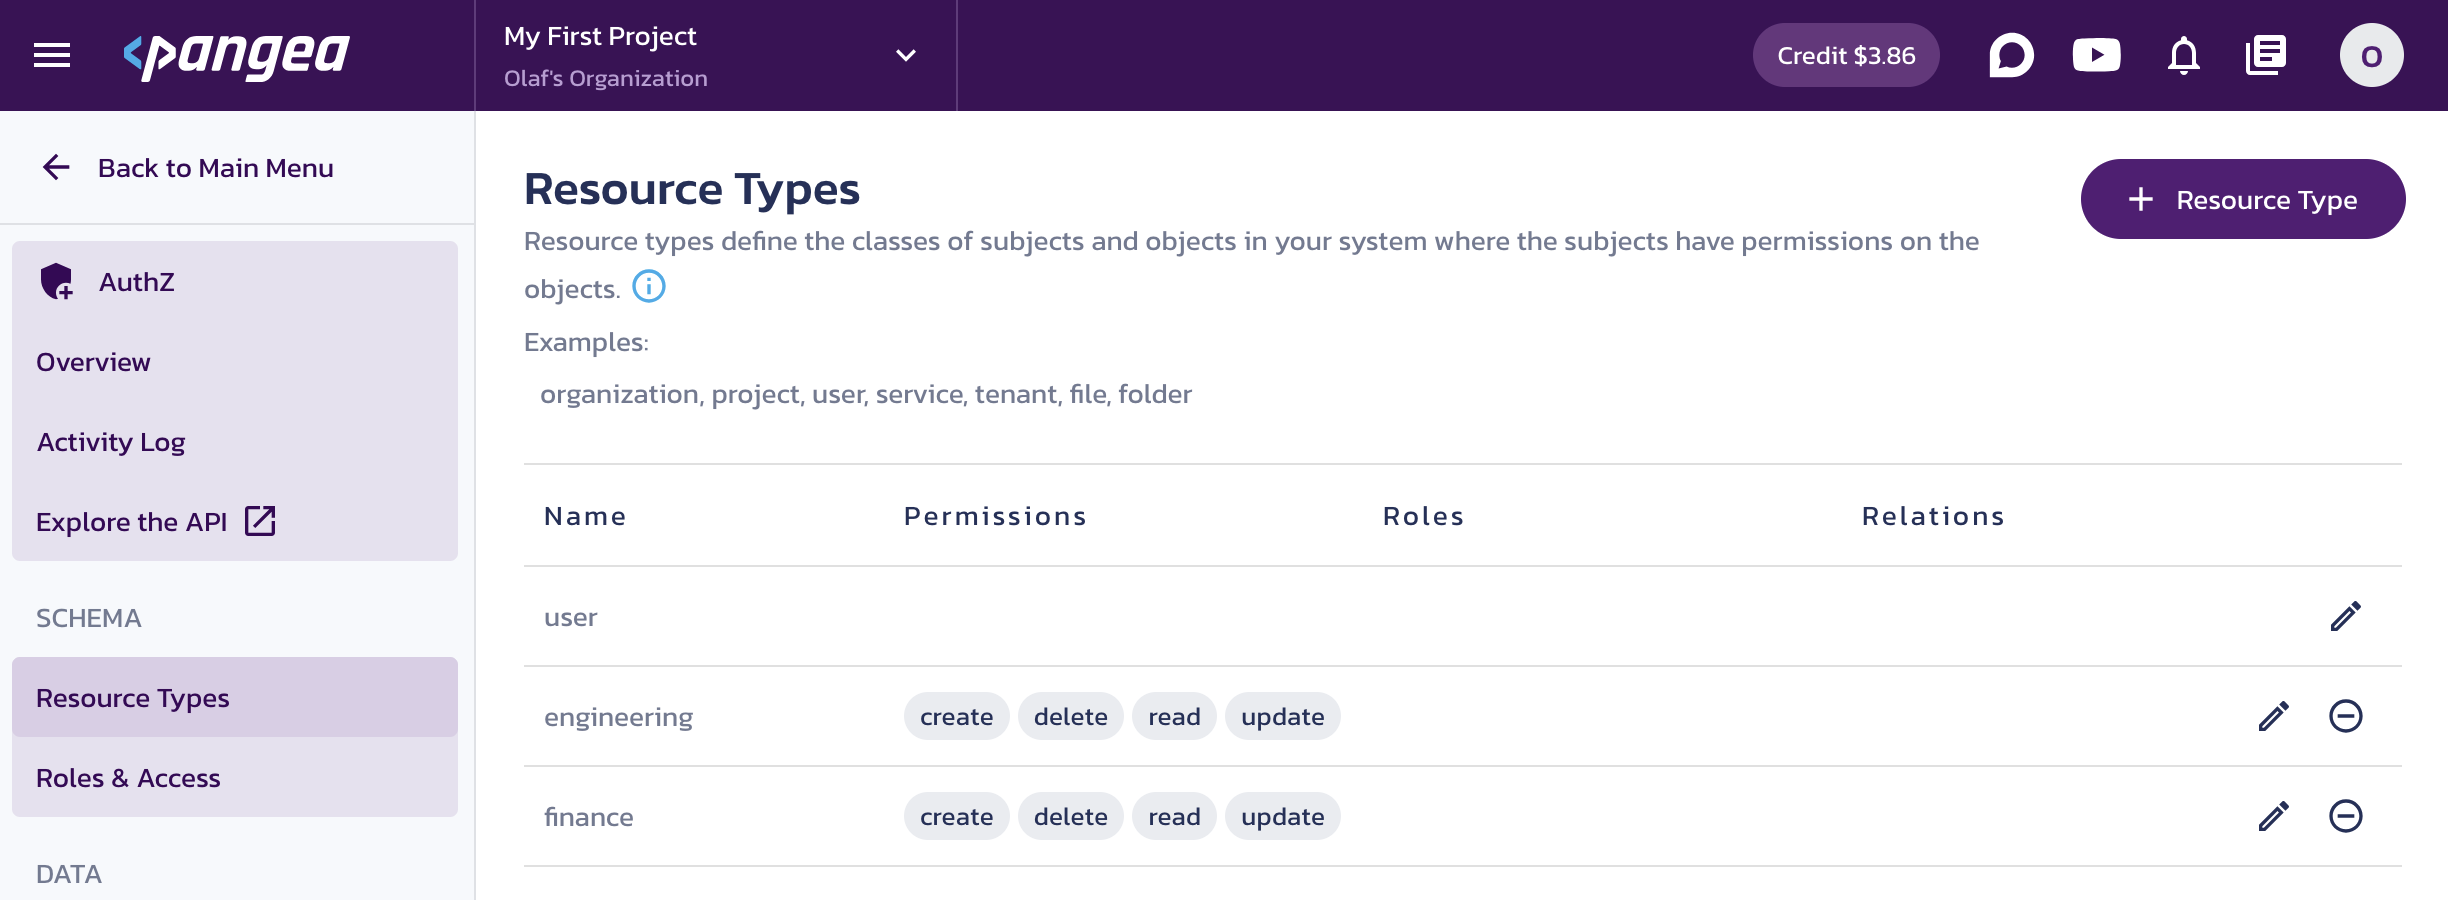
AuthZ Resource Types -
Click Roles & Access in the left-hand sidebar, type
engineerinto the Name input for your first role, and click Save. -
On the
engineerrole screen, check thereadpermission for theengineeringresource type. -
Click + Role at the top right and add
analystrole. -
On the
analystrole screen, check thereadpermission for thefinanceresource type. -
Click Save.
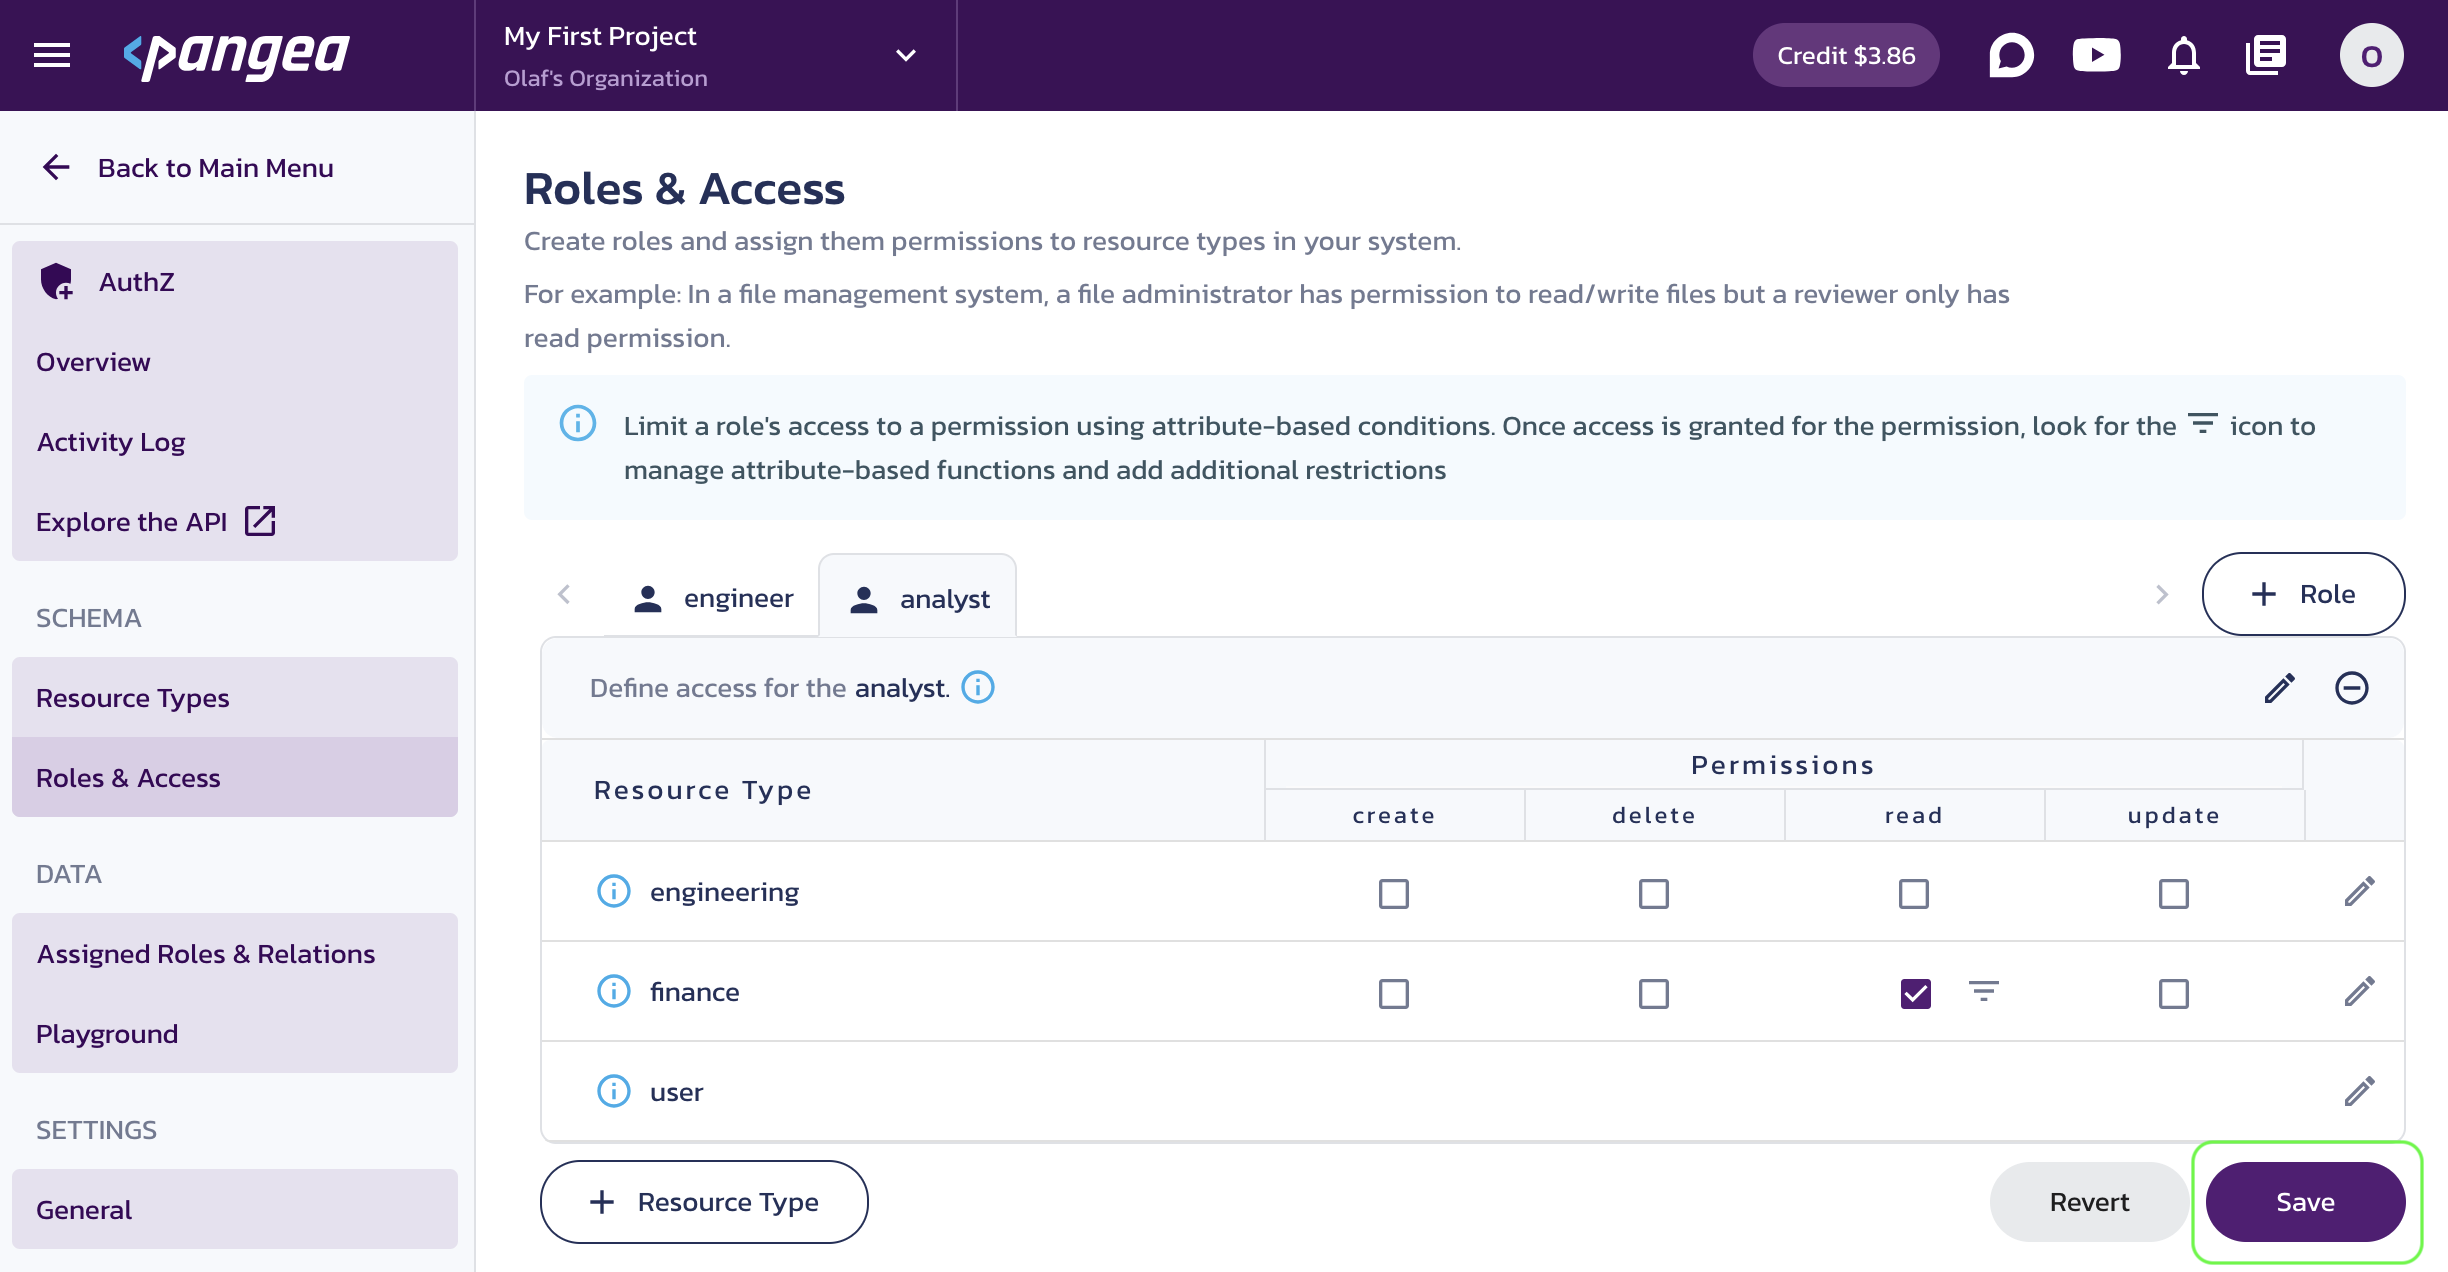
AuthZ Roles -
Click Assigned Roles & Relations, and in the opened dialog, assign the
analystrole to useralice.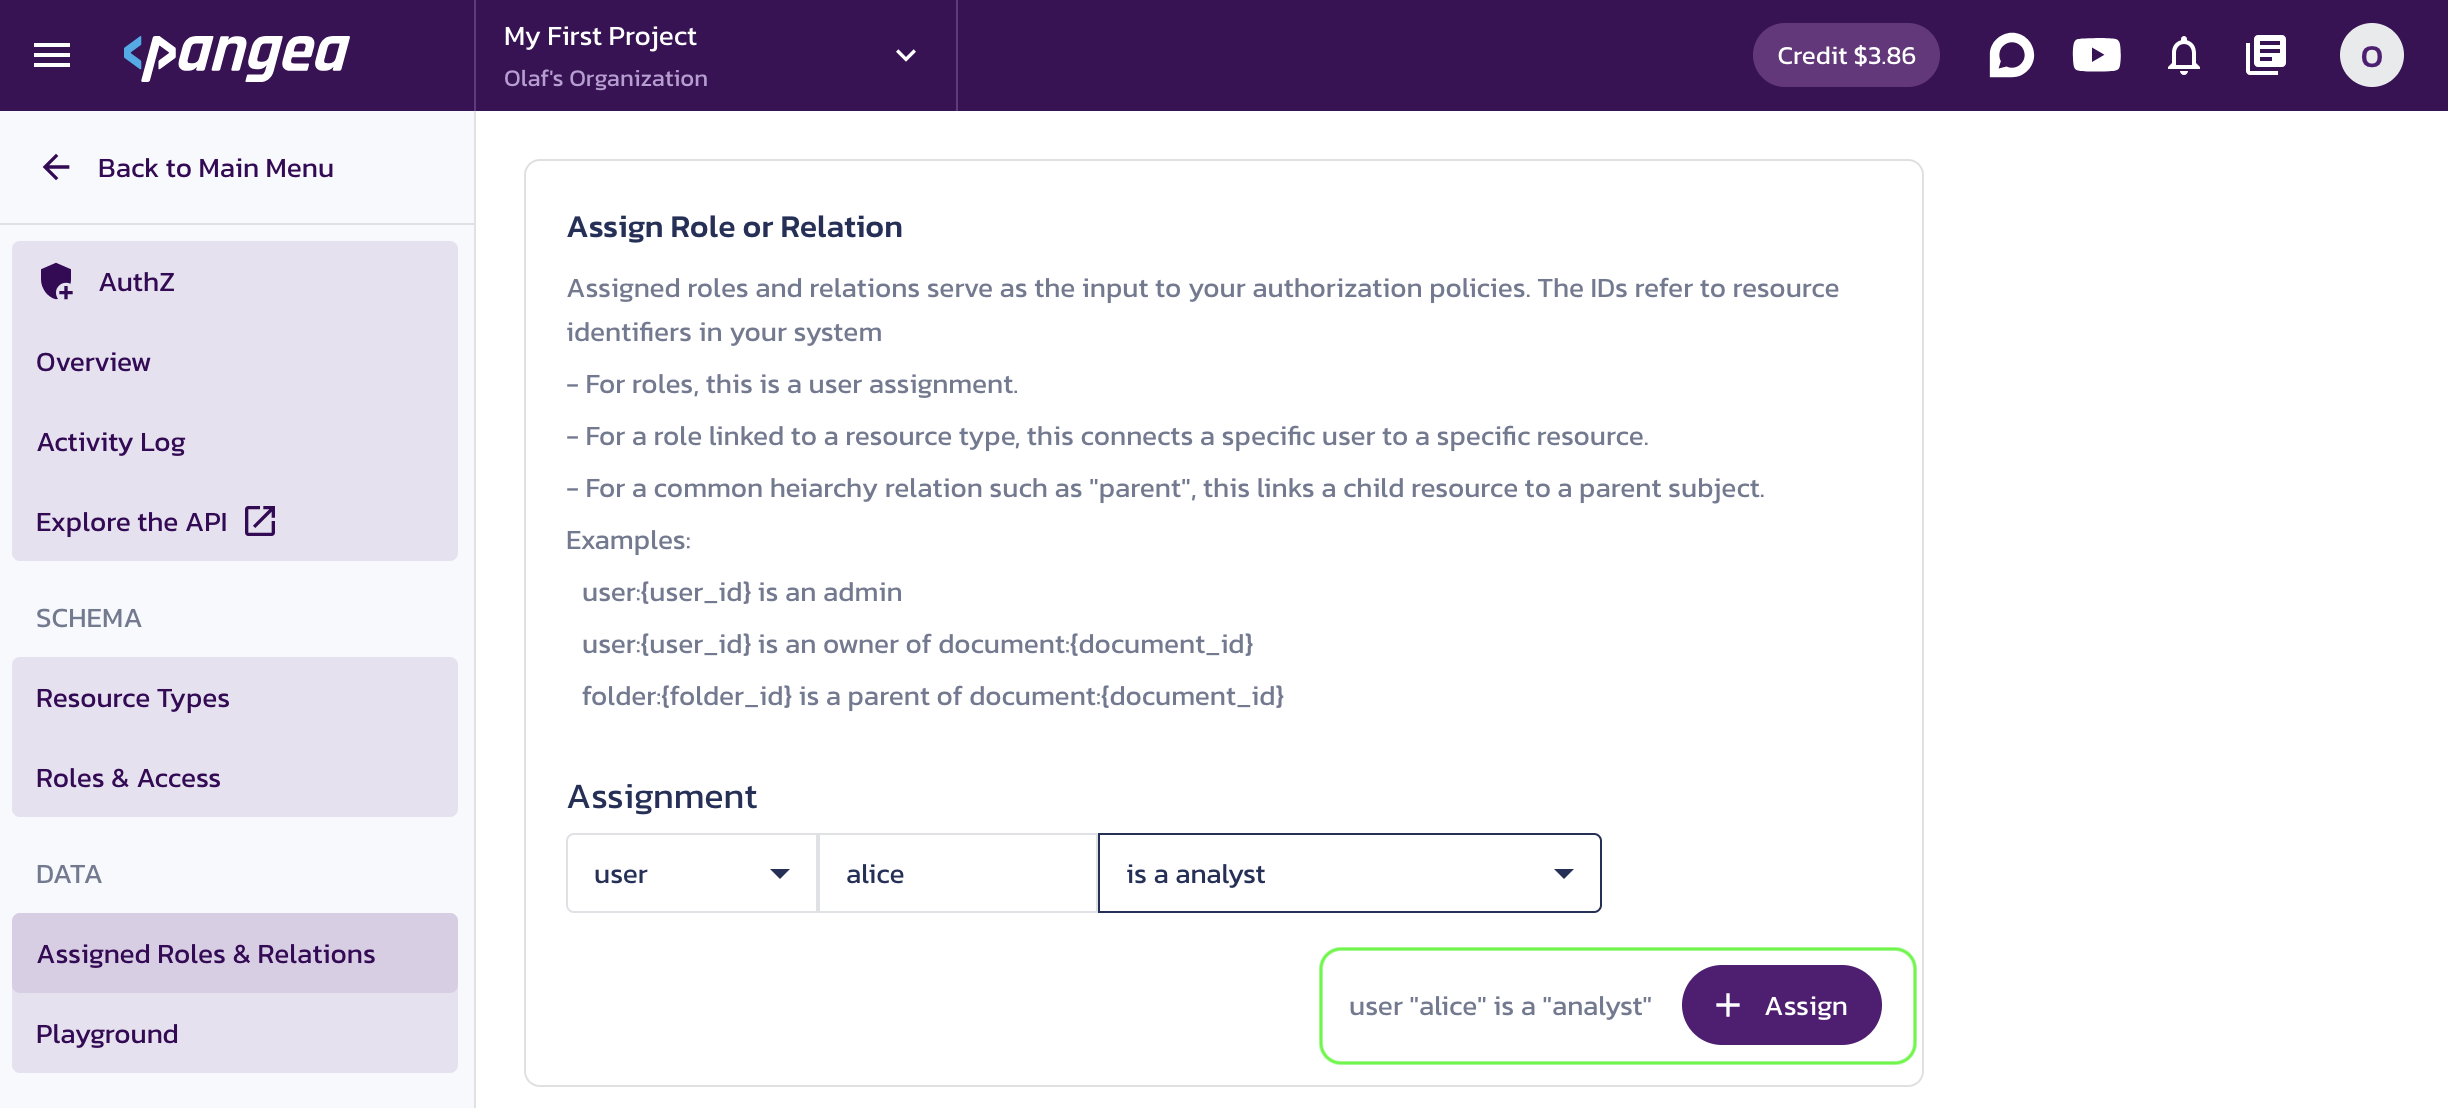
Assign Role or Relation -
Click + Assign in the Assign Role or Relation dialog.
-
On the Assigned Roles & Relations page, click + Assign to open the Assign Role or Relation dialog and assign the
engineerrole to userbill. -
Click + Assign in the Assign Role or Relation dialog.
-
On the Assigned Roles & Relations page, you will see the current assignments.
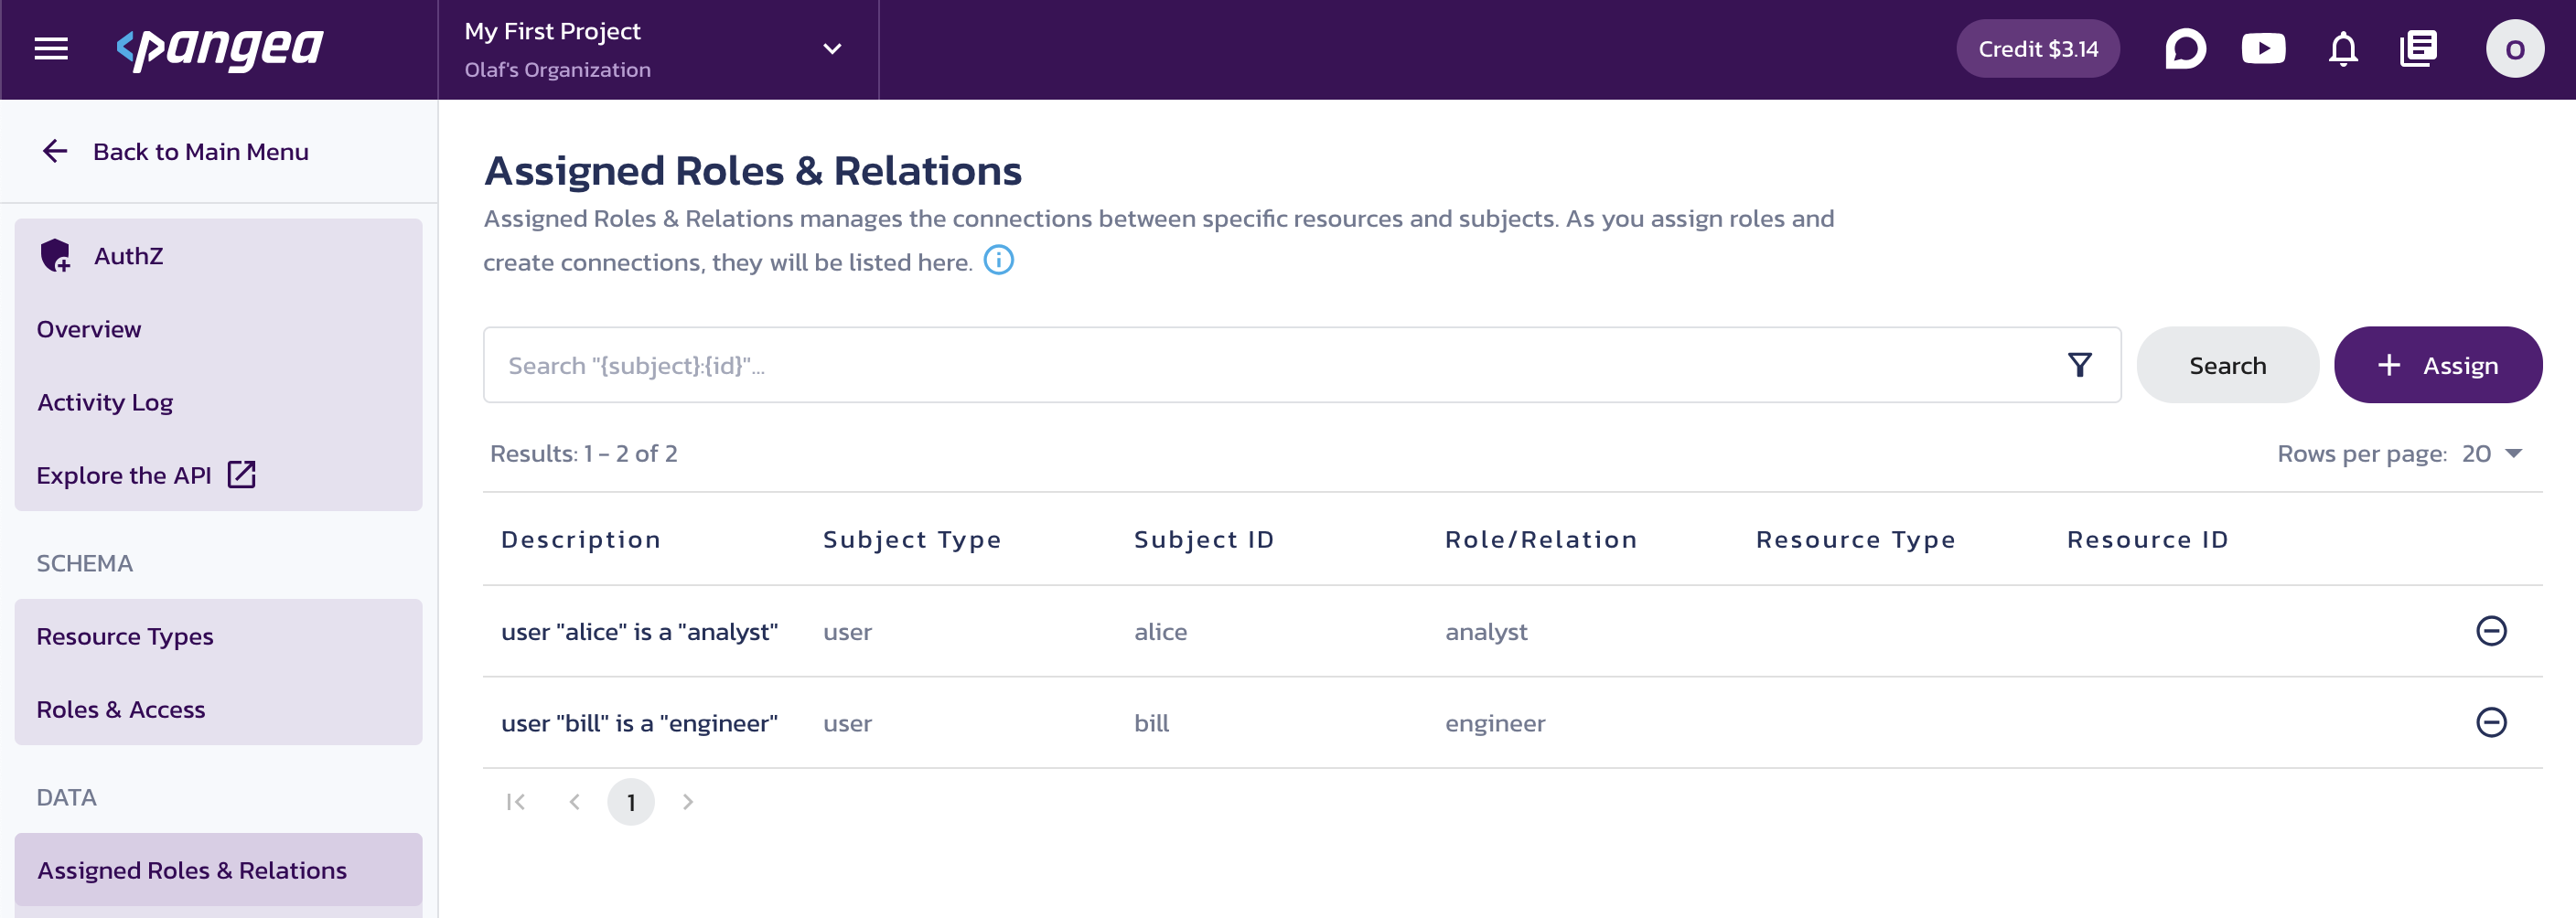
Assigned Roles & Relations
You can now check the permissions set in the authorization schema and the role assignments using AuthZ APIs or an SDK for the supported environments.
For more information on setting up the advanced capabilities of the AuthZ service and how to use it, visit the AuthZ documentation .
Create an AuthZ retriever
In the following example, we will extend the VectorStoreRetriever class with a custom filter based on permissions and assignments saved in AuthZ. The retriever will use Pangea's Python SDK to interact with the service in your Pangea project.
Add the following code to your script.
from langchain_core.vectorstores import VectorStore, VectorStoreRetriever
from pangea import PangeaConfig
from pangea.services import AuthZ
from pangea.services.authz import Resource, Subject
class AuthzRetriever(VectorStoreRetriever):
def __init__(
self,
vectorstore: VectorStore,
subject_id: str,
):
"""
Args:
vectorstore: Vector store used for retrieval
subject_id: Unique identifier for the subject, whose permissions will be used to filter documents
"""
super().__init__(vectorstore=vectorstore)
self._client = AuthZ(token=os.getenv("PANGEA_AUTHZ_TOKEN"), config=PangeaConfig(domain=os.getenv("PANGEA_DOMAIN")))
self._subject = Subject(type="user", id=subject_id)
self.search_kwargs["filter"] = self._filter
def _filter(self, metadata: dict[str, str]) -> bool:
"""Filter documents based on the subject's permissions in AuthZ."""
resource_type: str | None = metadata.get("resource_type")
# Disallow access to untagged resources.
if not resource_type:
return False
# Allow unrestricted access to public resources.
if resource_type == "public":
return True
response = self._client.check(resource=Resource(type=resource_type), action="read", subject=self._subject)
return response.result is not None and response.result.allowed
Create a retrieval chain with built-in access control
You can now create a retriever for a username specified in your AuthZ policies. Initialize the AuthZ retriever with the username bill.
retriever = AuthzRetriever(vectorstore=vectorstore, subject_id="bill")
retrieval_chain = create_retrieval_chain(retriever, qa_chain)
You will then receive answers based only on the information the user is authorized to access.
get_answers()
When you run the script, you will receive answers based on the restricted context accessible to the user.
Question: Do we have any inventions that don't have a patent yet?
Answer: Yes, the "Tears-bringing tune" is pending a patent.
Question: Can I bring a pet to public events?
Answer: No cats are allowed at public events, as they disrupt gameplay. Other pets are not mentioned, so I can't tell you.
Question: What is our biggest cumulative expense?
Answer: I can't tell you.
Note that the engineer bill does not have access to financial data.
Add authentication
To reduce risks associated with public access to your application, you can require users to sign in. After authentication, the user’s ID can be used to retrieve the authorization policies stored in AuthZ.
You can easily add login functionality to your application using the AuthN service. It allows users to sign in to the Pangea-hosted authorization server using their browser. Your application will then perform an authorization code flow using the Pangea SDK you’ve already imported to communicate with the AuthZ service. For demonstration purposes, we will use Flask as the client server.
Enable AuthN
If you are on the AuthZ page, navigate to the list of services by clicking Back to Main Menu in the top left corner. This will return you to the project page in your Pangea User Console, where enabled services will be marked with a green dot.
Click AuthN in the left-hand sidebar and follow the prompts, accepting all defaults. When you’re finished, click Done and Finish.
When the service is enabled, you will be taken to its Overview page. Capture the AuthN Configuration Details:
- Default Token (a token provided by default for each service)
- Hosted Login (the login URL that your application will redirect users to sign in)
You can copy these values by clicking on the respective property tiles.

Save the configuration values in your .env, for example:
# OpenAI
OPENAI_API_KEY="sk-proj-54bgCI...vG0g1M-GWlU99...3Prt1j-V1-4r0MOL...X6GMA"

# Pangea
PANGEA_DOMAIN="aws.us.pangea.cloud"
PANGEA_AUTHZ_TOKEN="pts_kwaun3...jhpqzf"
PANGEA_AUTHN_HOSTED_LOGIN="https://pdn-lqcuqlhizxsjrpbewgdrpi53cc72gdit.login.aws.us.pangea.cloud"
PANGEA_AUTHN_CLIENT_TOKEN="pcl_pgd43k...yoy6kn"
Enable Hosted Login flow
An easy and secure way to authenticate your users with AuthN is to use its Hosted Login , which implements the OAuth 2 Authorization Code grant. The Pangea SDK will manage the flow, providing user profile information and allowing you to use the user's login to verify their permissions defined in AuthZ.
- Click General in the left-hand sidebar.
- On the Authentication Settings screen, click Redirect (Callback) Settings.
- In the right pane, click + Redirect.
- Enter
http://localhost:3080in the URL input field. - Click Save in the Add redirect dialog.
- Click Save again in the Redirect (Callback) Settings pane on the right.
For more information on setting up advanced capabilities of the AuthN service (such as sign-in and sign-up options, security controls, session management, and more) visit the AuthN documentation .
Require users to sign in
Add the following code to your script to open the hosted login page in your browser. After creating an account in AuthN and signing in, the script will request the user profile from AuthN and save the username in a variable. This variable will then be passed to the AuthZ retriever, ensuring that only authorized data is accessible during the retrieval.
import threading
import urllib
import webbrowser
from functools import partial
from queue import Queue
from secrets import token_hex
from pangea.services import AuthN
from flask import Flask, request, abort

# Queue to share data between threads
queue = Queue()

# Initialize AuthN client
authn = AuthN(token=os.getenv("PANGEA_AUTHN_CLIENT_TOKEN"), config=PangeaConfig(domain=os.getenv("PANGEA_DOMAIN")))

# Initialize Flask app
app = Flask(__name__)

# Generate a unique state token for verifying callback
state = token_hex(32)

# Define the redirect route
@app.route("/callback")
def callback():
    # Verify that the state param matches the original.
    if request.args.get("state") != state:
        return abort(401)

    auth_code = request.args.get("code")
    if auth_code is None:
        return abort(401)

    # Exchange the authorization code for the user's tokens and info.
    response = authn.client.userinfo(code=auth_code)

    if not response.success or response.result is None or response.result.active_token is None:
        return abort(401)

    queue.put(response.result.active_token.token)
    queue.task_done()

    return "Authenticated, you can close this tab."

# Start the Flask server in a separate daemon thread
def run_server():
    app.run(port=3080, debug=False)

# Run Flask server as a daemon thread
server_thread = threading.Thread(target=run_server, daemon=True)
server_thread.start()

# Open a browser to authenticate
authn_hosted_login = os.getenv("PANGEA_AUTHN_HOSTED_LOGIN")
redirect_uri = "http://localhost:3080/callback"
url_parameters = {
    "redirect_uri": redirect_uri,
    "response_type": "code",
    "state": state,
}
url = f"{authn_hosted_login}?{urllib.parse.urlencode(url_parameters)}"

print("Opening browser to authenticate...")
webbrowser.open_new_tab(url)

# Wait for the server to receive the auth code.
token = queue.get(block=True)
check_result = authn.client.token_endpoints.check(token).result
assert check_result
username = check_result.owner

print(f"Authenticated as {username}")
When you run the updated code, sign up as alice in your browser, using your email during the sign-up process, and verify it. Once signed up and signed in successfully, you can close the page and return to your Python script. The script will receive the user profile and store the username in the corresponding variable.
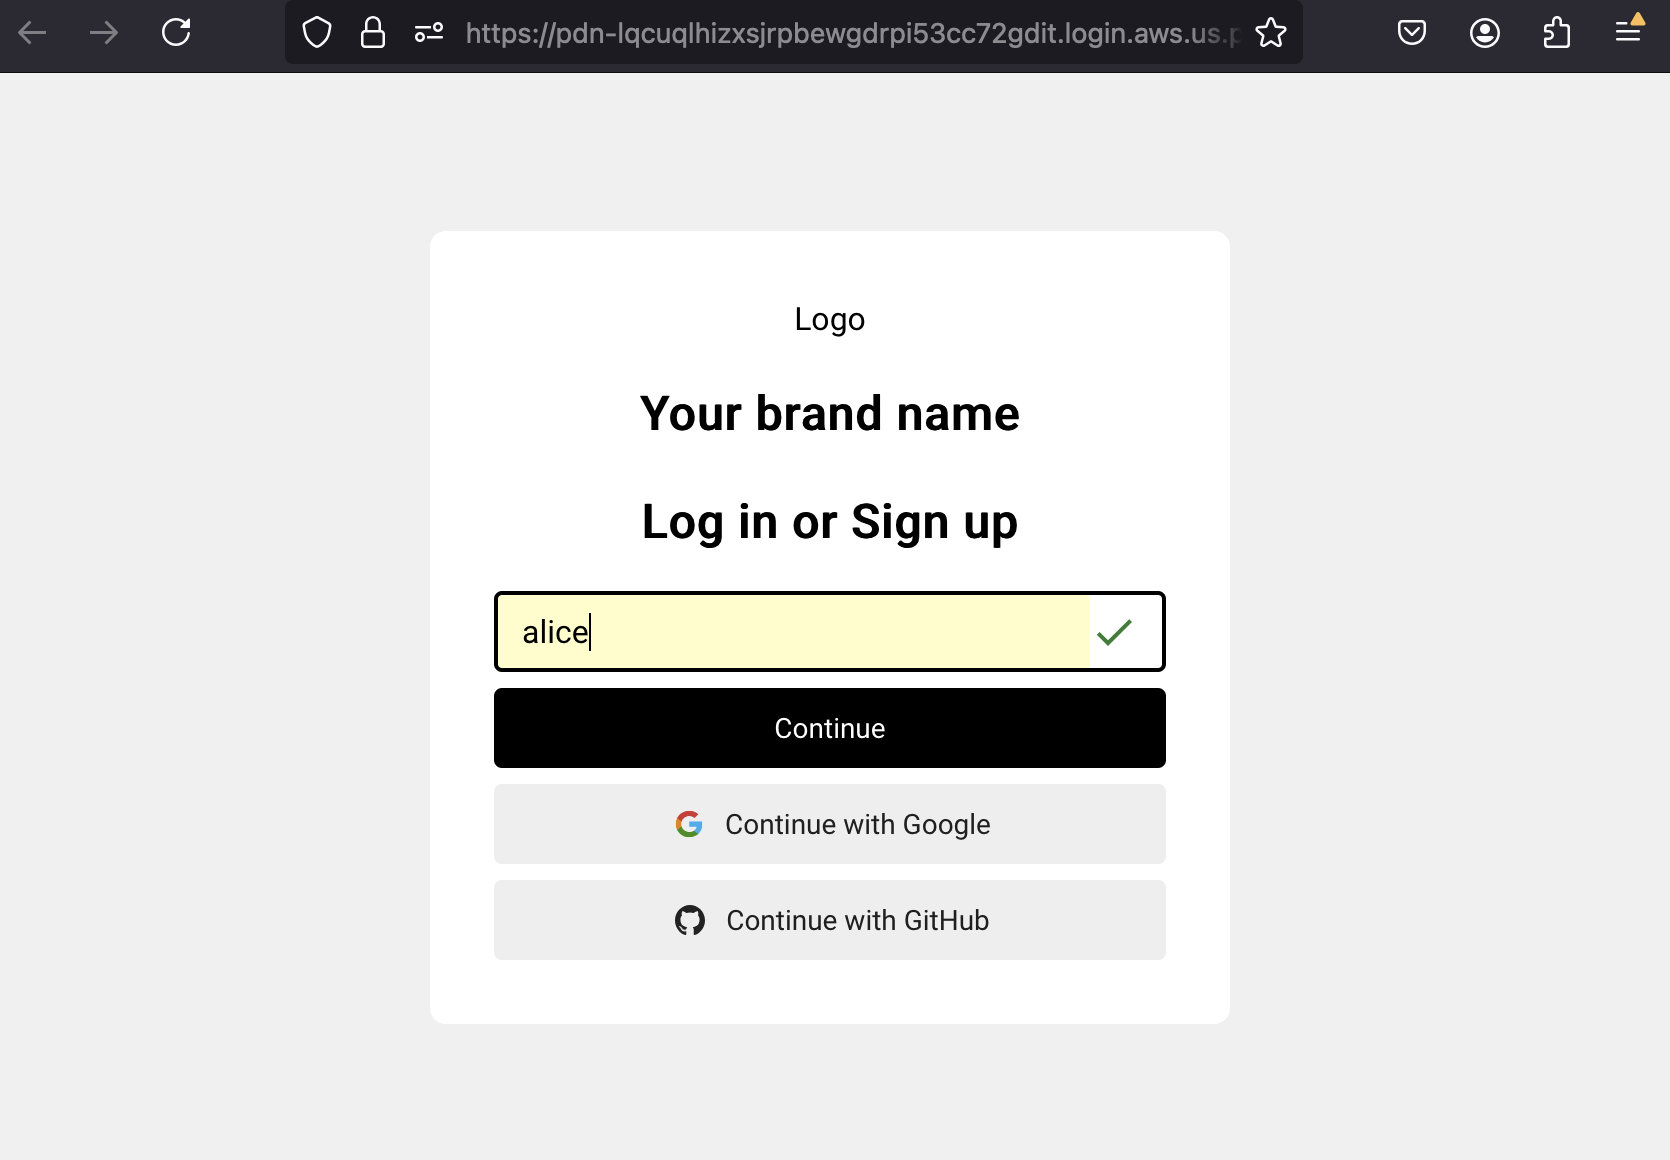
You can now pass the username dynamically to your AuthZ retriever using the value returned from AuthN.
retriever = AuthzRetriever(vectorstore=vectorstore, subject_id=username)
retrieval_chain = create_retrieval_chain(retriever, qa_chain)
get_answers()
When you run the script, you should receive answers based only on the context the authenticated user is authorized to access.
Authenticated as: alice

Question: Is there any invention in engineering that doesn't have a patent?
Answer: I can't tell you.

Question: Can I bring a pet to public events?
Answer: No, cats are strictly forbidden at public events. I can't tell you about other pets.

Question: What is our biggest cumulative expense?
Answer: The biggest cumulative expense is for Tea Leaves, which costs £50 weekly. Over a year, this amounts to £2,600 (£50 x 52 weeks).
Note that the analyst alice cannot include the engineering context in her conversation with the LLM. But rest assured, whether you're an engineer or an analyst, you must leave your cat at home when heading to a corporate party in this office.
Conclusion
Adding authentication and authorization to your RAG app enables the secure use of business-specific information in a generative AI application. By making minor modifications to the existing code, you can create an identity and authorization-aware experience in your LangChain apps using Pangea-hosted AuthN and AuthZ services.
For more examples and detailed implementations, explore the following GitHub repositories:
- Authenticating Users for Access Control with RAG for LangChain in Python
- User-based Access Control with RAG for LangChain in Python
Was this article helpful?