General
Password Requirements
If you haven't enabled password authentication during project creation, you can do so in
Log in/Sign up flow settings. The Password authentication method is a simple way to enforce access control to your app without requiring any third-party identity services or other devices.Follow these steps to configure password requirements:
-
In the Pangea User Console , click General in the left-hand navigation menu.
-
Click on Password Requirements and a settings dialog with several switches will appear.
-
Under Password Complexity, you can configure the required password complexity for users when setting up their accounts. The following options are available:
- Require one uppercase letter
- Require one lowercase letter
- Require a special character
- Minimum password length
tip:The National Institute of Standards and Technology (NIST) recommends an 8-character minimum for all passwords.
-
Click Save.
For non-production environments, Pangea recommends you use social authentication with development credentials to get started with AuthN.
Signup Settings
Signup Settings manages signup and signup verification settings.
-
Allow Signups: Allows users to sign up and create new accounts. Disabling this feature indicates that only invited users will be able to create accounts.
-
Captcha Verification: Require users to complete a Captcha to signup. By default, it is set to Disabled. Use the toggle switch to enable or disable this setting and it autosaves the settings.
-
Email Verification: Require users to verify their email address before the account creation process is complete. By default, it is set to Disabled. Use the toggle switch to enable or disable this setting and it autosaves the settings.
note:This setting requires email verification for password accounts, but not for social accounts.
Legal Agreements and Disclaimers
Legal Agreements and Disclaimers: Define legal agreements that should be presented and accepted by users and add disclaimer content to the login and signup pages.
-
End User License Agreement: Require users to sign an End User License Agreement when creating an account or when updates to the EULA are published.
-
Create a new EULA: Input a EULA agreement that users will be required to sign. When there is an existing EULA, clicking the EULA name opens a dialog to modify the agreement. Click the toggle to require users to sign the EULA.
-
Privacy Policy: Require users to sign a Privacy Policy when creating an account or when updates to the Privacy Policy are published.
-
Create a new Privacy Policy: Input a Privacy Policy that users will be required to sign. When there is an existing Privacy Policy, clicking the Privacy Policy name opens a dialog to modify the agreement. Click the toggle to Enabled to require users to sign the Privacy Policy.
-
Disclaimers and Other Acceptance: Require users to sign a Disclaimer or any other custom Acceptance policy when creating an account or when updates to the given policy are published.
-
Create Disclaimer: Input a Disclaimer that users will be required to sign. Currently, only one custom Disclaimer is allowed. When there is an existing Disclaimer, only Edit Disclaimer is available.
Session Configuration
Configure token type and token lifetimes to limit the amount of time your app is vulnerable to a malicious token.
Session Configuration: Select the token to configure: Opaque Session Tokens or JSON Web Tokens (JWT). By default, it is set to Opaque Session Tokens.
Opaque Session Tokens: An unique identifier that does not contain information about the user or session. This token is a reference to additional data stored securely within the Pangea AuthN service.
JSON Web Tokens (JWT): JWT's use an open standard for encoding user and claims information. To use JWTs properly, you must first enable the Vault service and configure a signing key. Pangea does not allow JWT revocation, so we recommend using short session lifetimes.
Token Lifetimes: Configure session, JWT and refresh token lifetimes. The lifetimes will determine how long tokens generated by the AuthN service are valid before expiring and must be refreshed. You can set the time based on days, hours, minutes, or seconds.
-
User Token (Opaque): Opaque session tokens are also called User tokens. These tokens contain no information about the subject line and generally have a longer lifetime than JWTs.
note:This field shows up as User Token (JWT) when JSON Web Tokens (JWT) is selected in the Session Configuration.
-
Refresh Token: A refresh token contains no information about the subject. It is only to extend the lifespan of an existing Session token or JWT. Refresh tokens are often long-lived.
Social (OAuth/OpenID Connect)
Enable Social (OAuth/OpenID Connect) Authentication
You cannot use the same email account with different social providers because each email address can only support one authentication method. If an email is already registered with one method and you attempt to sign in with the same email via a different method, it fails. The current error message directs users to the registered method.
Social authentication allows your users to authenticate into your app with common third-party identity providers via OAuth. The following social authentication providers are available:
- GitHub
- GitLab
Use one of the following options to enable social authentication:
Without configuring OAuth accounts on the providers
This option is not intended for normal use and may not be available for all providers. However, a built-in development account offers an easy path to get started before setting up your own OAuth client on a provider and adding it to the AuthN configuration.
You can try out social authentication without configuring your own OAuth accounts on the providers.
- In the Pangea User Console , click General in the left-hand navigation menu.
- Click on Social (OAuth/OpenID Connect) and a settings dialog will appear on the right pane.
- In the Social (OAuth/OpenID Connect) dialog, click Configure located on the provider's row. This will open an additional dialog for configuring social login.
- In the social login configuration dialog, enable the Use development OAuth credentials setting if it is available. When enabled, this option disregards any set Client Id or Client Secret and uses the development account for operation.
- Click the Save button to save the selection, which will close the social login configuration dialog.
- In the Social (OAuth/OpenID Connect) configuration dialog, the development mode will be indicated with a blue tag icon on the provider's row. Click Save to apply and save the updated configuration.
Configure OAuth accounts on the providers
-
In the Pangea User Console , click General in the left-hand navigation menu.
-
Click on Social (OAuth/OpenID Connect) and a settings dialog will appear. In the dialog, take note of the provided Callback URL. This URL will be required when setting up OAuth clients on the providers.
-
Click on Configure for a social authentication provider and a social login configuration dialog will appear. In this dialog, you can view and copy the Callback URL value as well.
To configure a social login you must provide Client Id and Client Secret. Refer to the specific instructions for each social authentication provider to set up an OAuth client and obtain these values:
note:The steps below assume you already have an active provider account.
Google
Expand for details
-
Go to the
Google API Console Credentials page. -
Click Select a project, then NEW PROJECT, and enter a name for your project. Note that project names cannot be changed later. Click Create.
-
In your newly created project, go to the Credentials page and click + CREATE CREDENTIALS, then select OAuth client ID.
-
You might be prompted to set a product name and other details on the consent screen. If so, click CONFIGURE CONSENT SCREEN, supply the requested information, save it, and navigate back to the Credentials page.
-
On the Credentials page, click + CREATE CREDENTIALS again and select OAuth client ID.
-
Select Web Application for the Application Type.
-
Scroll down to the Authorized redirect URIs section and click + ADD URI to enter the redirect URIs. Add the Callback URL value displayed in the Social (OAuth/OpenID Connect) configuration or Google social login configuration dialog in the Pangea User Console . Click Create.
-
In the dialog that appears, note the Client ID and Client secret. You will use them in the next steps.
You can always revisit the Google API Console Credentials page for your project to re-obtain its Client ID and Client secret.
GitHub
Expand for details
-
Sign in to your GitHub account .
-
Click on your profile picture located in the top right corner, then select Settings.
-
Select Developer settings from the left-hand menu.
-
Go to OAuth Apps and either register a new application or select an existing one.
-
In the Authorization callback URL input, enter the Callback URL value displayed in the Social (OAuth/OpenID Connect) configuration or Google social login configuration dialog in the Pangea User Console . Click Register application for a new application or Update application for an existing one.
-
Click Generate a new client secret button. Save the Client ID and the new Client secret. You won’t be able to see the Client secret value again after leaving this screen. You can generate a new client secret at a later time if needed.
Use the Client ID and Client secret values for setting the GitHub social authentication provider in the Pangea User Console in the next steps.
GitLab
Expand for details
-
Sign in to your GitLab account .
-
At the top of the left sidebar, click on your avatar and select Edit profile.
-
On the left sidebar, click on Applications.
-
On the Applications screen, click on Add new application.
-
In the Add new application dialog, populate the following inputs:
- Name - Enter an application name as you want it to appear in the list of applications.
- Redirect URI - Enter the Callback URL value displayed in the Social (OAuth/OpenID Connect) configuration or GitLab social login configuration dialog in the Pangea User Console .
Enable the following options:
- Confidential
- Scopes:
- openid
- profile
-
Click the Save application button. The new Application: <your-application-name> screen will be displayed.
-
Save the Application ID and Secret. You will not be able to access the Secret value again after leaving this screen.
-
Click Continue. This will take you back to the Applications screen with a link to your new application.
-
Use the application link if you need to change anything in its configuration. You can use the Renew secret button to reset the client secret and make a copy of the new one. You can use the Edit button to change the application configuration parameters.
You can find additional information on the Configure GitLab as an OAuth 2.0 authentication identity provider page.
LinkedIn
Expand for details
-
Navigate to My apps page on the LinkedIn website and sign in.
-
Click Create App.
-
On the Create app page, provide the required details:
- App name - Enter a name for your OAuth client app as you want it to appear on the My apps page.
- LinkedIn Page - Enter the URL for a company page on LinkedIn.
You can use your company's LinkedIn URL. Alternatively, you might be able to use the default company URL associated with your account:https://www.linkedin.com/company/my-company/. You can also create your company page by using the Create a new LinkedIn Page link. - App logo - Upload an image for your app logo to appear on the sign-in page during the social authentication flow.
- Consent to the Legal agreement terms.
-
Click Create App. This will redirect you to your new
<App name>page. -
Navigate to the Products tab.
- Click Request access for the Sign In with LinkedIn using OpenID Connect product.
- Consent to LinkedIn API Terms Of Use and click Request access. The Sign In with LinkedIn using OpenID Connect product should now appear under Added products.
-
Switch to the Auth tab.
- Under OAuth 2.0 settings, click on the pencil icon to add Authorized redirect URLs for your app.
- Click Add redirect URL.
- Enter the Callback URL value displayed in the Social (OAuth/OpenID Connect) configuration dialog or LinkedIn social login configuration dialog in the Pangea User Console .
- Click Update.
- Note the Client ID and Client Secret displayed. You will use them in the next steps.
-
You can view and modify your OAuth client's settings by revisiting the My apps page on the LinkedIn website.
-
-
Return to the social login configuration dialog in the Pangea User Console . Enter the Client ID and Client Secret values obtained from the configured OAuth client on the provider into the respective fields.
-
Click Save to close the social login configuration dialog.
-
Use the switch in the provider's row to enable or disable this social authentication option in the end-user interface.
-
Click Save to save the social authentication configurations.
For example:
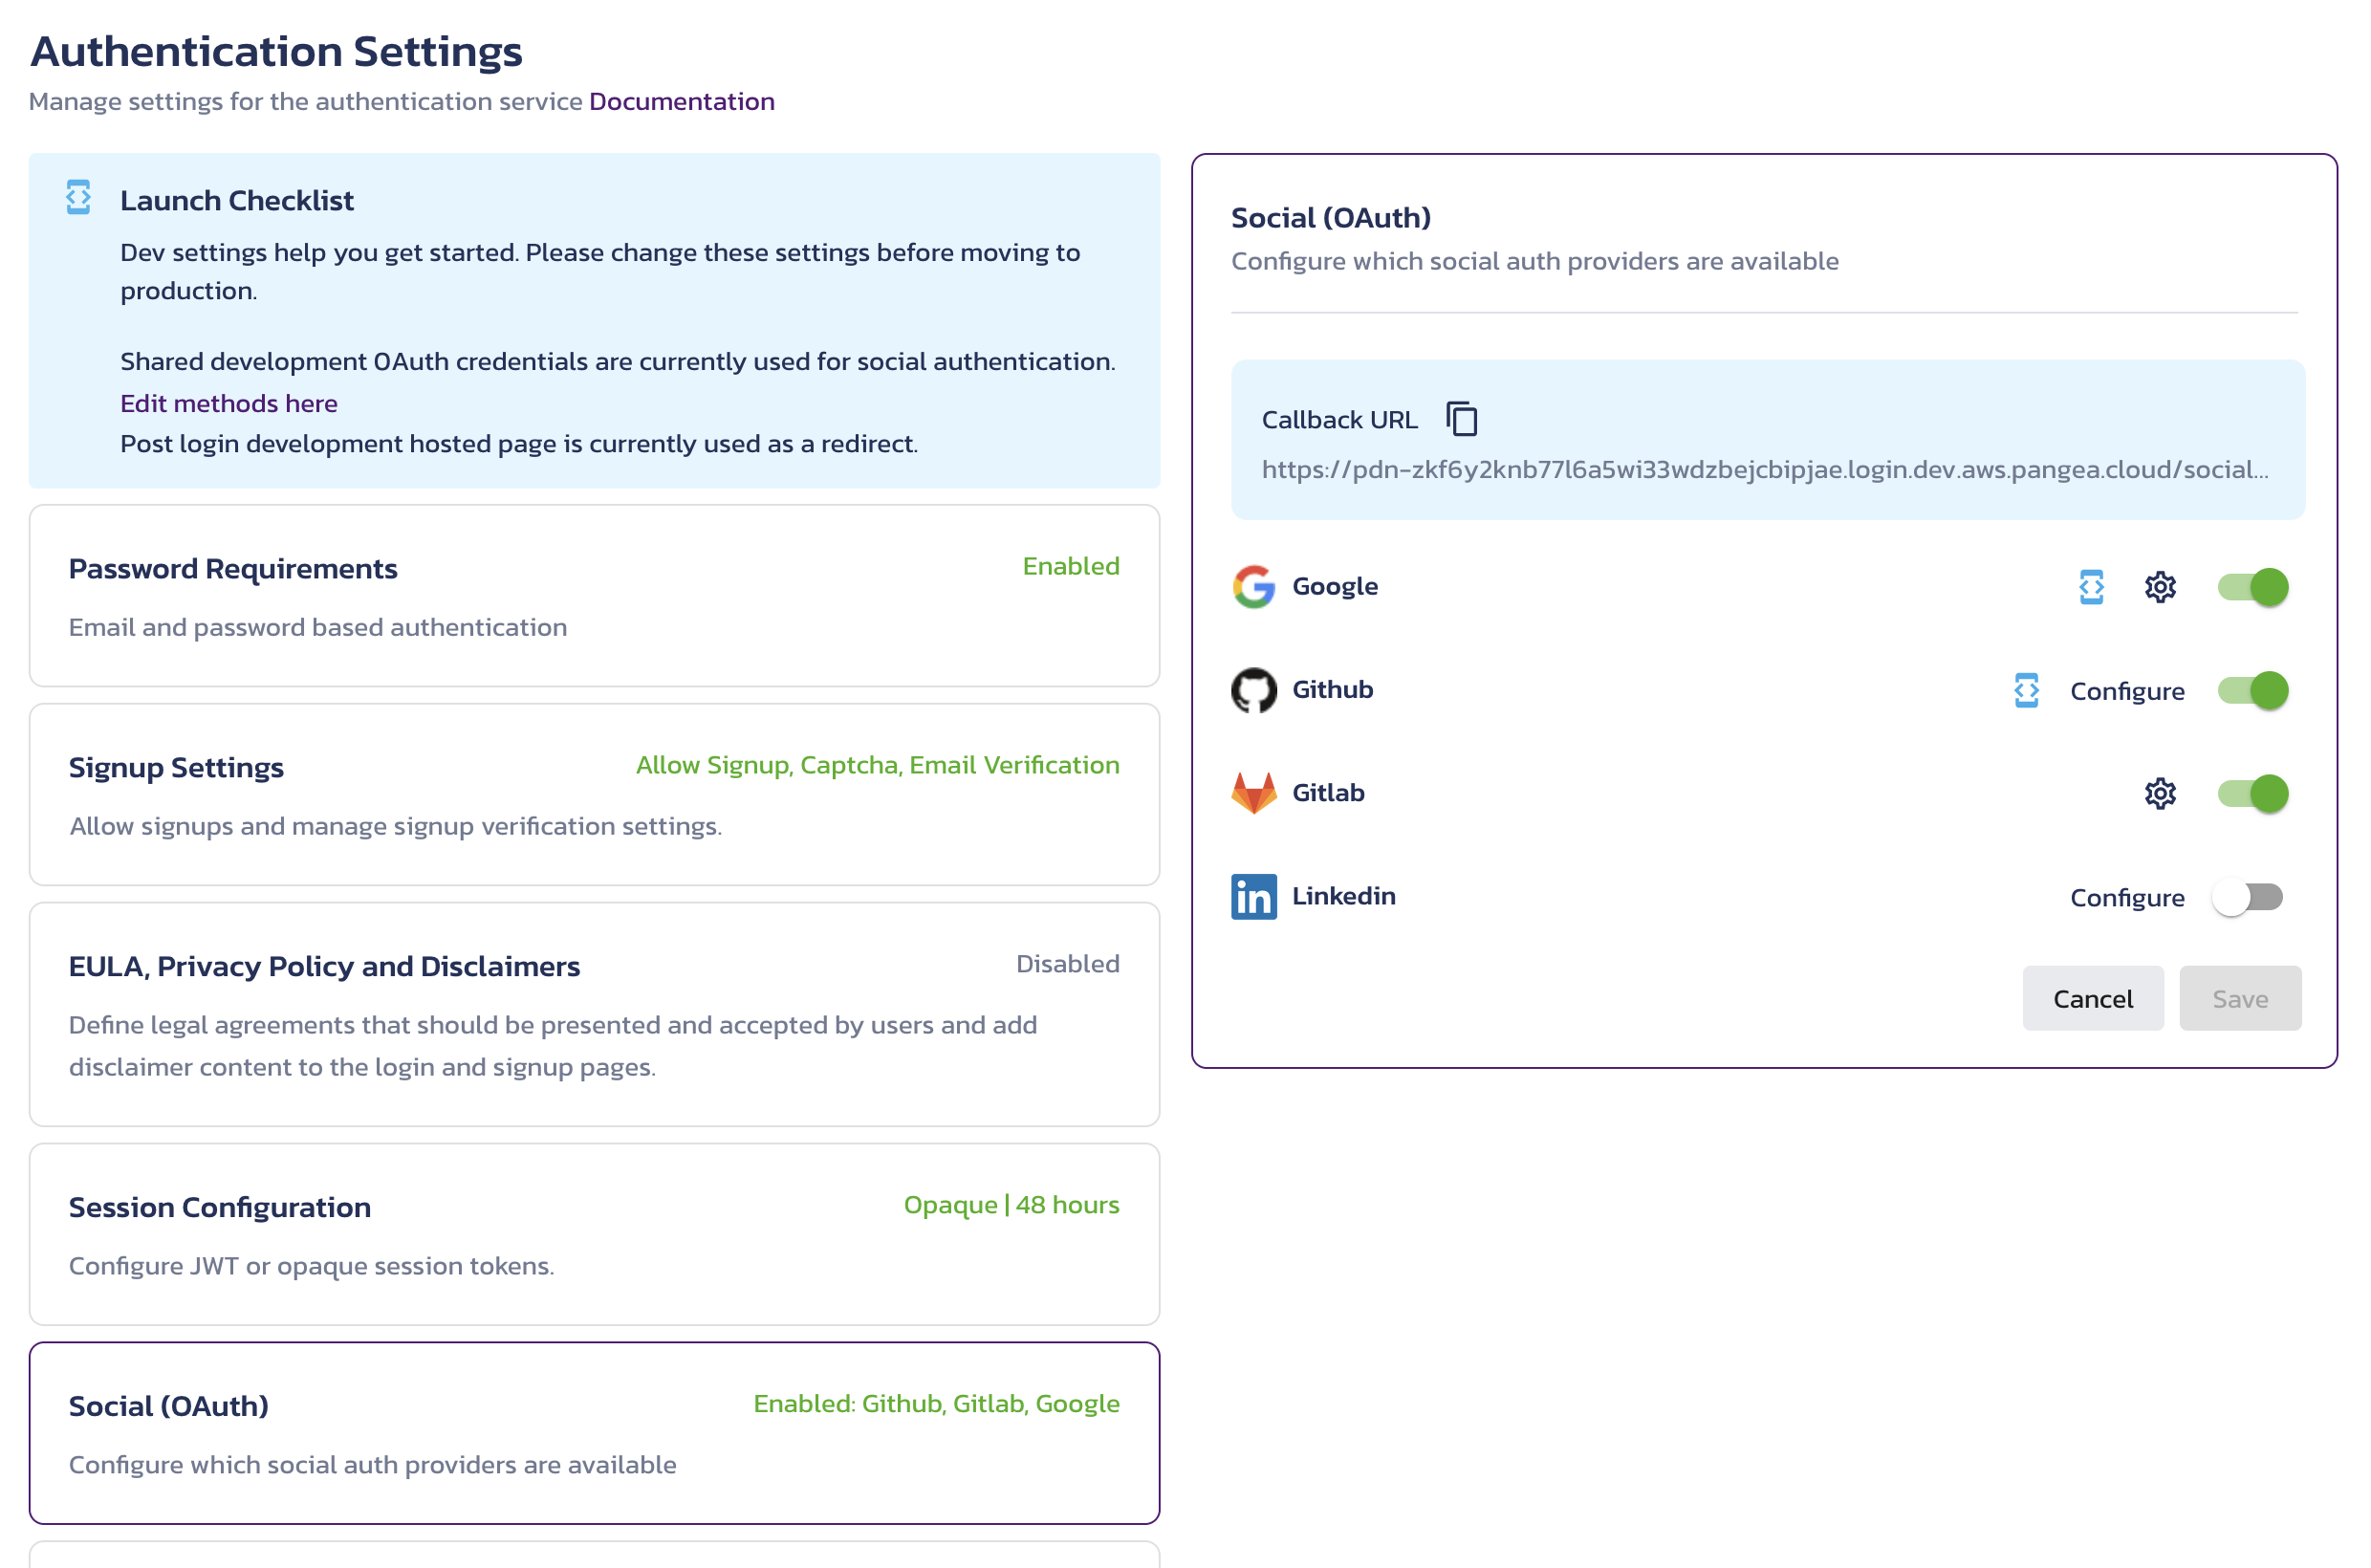
In the Social (OAuth/OpenID Connect) screenshot:
- Google and GitLab are configured with custom OAuth client values, which is indicated with the gear icon.
- Google and GitHub use the development OAuth account, which overrides the custom settings in Google configuration.
- LinkedIn social authentication is not configured, as denoted by the presence of the Configure link on the provider's row. Additionally, it does not offer the use of the development OAuth account. Because of this, the LinkedIn social authentication option is not enabled in the end-user interface in this Social (OAuth/OpenID Connect) configuration.
To revisit the settings of a configured provider, click on the gear icon associated with that provider.
Test OAuth configuration
In the Pangea User Console , click on the Hosted Login link in the left-hand navigation menu. This will open the Log in or Sign up dialog. In the dialog, click on a configured provider option and follow the prompts provided by the selected provider.
After successfully signing in, you will be redirected to your Pangea profile page. On the page, you should see the Logout button, which will allow you to return to the Log in or Sign up dialog if needed.
Most social authentication providers do not allow multiple logins in the same browser session. If you encounter this issue and wish to sign in with a different account, you'll need to either sign out first or open the Hosted Login link in a private browsing session or a different browser.
Profile Fields
The Profile Fields tab is a group of settings that allows you to manage the fields that appear for your users and their profiles. The Profile Fields button under the AuthN General Settings tab has a small green text in the corner indicating the number of fields you currently have enabled for users. Upon selecting the button, a modal appears to the right where you can view and edit all currently enabled and available fields.
Profile Fields settings
Enabled fields will appear at the top, showing the fields you should expect your users to see. Each enabled field has a three-dot icon to the right, giving you options to Edit or Disable the field.
Available fields will appear below the enabled fields, showing a list of fields that can be added to your users' profile screens.
- List of currently available default fields: First Name, Last Name, Phone, Image URL, Name, Given Name, Family Name, Middle Name, Nickname, Profile URL, Picture URL, Website URL, Gender, Birthdate, Time Zone, Locale, Updated at
Add
To add an available field to the list of enabled fields your users will see, simply click the Add button to the right of it. The field will appear in the Enabled list.
Disable
To remove a field from the currently enabled list, click the three-dot icon to the right of it and click the Disable button. The field will move to the Available list.
Edit
To edit an enabled field, select the three-dot icon to the right of it, then click Edit. A modal will appear with the following data for the field:
- Display name - Changes the name that is displayed for your users, though this doesn’t affect the actual field key that references the field across users
- Field key - Indicates a unique field key for mapping
- Type - Indicates the type of input the field expects (text, numeric, etc.)
- Required - Admins can use this to indicate if the field is required or optional for users
- Show on signup - Designates whether the field appears to users on signup (enabled as a default)
Note that fields such as Field key and Type may be grayed out when editing the default list of fields, though all values are editable when creating custom fields (below).
Custom field
To create a new custom field, click the + Custom field button next to the Enabled fields header, then input the following:
- Display name (required)
- Field key (required)
- Type
- Required
- Show on signup
Reorder
To change the order in which the enabled fields appear for your users, click any field by its two-horizontal-line icon to the left of the field name and drag it to the position you desire. Remember to click the Save button at the bottom to ensure the changes take effect.
Redirect Settings
Set up a redirect
When using AuthN, you will need to provide a redirect URL for certain endpoints. Redirect URLs are used to hand off users from the Pangea-hosted AuthN pages back to your app. When an application wishes to start a flow it redirects to a hosted login page passing in a callback redirect URL as a parameter. AuthN validates the URL is in the list of acceptable redirects. When the flow is completed the hosted page redirects back to the URL. The AuthN service will then validate the URL passed into the endpoint against the list of acceptable redirect URLs you configured in the Redirect Settings page.
- If the URL matches one on the list, the AuthN flow will succeed (The Pangea Console allows you to configure one or more redirect URLs)
- If the redirect URL is invalid, then the AuthN flow will fail
If an attacker can redirect users back to their own page after a login flow they could capture your user's tokens.
Redirect URLs accept exact matches, or the asterisk can be used as a wildcard. For example, after a user logs in via the hosted AuthN pages, you may want that user to land on a customized dashboard with a URL similar to:
https://theoffice.work/<location>/dashboard
In this scenario, <location> is a variable depending on how the user logs in. If you only have three locations - scranton, sandiego, and paloalto, you could
provide three exact match URLs. However, this would be impractical, especially if you expect the list of locations to grow or change. To ensure that this
will work no matter the location, you can configure your redirect URL like so:
https://theoffice.work/*/dashboard
Using the wildcard will allow you to match against any values between the slashes.
To set a redirect:
- In the Pangea User Console , click General on the left-hand navigation menu.
- Click Redirect Settings.
- Click + Redirect. A dialog will appear asking you to enter a redirect URL.
- Type the URL and click Save.
Delete a redirect
To delete a redirect:
- In the Pangea User Console , go to Redirects on the left-hand navigation menu.
- Click the minus(-) button beside the redirect URL.
- The redirect is deleted.
Was this article helpful?