Bring Your Own Bucket - AWS
Pangea now offers a Bring your own Bucket (BYOB) method of storage for Secure Share, enabling your application to be more flexible with file storage based on your preferences.
While the Secure Share service gives you the option of managing your application’s files and folders from within Pangea, this method can empower you with the ability to utilize external storage buckets you may be using. The guide below will walk you through one example of this functionality, with detailed steps for integrating a bucket from your AWS console with your Pangea User Console.
By the end of this guide, you will configure your AWS and Pangea console settings for storage integration, create a sample validation file to be placed in your AWS bucket, and verify the setup by accessing the file for Secure Share from within your Pangea console. This guide assumes you already have:
- A Pangea account with the Secure Share service enabled
- If not, refer to our Secure Share setup documentation
- An AWS account with the ability to create S3 storage buckets
- To learn more about buckets, see the AWS S3 documentation
AWS console steps
The following steps will help you configure your AWS bucket so Pangea has the ability to access it.
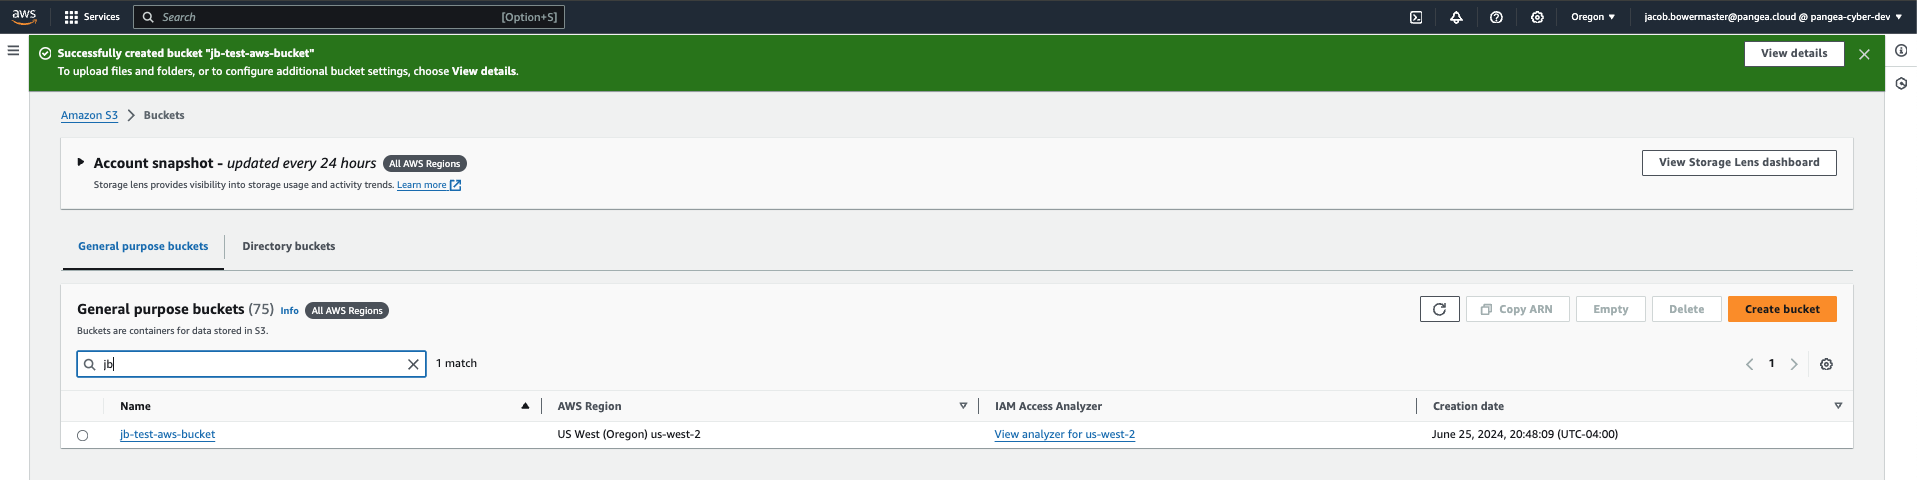
- Log into your AWS console . Use the search bar at the top to search “buckets”. Click the first result to be taken to the Buckets tab of the S3 storage page.
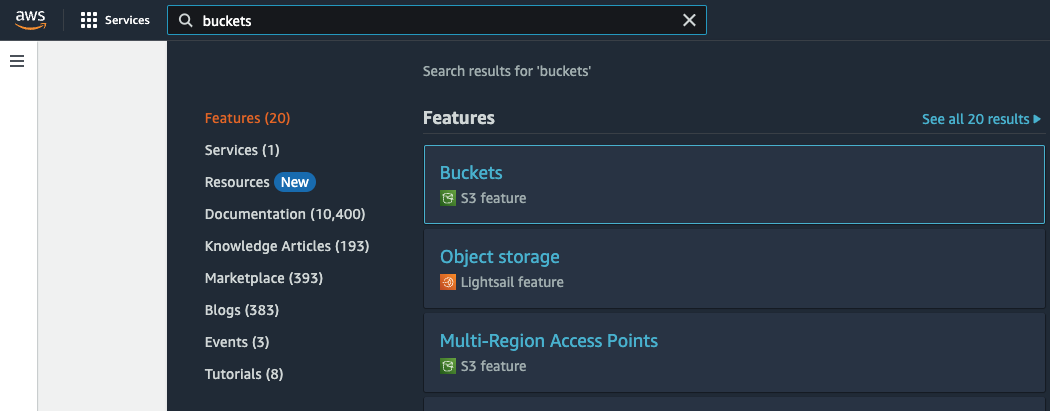
- To create a bucket, select the Create bucket button on the right; you will be taken to the bucket configuration screen (if you intend to use an existing AWS bucket for Share, select it from the list and use the following instructions to verify its settings in the Properties and Permissions tabs).
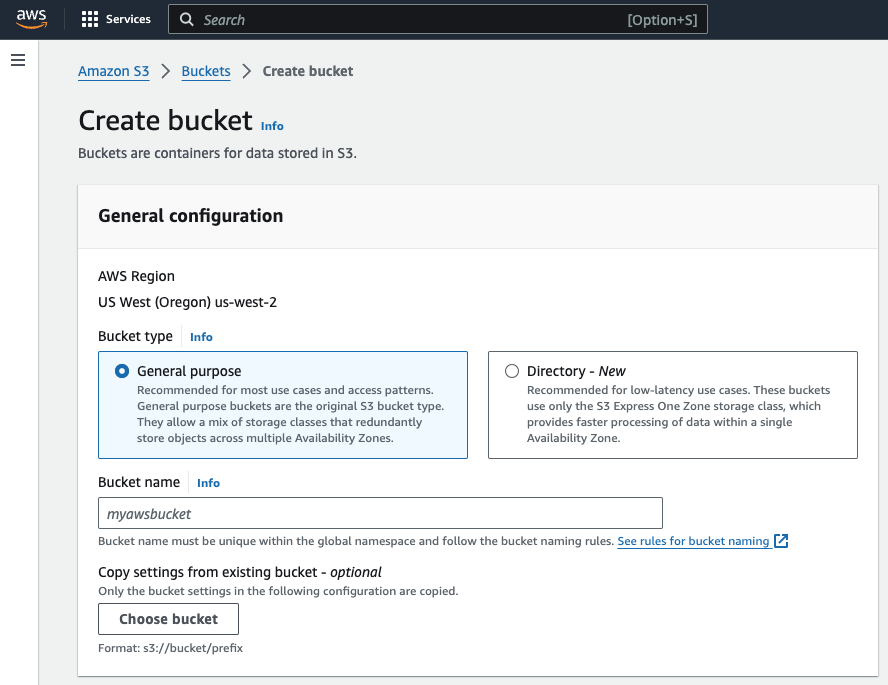
- Bucket type - Leave
General purposeselected - Bucket name - Input a name of your choosing (copy this down for later)
Set bucket and object permissions
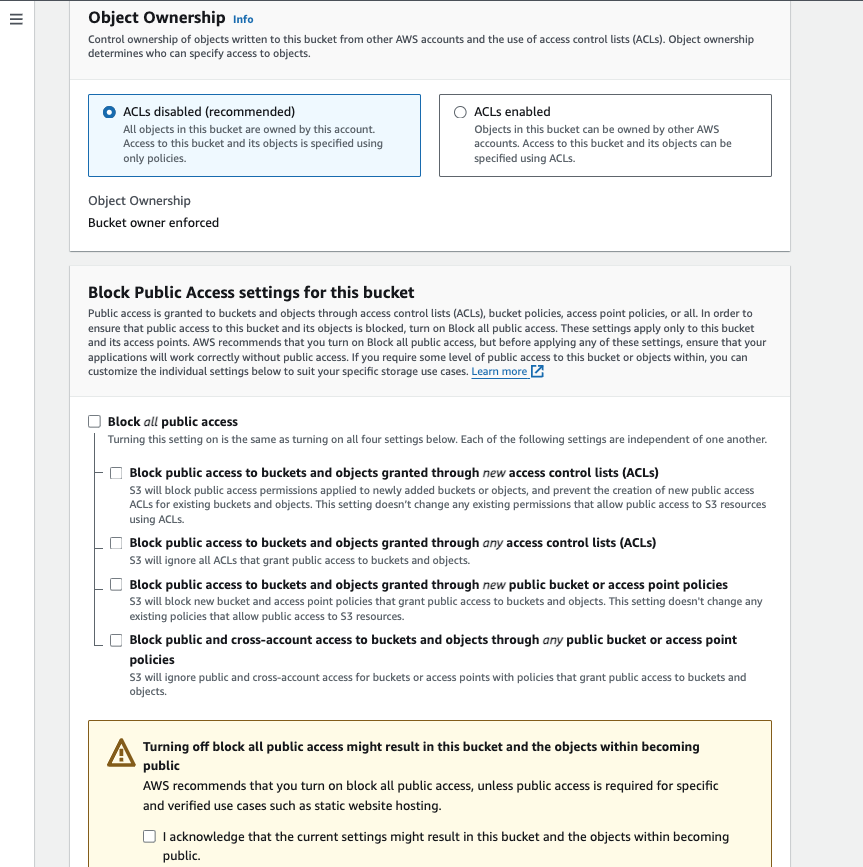
- Object Ownership - Leave
ACLs disabledselected - Public access - Ensure all boxes in the “Block Public Access settings for this bucket” modal are unchecked, then check the acknowledgement box beneath it
- Bucket Versioning - Leave on default
Disable - Default encryption - Leave on default
Server-side…(SSE-S3) - Bucket key - Leave on default
Enable - No need to adjust any Advanced settings for this process
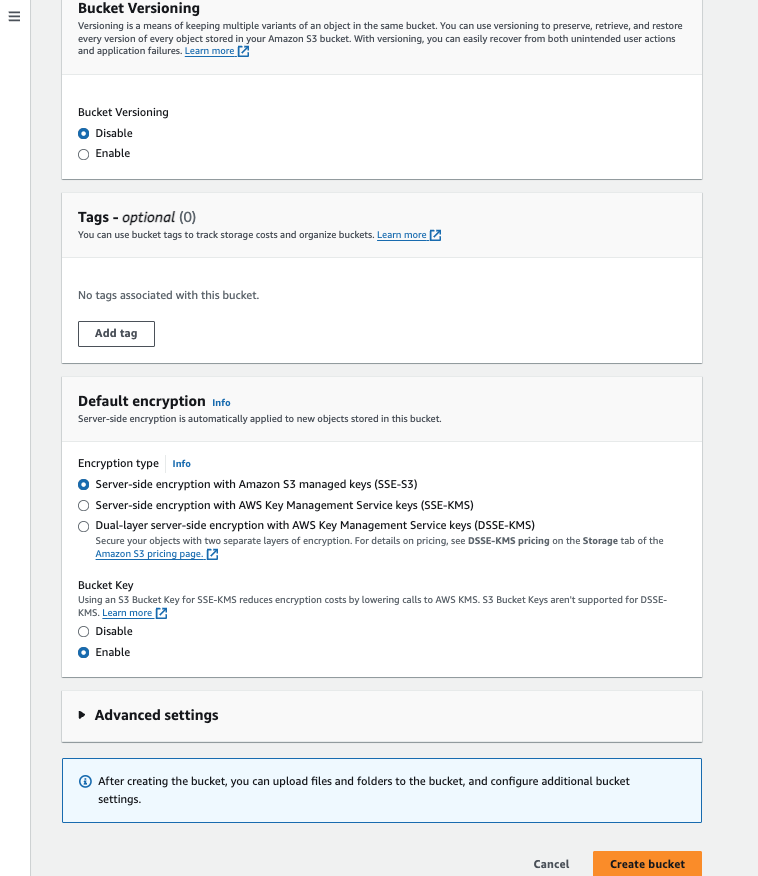
- Select the Create bucket button; you will now be able to search for and view your bucket in the list.
Select your bucket
- Select your bucket by clicking on its name, then navigate to the Permissions tab (beneath the name of your selected bucket at the top).
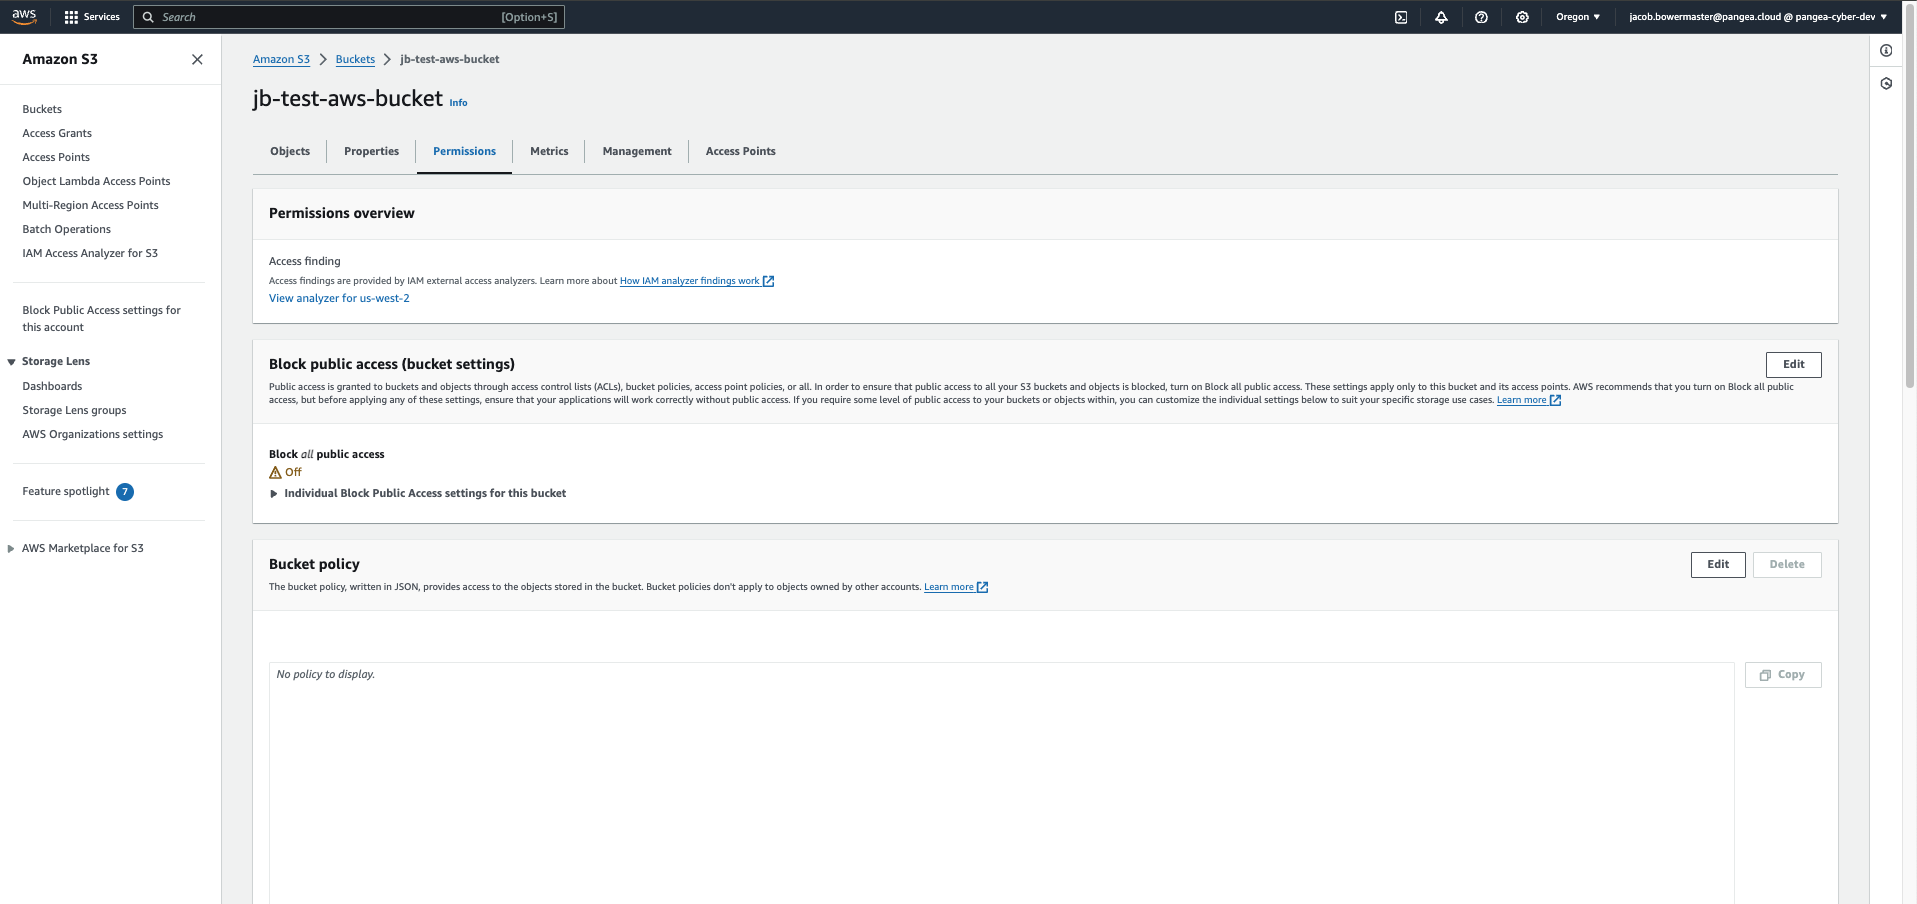
Set bucket permissions
- In the Block public access block, ensure that the bucket is NOT configured to “Block all public access”:
- If it is
Off, continue to step 5 below. - If it is
On, select the Edit button. A window will appear as shown below.

- Ensure all boxes are unchecked and click Save changes. If editing this setting, you will need to type “confirm” in the pop-up dialog and select the Confirm button as shown below.

- Tip - Leave your AWS window open, as you will need to edit more settings throughout the Pangea User Console steps below.
Pangea bucket setup
Once you have completed the steps to configure the bucket for this process on the AWS side, you will be able to designate the bucket as one of your storage options within your Pangea User Console. The steps below will walk you through this process.
You can follow the steps below provided you have already configured the Secure Share service. If you are new to Pangea or Secure Share, please reference its documentation to get started. Once you have initialized Share, return to these steps to finish setting up your AWS bucket.
Pangea User Console steps
- Log into your Pangea User Console .
- Navigate to Secure Share, then click the General tab on the left under Settings.
- Select the first option in the menu - Storage Pools. The modal that appears to the right will show available storage options to use with Secure Share, listing any you have already designated for Share, including the default “Pangea managed bucket”.
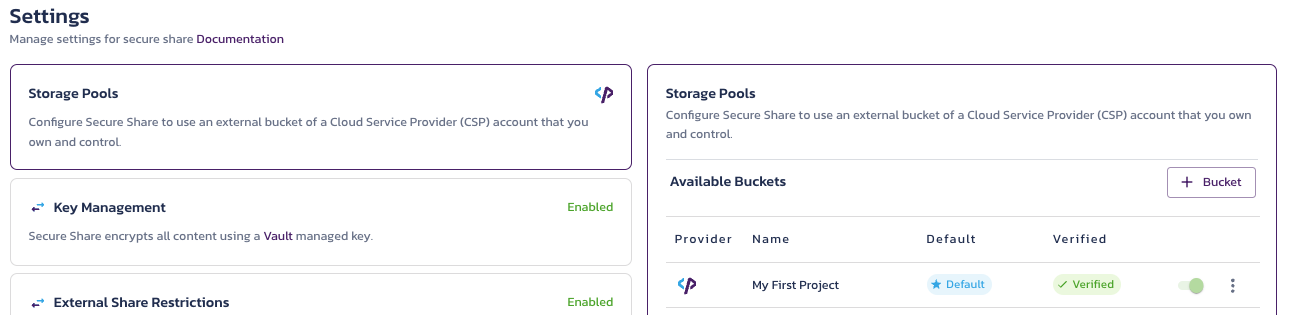
- Select the + Bucket button on the right; a pop-up will appear.
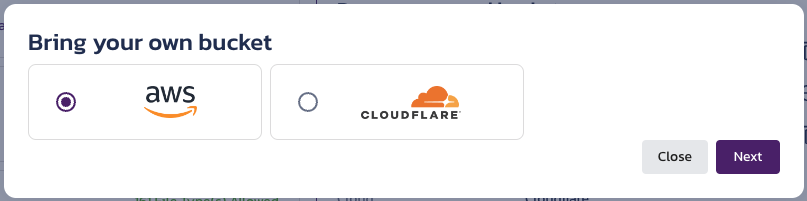
-
Select AWS, then click Next.
-
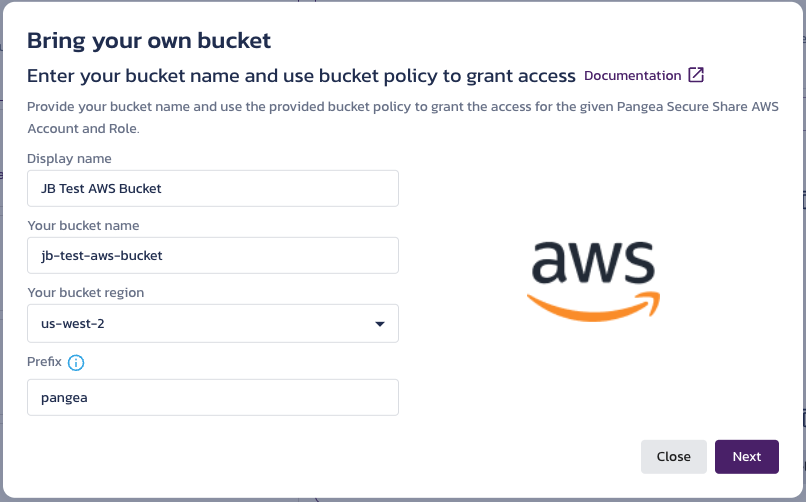
The modal will appear as shown below, where you will need to input the relevant bucket data:
- Display name
- Your bucket name as it will display in your PUC storage pools
- Your bucket name
- For verification, this needs to match exactly as it appears on your AWS S3 bucket
- Your Bucket region
- Can be found in the location dropdown at the top right of your AWS console, e.g., US WEST (Oregon) us-west-2
- A Prefix for bucket contents (we recommend to leave “pangea” for easy identification)
- The folder Secure Share will utilize for everything it needs - Share will not reach outside of the designated folder for any purpose (thus, the folder contents should not be altered)
Enter bucket policy
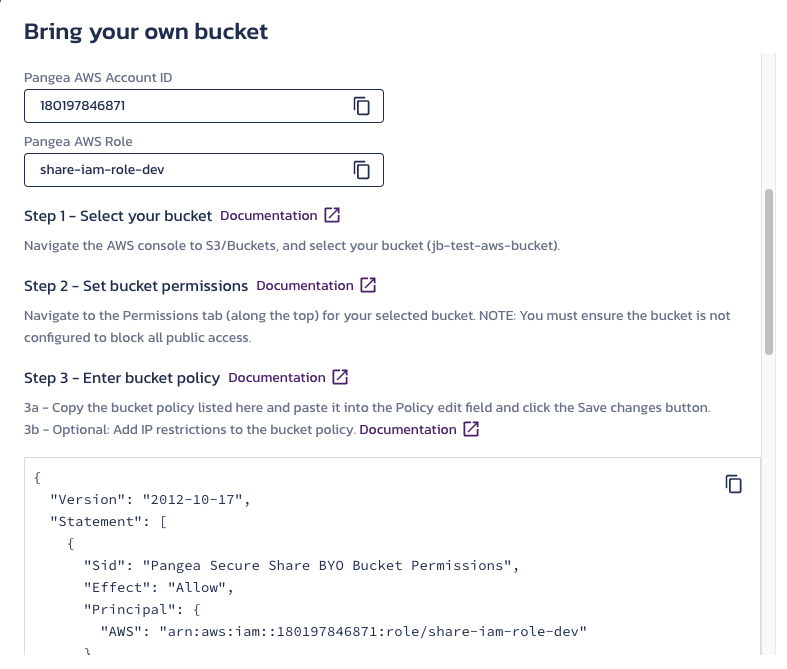
- Once you have completed the form, click Next. A new set of information will appear below, titled “Set bucket and object permissions''.
Follow the three steps to configure and confirm your AWS permissions. A bucket policy will automatically generate with the necessary Pangea AWS Account ID and Role, as well as the bucket name you provided. Copy the policy and paste it into your own AWS bucket policy to grant the appropriate permissions.
AWS bucket policy CLI
The PUC UI also includes an example AWS CLI command to create your customized policy data as a bucket-policy.json file and apply it to your bucket's Permissions if you prefer this over the manual method.
- To run this command, you can do so from either:
- AWS CLI, if you already have this installed on your machine
- Within your AWS console's CloudShell terminal
- To read more about AWS CLI, visit their CLI documentation
Steps to run CLI commands in the AWS console (CloudShell):
- Open your AWS console and locate the CloudShell icon at the top.

- Click the icon, then wait for the terminal to initialize.
- Create the bucket-policy.json file:
- Type
cat <<EOF >bucket-policy.json, then hit enter. - Copy the customized bucket policy from your PUC UI (copy icon in the top right).
- Paste the customized bucket policy into your CLI or CloudShell and hit enter.
- Type
EOFthen hit enter. - Use the copy icon to copy the aws s3api command, then paste it into the CLI or CloudShell and hit enter to run it.
- If successful, you will be able to see the policy in your Permissions tab.
- Type
IP address filtering for your bucket can be achieved via the AWS bucket policy as well. This is an optional setting, and as Secure Share can be used to share files with anyone, anywhere in the world, this is NOT a recommended configuration for BYOB. If you believe this may be beneficial to your configuration, please see more info in the IP filtering section below.
CORS policy
CORS: Things to Know
- Cross-origin resource sharing (CORS) defines if and how client web applications from one domain have access to interact with resources in a different domain.
- A CORS policy, like the one we create for this process, specifies which sites (origins) can do which operations (i.e., GET, PUT, POST, HEAD) to the bucket and its contents.
- Secure Share uses the
pangea.clouddomain, so to prevent errors when using presigned URLs for web app uploads, your bucket's CORS policy needs the properAccess-Control-Allow-*headers to define accessible Origins, Methods, and Headers for its contents. - The origins that will be able to access your bucket are driven by your policy’s "AllowedOrigins". A restrictive CORS policy should only allow:
- All Pangea console and hosted share page locations
- All Pangea Secure Share links
- Any of your own application origins
- Any sites your application may accept uploads from via presigned URLs (e.g. using Pangea’s Share file explorer control where customer-provided callbacks use presigned URLs for handling upload requests)
- For an unrestricted CORS policy, or if you do not yet have a specific set of origins, you can use "AllowedOrigins" : ["*"] in your CORS policy.
- Add the CORS policy to your AWS bucket with the following steps:
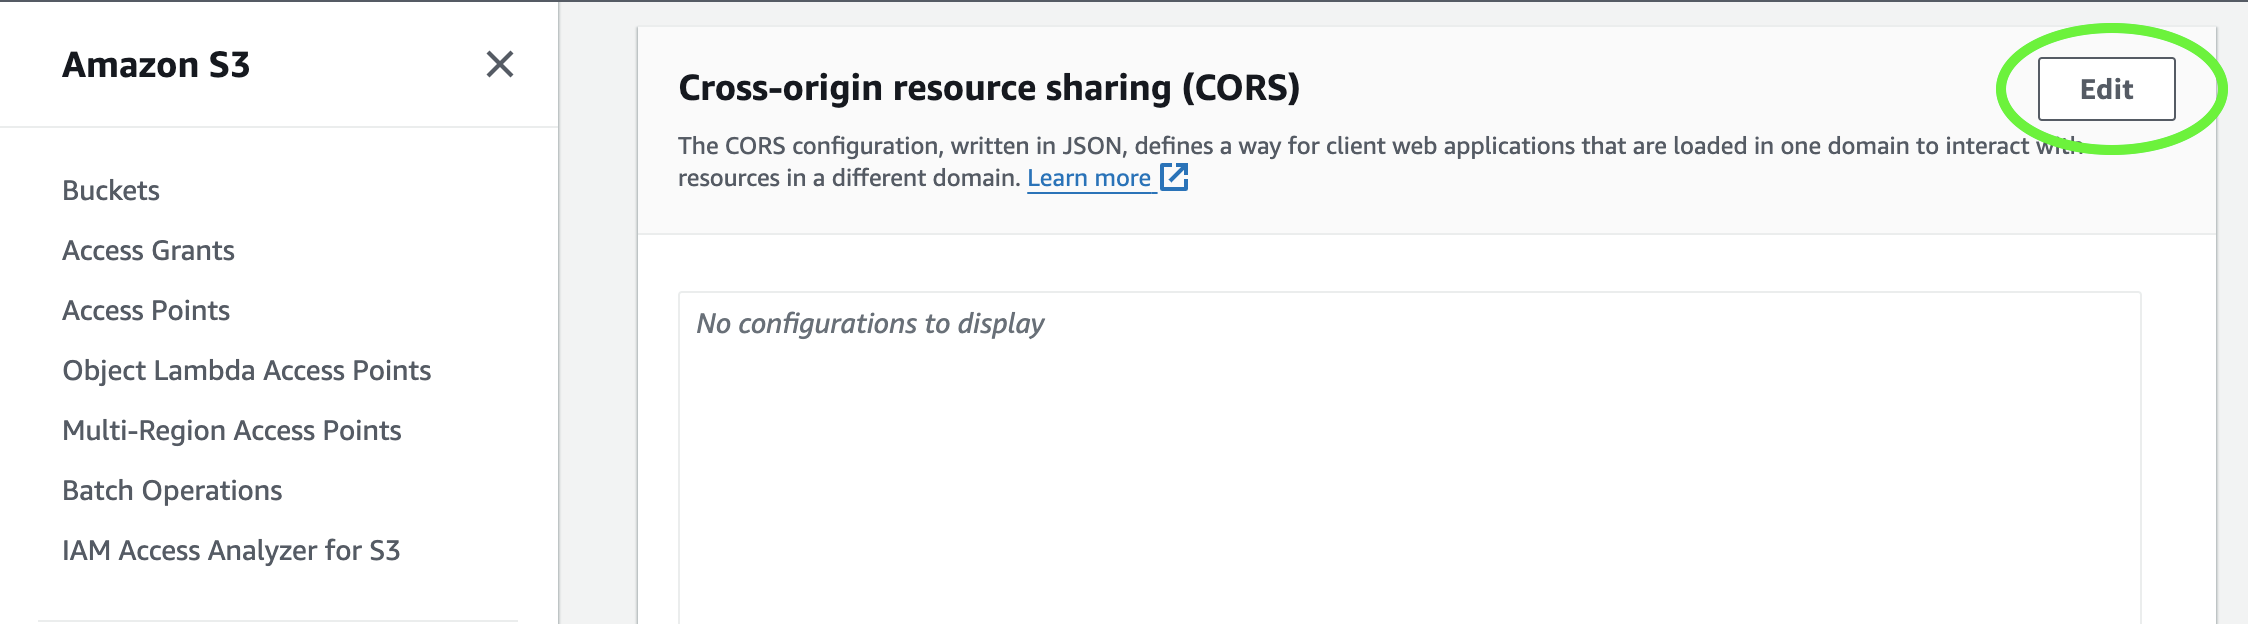
- Navigate to the Permissions tab of your bucket if not there already, then scroll to the Cross-origin resource sharing (CORS) section.
- Click the Edit button.
- Enter the CORS Policy as shown below, using the note above to help determine which origins to include after the two Pangea URLs:
[
    {
        "AllowedHeaders": [
        "content-length",
        "content-type"
    ],
    "AllowedMethods": [
        "POST",
        "GET",
        "PUT"
    ],
    "AllowedOrigins": [
        "https://console.pangea.cloud",
        "https://secure.share.aws.us.pangea.cloud"
    ],
    "ExposeHeaders": [],
    "MaxAgeSeconds": 0
    }
]
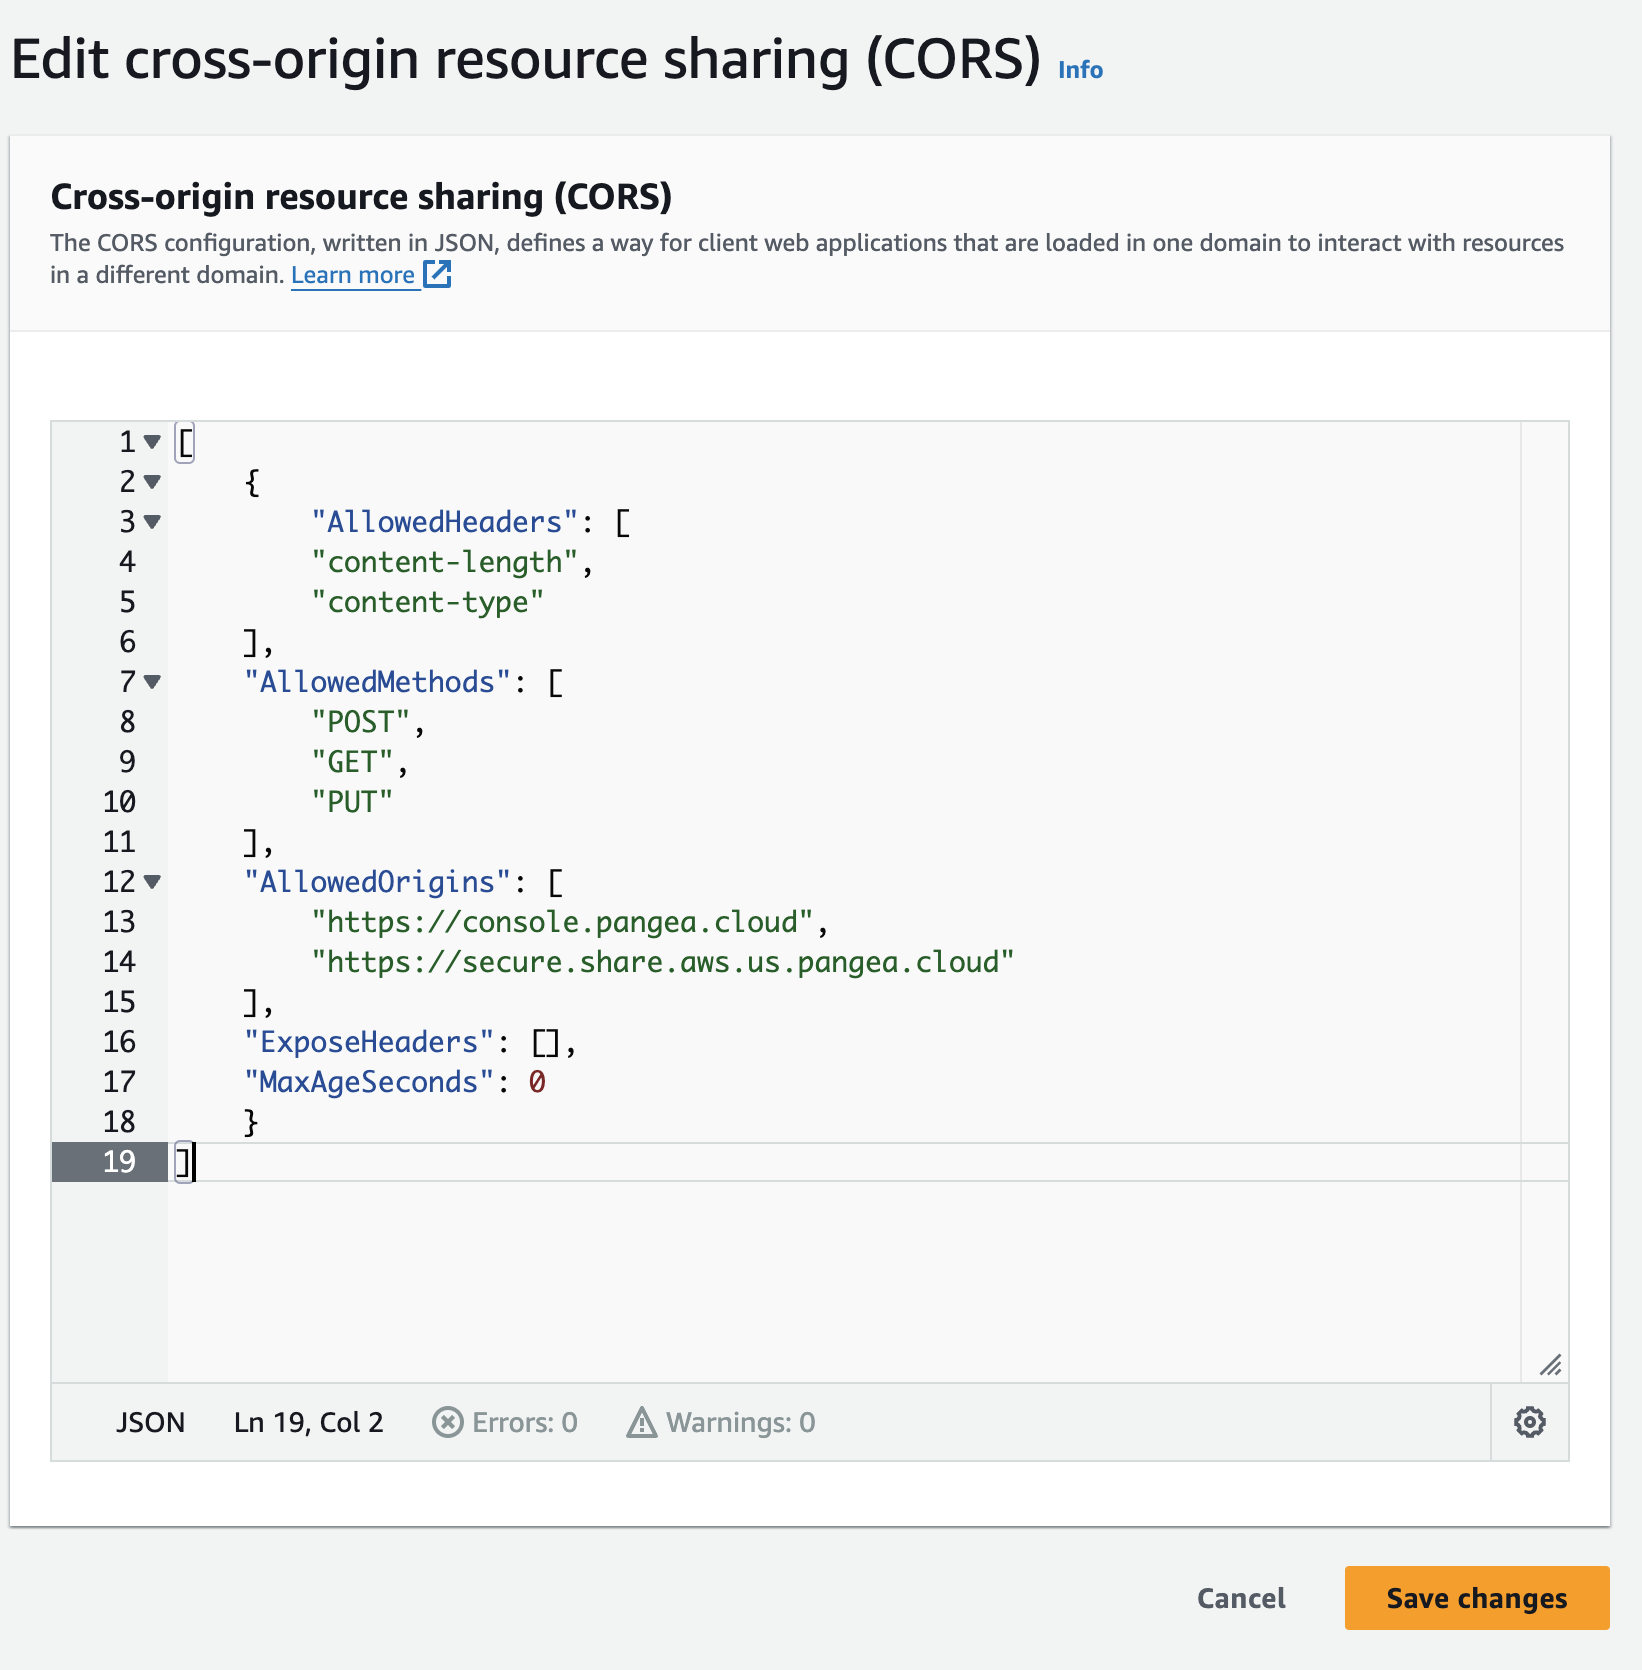
- Click Save changes. You will be taken back to your bucket’s overview page where you can see the newly added policy in the CORS section.
Validation info
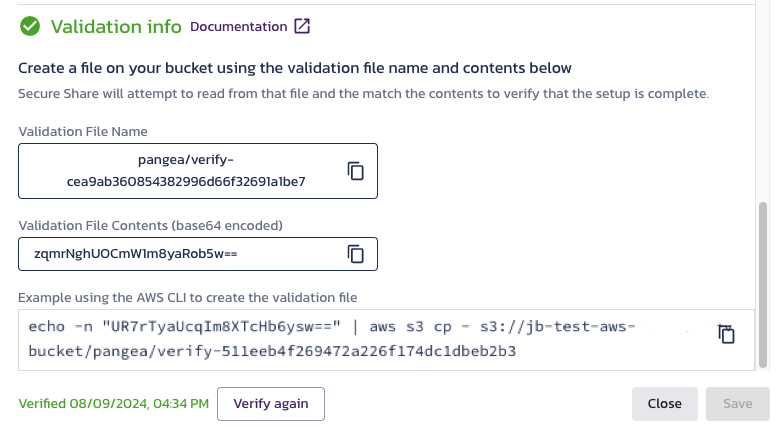
- Continuing through the Pangea User Console BYOB setup page, you will see a section titled “Validation info” that shows the Validation File Name and Validation File Contents. Secure Share will verify that the given bucket information and policy has been configured properly by downloading and matching the contents of the validation file using the given Validation File Name and Validation File Contents. If the validation fails, please verify that the bucket name, region, bucket configuration, and policies are correct.
AWS validation CLI sample
Your Validation File Name and Contents are available for manual copy-and-paste, however, the easiest and error-proof method for validating the file is running the customized CLI command we provide.
As noted above, to run CLI commands in AWS:
- Open your AWS console and locate the CloudShell icon at the top.
- Click the icon, then wait for the terminal to initialize.
- Go back to the instructions in your PUC Storage Pool setup and copy the CLI command by clicking the copy button
- Navigate to your AWS CloudShell terminal, then paste and hit enter to run the CLI command.
- If successful, you will be able to see the file in your bucket (Objects tab).
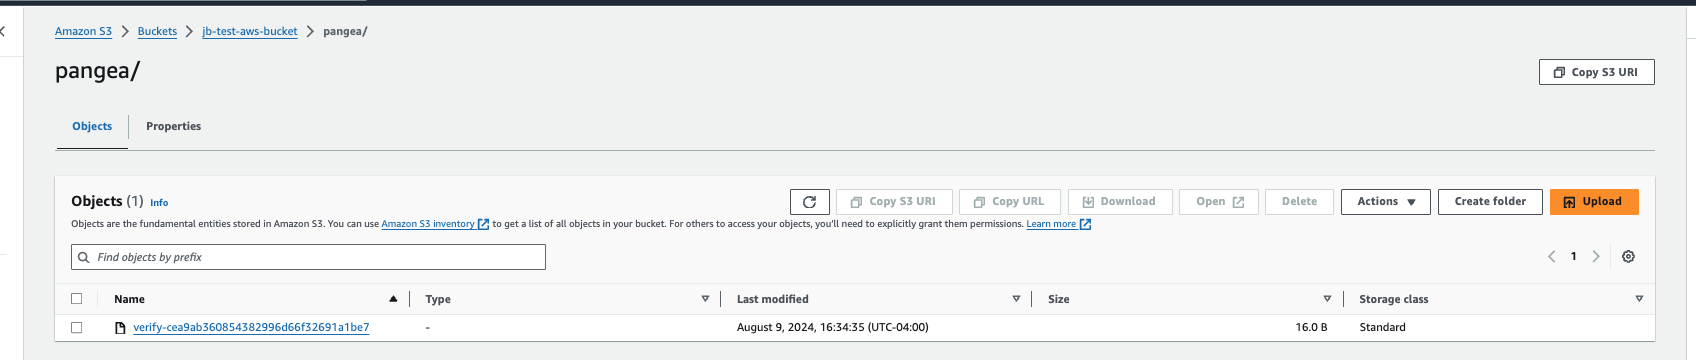
- Once the validation file is in your AWS bucket, return to the modal and click Verify.
- If successfully verified, you will see “Verified (timestamp from when you last verified)” to the left of the Close and Verify buttons (Verify becomes a Verify again button in case details regarding your bucket have changed).
- Select Close and return to the Storage pools screen, where you will see the bucket’s verification status along with any other storage pools you have.
If you encounter any errors and the bucket cannot be validated, please verify all of the steps in the UI were properly completed. Validation errors can occur due to any of numerous reasons, including:
- Validation file doesn't exist or file name does not match exactly between PUC and AWS
- Validation file contents are incorrect
- Block Public Access settings are not configured properly
- Bucket name mismatch between PUC and AWS
- Incorrect AWS region
- Bucket policy has missing or incorrect data
Using the bucket
You now have an external bucket integrated with Pangea as an external storage pool - congratulations! Use the screenshot and descriptions below to explore what the buttons in your PUC are used for.
![]()
Enable your bucket (1)
- Storage pool buckets can be enabled or disabled.
- Only enabled buckets are usable in your PUC or APIs.
- To enable a bucket, select the toggle on the far right of the other icons.
- Buckets must be verified before they can be enabled.
- Enabled buckets will show a green toggle (1b).
Edit bucket details (2)
- Select the three-dot icon on the very right of the bucket row, then click Edit (pencil icon).
- This can be used to make changes to the bucket name, policy, etc.
- Be sure to re-verify and save changes if any changes are made.
Copy the bucket ID (3)
- Select the three-dot icon on the very right of the bucket's row, then select Copy ID (copy icon) from the dropdown.
- Clipboard icon next to ID
Remove a bucket (4)
- Select the three-dot icon on the very right of the bucket row, then select Remove (trash icon).
- A pop-up will display, prompting you to confirm bucket deletion by typing its exact (case-sensitive) name, then clicking Remove. The bucket should no longer appear in your list of “Storage Pools”.
- Enabled buckets cannot be removed; you must first disable a bucket before the Remove menu item becomes enabled.
- The Pangea bucket cannot be removed.
- When a bucket is removed, all of its Secure Share content is also removed.
Set your default bucket (5)
- The Storage Pools feature allows you to set a default bucket for Secure Share, which will be used for your Share operations.
- To select a default storage pool for Secure Share, click the Make default button in the Default column for any verified bucket; the button is grayed out (5b) until the bucket has been verified.
- Secure Share APIs accept an optional bucket ID parameter; if the bucket ID parameter is not specified, the default bucket is used.
Advanced settings
IP restrictions
Important considerations before restricting IPs
One of the key values Secure Share provides is the ability to share files with anyone, anywhere in the world. Therefore, to utilize the service to its full potential for your application, we generally recommend that you do NOT use this IP filtering feature unless you have considered all of the following:
- You are familiar with the implications of IP restriction
- You have an organizational requirement to have all potential IP addresses (including end users to be shared with) previously defined or constrained to a corporate network/VPN
- There is no potential for new internal or external users to utilize your application with an IP address that is unknown or outside of the defined list in the policy
Pangea IPs (CSP/Region IP):
- AWS/US-WEST 54.176.53.52/32
- AWS/US-EAST 3.223.13.213
- AWS/EU 3.66.126.22/32
- GCP/US 34.83.183.134/32
- GCP/EU 35.241.162.165/32
To add IP restrictions to your bucket in AWS:
-
Your app and Share usage, including every end user to be potentially shared with, have a requirement to be constrained to an array of addresses within a corporate network/VPN
-
Your use case necessitates an IP whitelist of previously defined addresses that is not subject to change over time - if there is any potential for future users to have access issues due to their IP not being previously known, we recommend to NOT use this configuration.
-
Navigate to your AWS S3 bucket used for BYOB.
-
Go to the Permissions tab, then scroll to the bucket policy section.
-
Click Edit. You will need to add the IP restrictions to your existing policy, as shown in the example below. We have provided a list of Pangea addresses in the note above, which you will need to include based on your region if using restrictions.
{
"Id": "SourceIP",
"Version": "2012-10-17",
"Statement": [
    {
        "Sid": "SourceIP",
        "Action": "s3:*",
        "Effect": "Deny",
        "Resource": [
        "arn:aws:s3:::<your bucket>",
        "arn:aws:s3:::<your bucket>/*"
    ],
    "Condition": {
    "NotIpAddress": {
        "aws:SourceIp": [
            "11.11.11.11/32",
            "22.22.22.22/32"
        ]
    }
    },
    "Principal": "*"
    }
    ]
}
Pangea IP addresses, to ensure you allow Pangea activity based on your region:
CSP/Region IP
- AWS/US-WEST 54.176.53.52/32
- AWS/US-EAST 3.223.13.213
- AWS/EU 3.66.126.22/32
- GCP/US 34.83.183.134/32
- GCP/EU 35.241.162.165/32
For more information, including how to navigate this process to ensure you do not accidentally lock down the bucket from being accessed, reference the aws:SourceIP section of this AWS article.
If you came to this section from step 5 of the setup above, click here to return to where you left off in the guide once you have completed editing your bucket policy (be sure to leave an AWS tab open as you will need to edit the policy further as you go through the Pangea User Console steps).