Building a Secure Cloudflare Pages App
This tutorial will guide you through the integration of Pangea
AuthN, Secure Audit Log, and Secure Share services on top of Cloudflare Pages .The goal of this tutorial is to have your app up and running in under an hour, featuring a secure, state-of-the-art authentication system and platform to deploy your next big project.
Cloudflare Pages
Cloudflare Pages is a JAMstack edge platform that allows you to deploy many different types of apps using Cloudflare's distributed CDN . This means your app can be deployed regionally anywhere in the world so that your users can quickly access your service without having the request bounce back and forth across oceans.
JAMstack is a deployment paradigm where the web experience is deployed separately from the business logic of an app, making it easier to scale in certain cases. Common types of apps deployed this way include landing pages, blogs, forums, documentation sites, e-commerce using headless offerings, etc. Almost any app can be deployed using this methodology, but as with everything in tech, it varies between use cases.
Why use Pages?
With Pages, you can create an app in one click, push it to a git repository, and make your changes in a live environment.
Some of the included features:
- Certificates are both provisioned and managed by Cloudflare
- Runtime is auto-scaled
- Preview (staging) and Production environments out-of-the-box
- A myriad of in-house services, such as object storage, databases, streaming, etc.
- A generous free-tier
- End-to-end observability
Cloudflare also has a proxy service that can help mitigate DDOS & MITM attacks at the network layer.
Pangea Services
AuthN
Pangea AuthN service is a state-of-the-art authentication system supporting all modern authentication protocols, including:
- Traditional password-based login
- Passkeys for passwordless login
- Single Sign-On using SAML
- MFA using SMS auth codes
- Time-based one-time password (TOTP)
- Magic Links
- Identity aggregation
Pangea authentication service also comes bundled with intelligence services, helping to keep your app secure and ensuring your users are not bots or at-risk. Our bundled intelligence services include:
-
Embargo - Restricts access based on a user's geolocation
-
User intelligence - Detects password breaches or compromised user Personal Identifiable Information (PII) data
-
Malicious domain detection - Identifies and blocks activities associated with known malicious domains
After enabling bundled intelligence services using the toggles in the Security Controls page, no additional work is required.
Hosted login
Pangea AuthN service also offers a customizable hosted login page which allows you to quickly add authentication to any app.
Secure Audit Log
Pangea Secure Audit Log service is a tamper-proof record of important system events, including database access logs or any bespoke events that need to be tracked for security and/or provenance reasons, such as logging a chain of custody digitally, similar to blockchain. Pangea audit service also publishes its cryptographic verifications periodically to multiple 3rd party services including blockchain. You can read more about it here.
In this tutorial, you'll be using Secure Audit Log for events associated with authentication and accessing the Pangea Secure Share service, introduced below.
You will be tracking the following events:
- File uploads, deletes, accesses
- Magic Link Creation
- Sign-ups
- Sign-ins
Secure Share
Pangea Secure Share service is a secure file transfer system designed for applications to support authorized upload and download of files. Its browser-based user-facing features enable secure storage, sharing, and requesting of these files.
Files stored in Secure Share are encrypted on top of the default encryption provided by the underlying cloud storage. By default, the encryption process uses Vault, but can also support developer-supplied keys. Additionally, individual files can be encrypted with a password, which is never stored and required for decryption.
Secure Share is integrated with File Scan to prevent the storage of any files detected as malware.
By default, integration with the Secure Audit Log service is enabled, and file access events are logged.
You will be using Secure Share to give users the ability to share files in your app.
Storage Pools
Secure Share lets you use Cloudflare R2 and other cloud storage options. Refer to the Storage Pools documentation to learn how to customize your storage in Secure Share General settings in the Pangea User Console .

Bring Your Own Bucket to the Secure Share Storage Pools
App Requirements
Now that you understand the basic high-level offerings of these two platforms, you should verify they meet the needs of what your app intends to accomplish.
These are the requirements:
- Deployment without having to write a bunch of scripts or manage infrastructure
- Sign up and log in with MFA and email
- Redirect unauthenticated users to hosted login
- Show a protected page when they log in
- Upload files to share with other users
- Track users that have accessed uploaded files
- DDOS protection to avoid going bankrupt
In this tutorial, we will only cover a basic implementation of authentication, audit log, and file-sharing functionality.
Note that you can also easily integrate other Pangea Services.
Considerations
Pangea is not yet fully integrated with Cloudflare's standard authentication platform. As of April 23rd, 2024, Pangea does not yet support being an OpenID Connect (OIDC) Provider , but will soon. Once Pangea AuthN supports being an OIDC provider, we can directly integrate with Cloudflare Zero-Trust/Access.
We've decided to go with cookies in our bettertransfer.dev app as a way to access static content without needing to include a JWT in each request. JWTs are a common approach in JAMstack Single Page Applications (SPA), but cookies also allow us to easily fetch media, such as images, without needing to URL.createObjectURL fetch each. In this tutorial, we will stick with session tokens to keep things simple.
Pangea Offerings:
- Sign up and log in with MFA and email
- Secure storage with either a hosted storage backend or a user-managed backend, such as Cloudflare R2 or S3
- Tamper-proofed secure audit logging for tracking which users access files
Cloudflare's Offerings:
- Fully-managed JAMstack deployments
- DNS-level proxy to prevent DDOS attacks
- R2 storage backend with CDN support
- One-click CI/CD configuration
- Global CDN
Building the App
This tutorial is based on specific versions of software packages as of April 23rd, 2024. Please note that changes to these packages may have occurred since this guide was written. As a result, some instructions, functionalities, or code snippets may not work with future versions of the packages.
Prerequisites
-
Node.js >= v20.11.1installed, we recommend using NVM -
A custom domain for your app purchased through any domain registrar
A complete list of domain registrars can be found here . This sample app uses GoDaddy .
Note that you don't need a custom domain to run the app locally.
-
macOS or Linux
Set up Cloudflare Pages
npm create cloudflare@latest transfer-app -- --framework=next
This runs the npm create command. You can find more information here . It generates a Next.js app that can be deployed to Cloudflare Pages .
After running that command you will receive a prompt. Here's how to answer:

- Opt out of using
ESLintsince linting is out of the scope of this post. - Opt out of using an
srcdirectory to simplify this process since Cloudflare'swrangleris the tool managing deployments. It would also require extra configuration work for a/pagesdirectory. - Pangea internal components for file upload and audit logging both use MUI so you do not need Tailwind here, although both can live together harmoniously.
You can choose to deploy the app immediately by selecting Yes for the final prompt, but that is optional. The focus of this tutorial is local development, so select No.
Verify that the template is working and running properly:
cd transfer-app
npm run dev
Create a free Pangea account and configure AuthN
Go to the Pangea Cloud website and sign up for your free account.
Create an account, and it will walk you through the steps to create your new Pangea project.
Select AuthN when asked to start with a common service and follow the prompts.
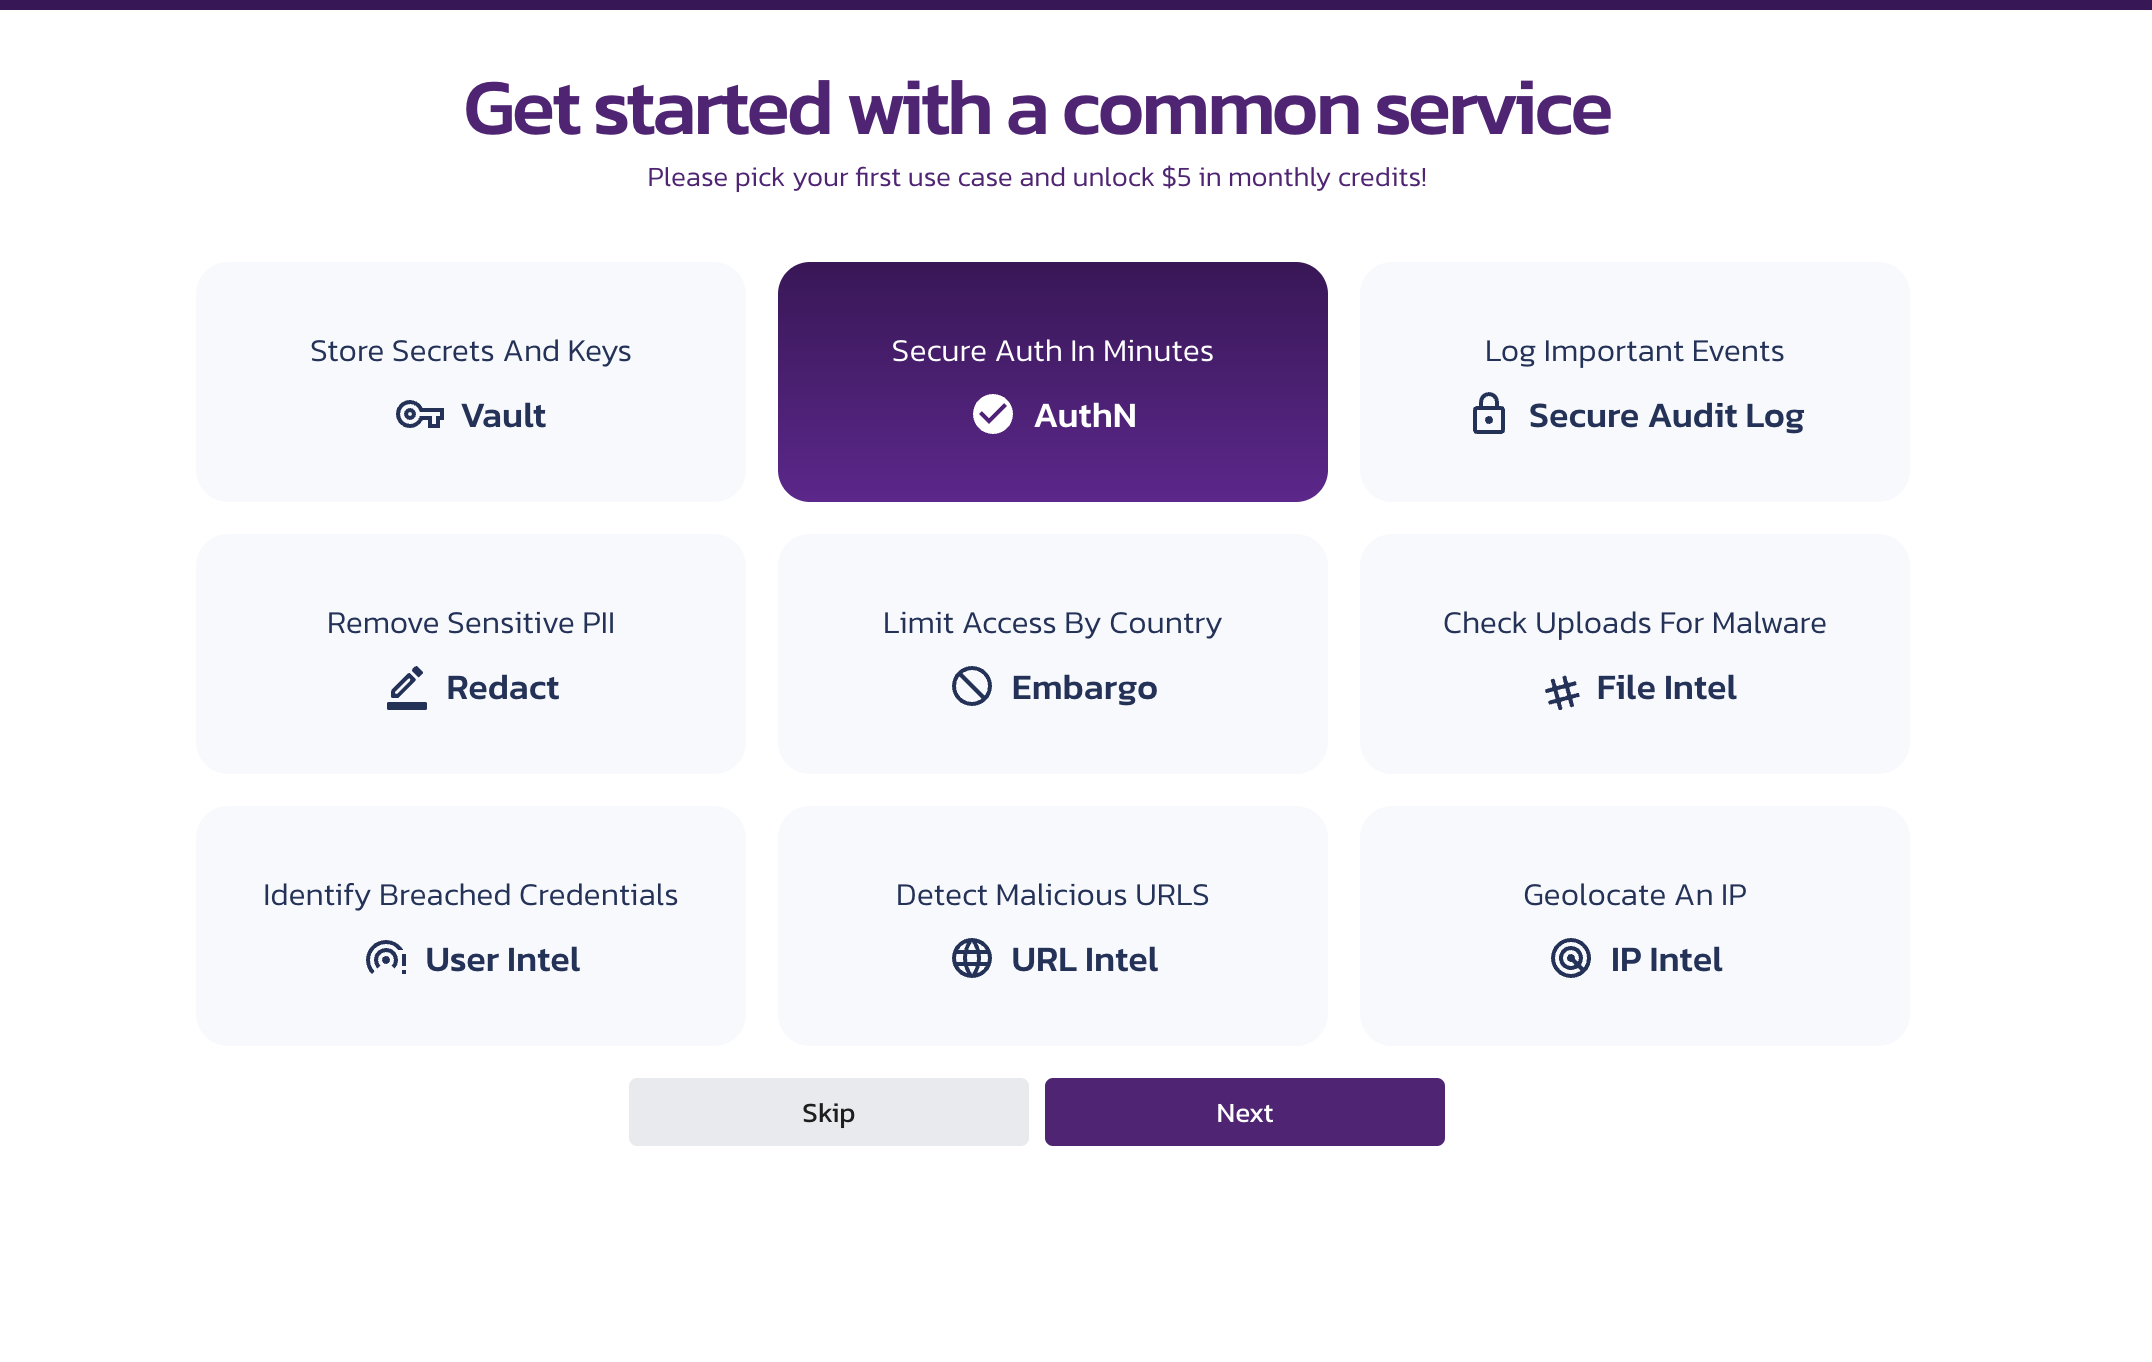
After completing the wizard, you will be taken to the Pangea User Console Dashboard. Select AuthN in the left-hand navigation sidebar.
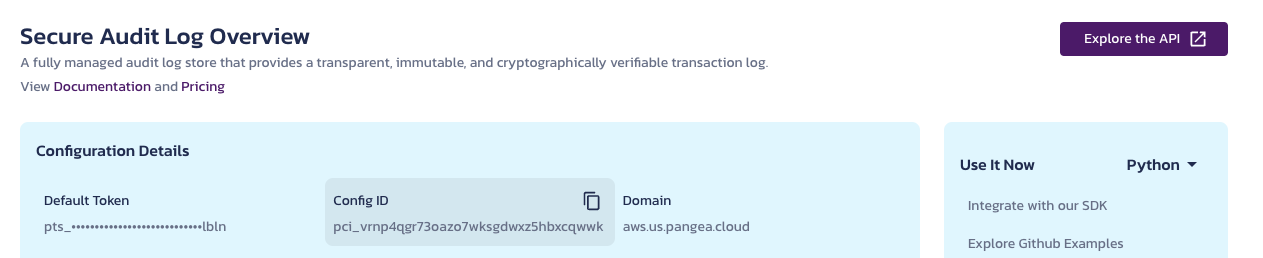
The service overview page should look like this:
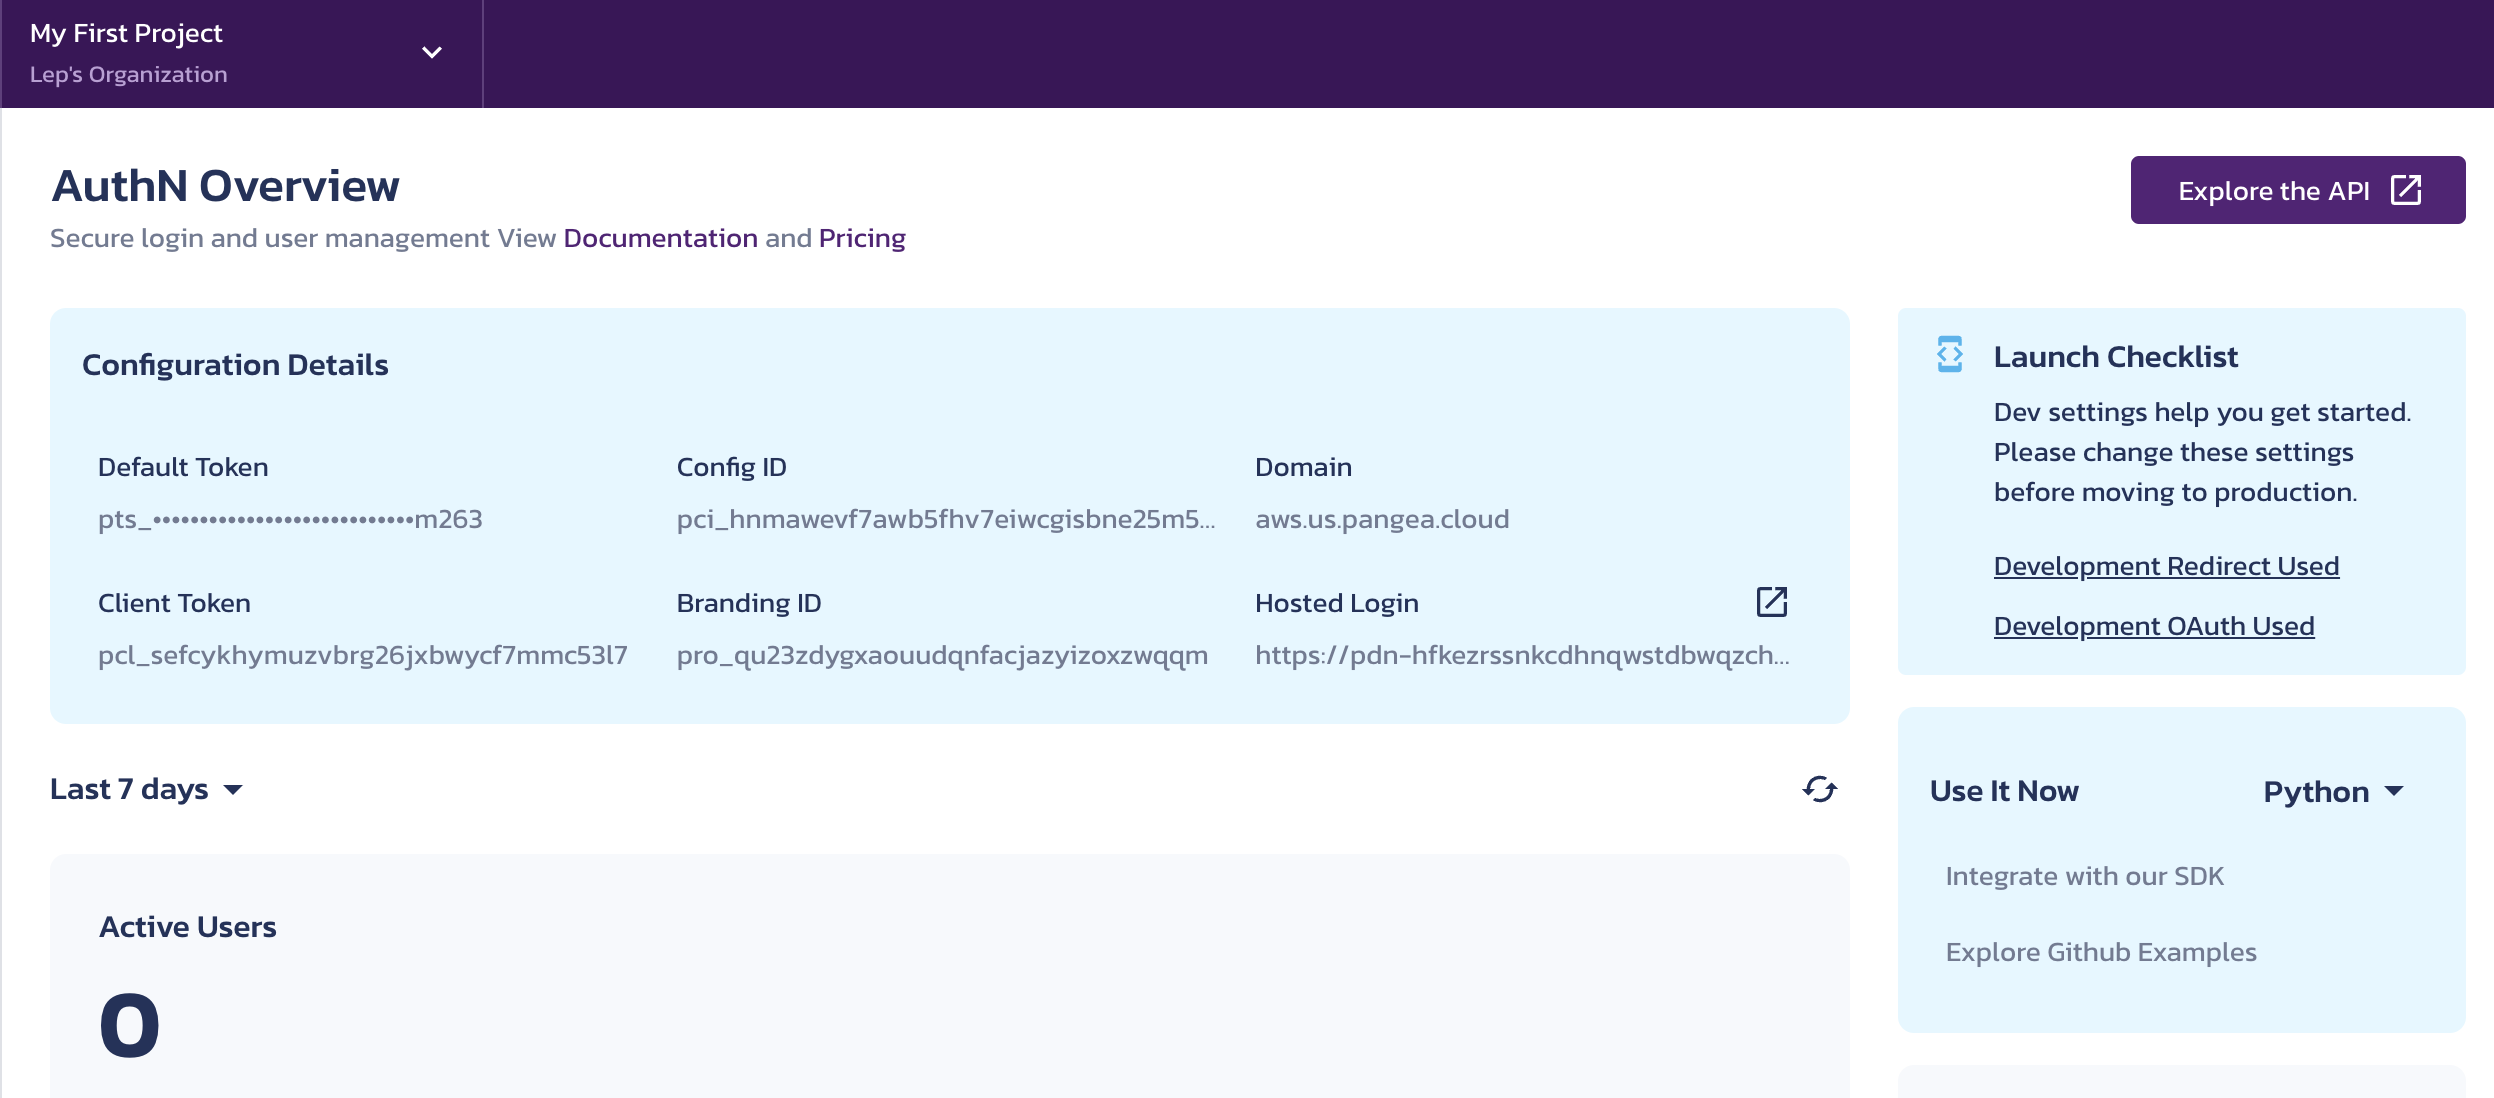
You will need these values when you start coding the app.
Click the General tab and scroll down to Redirect (Callback) Settings.
Click the + Redirect button and add the following URL: http://localhost:3000, which will allow the hosted login page to redirect back to your app.
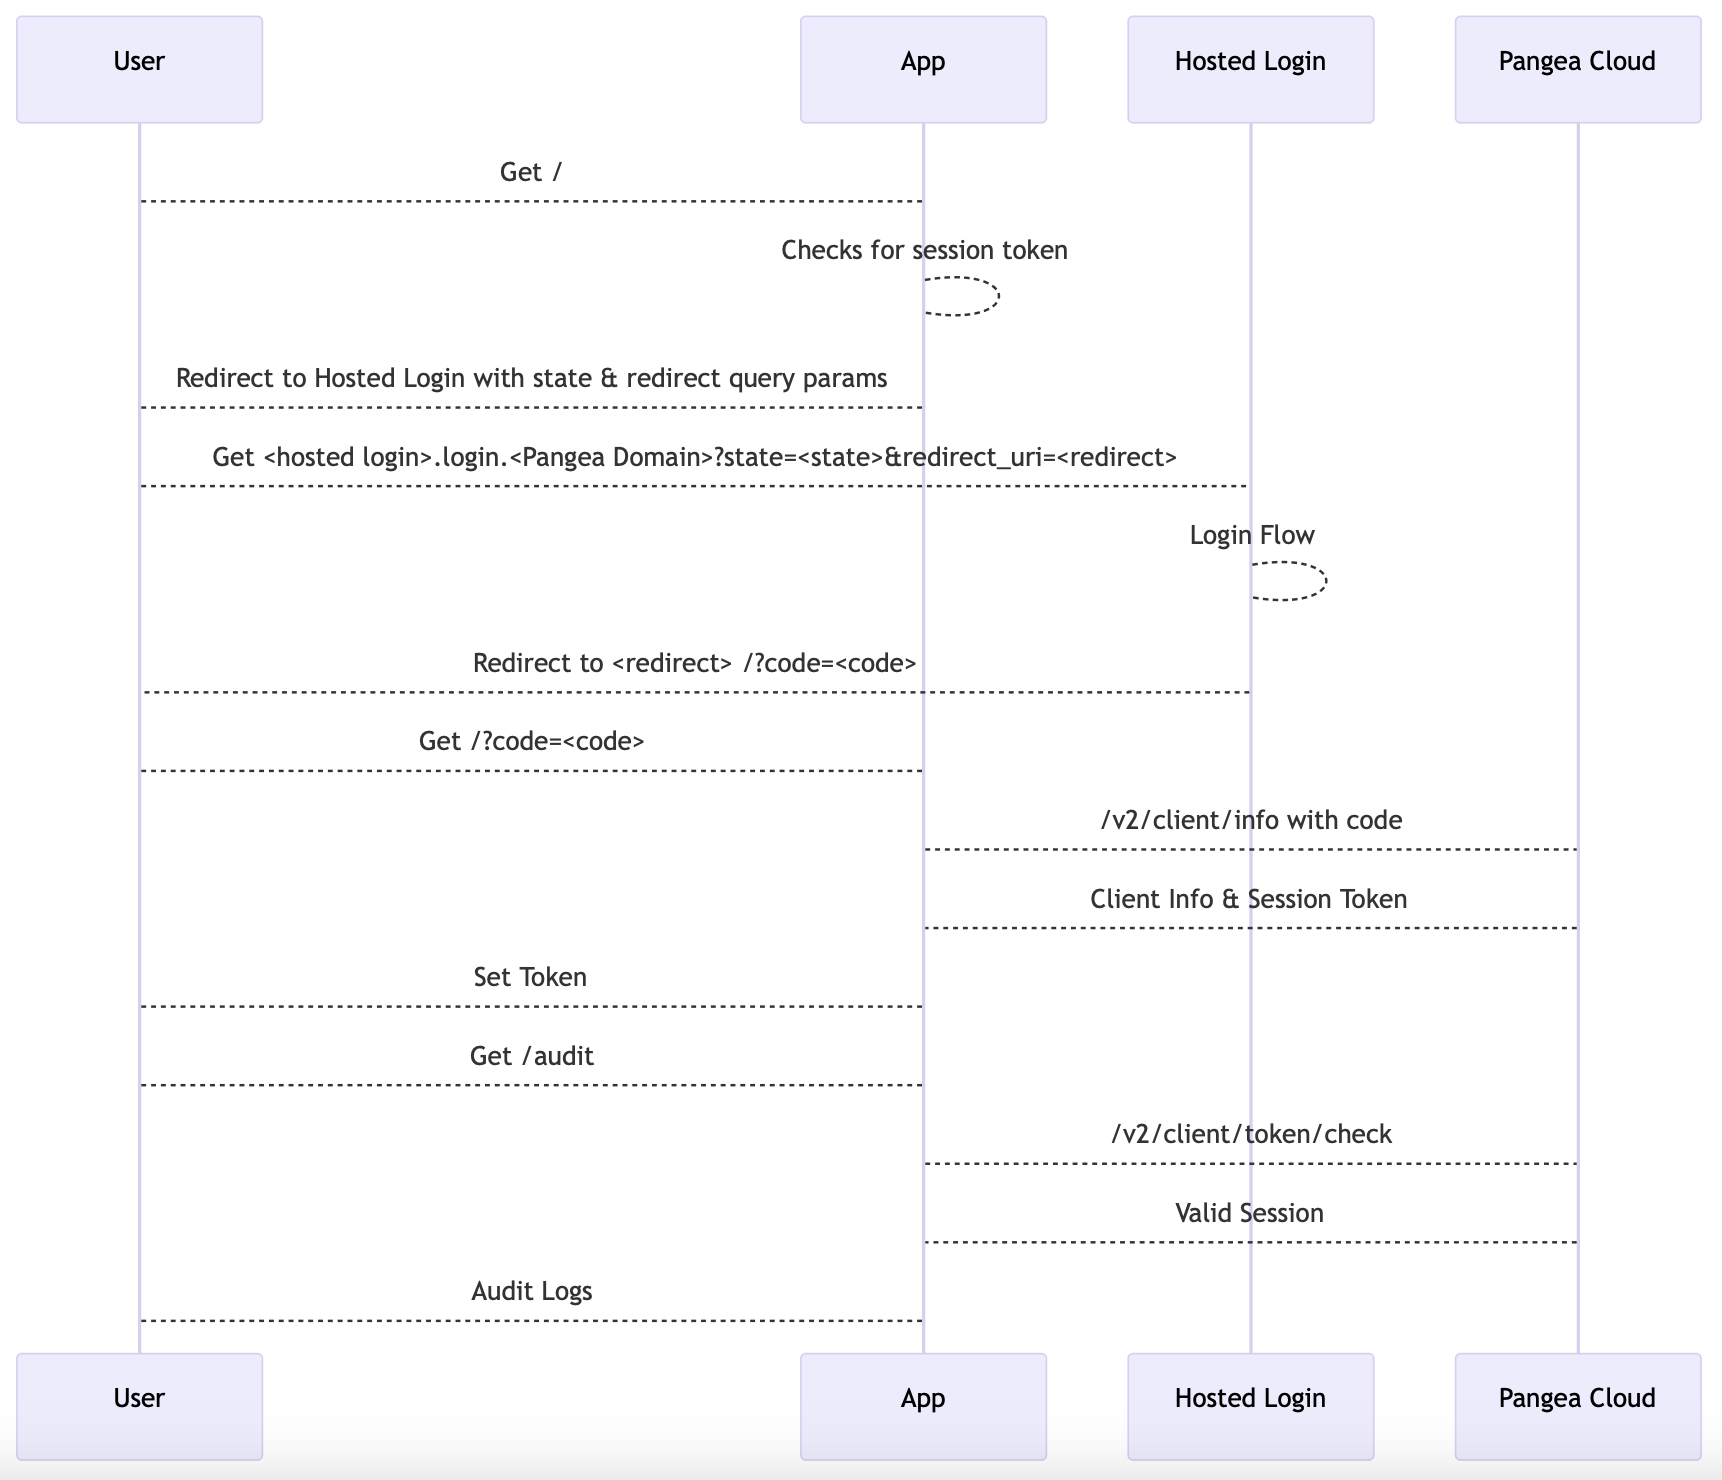
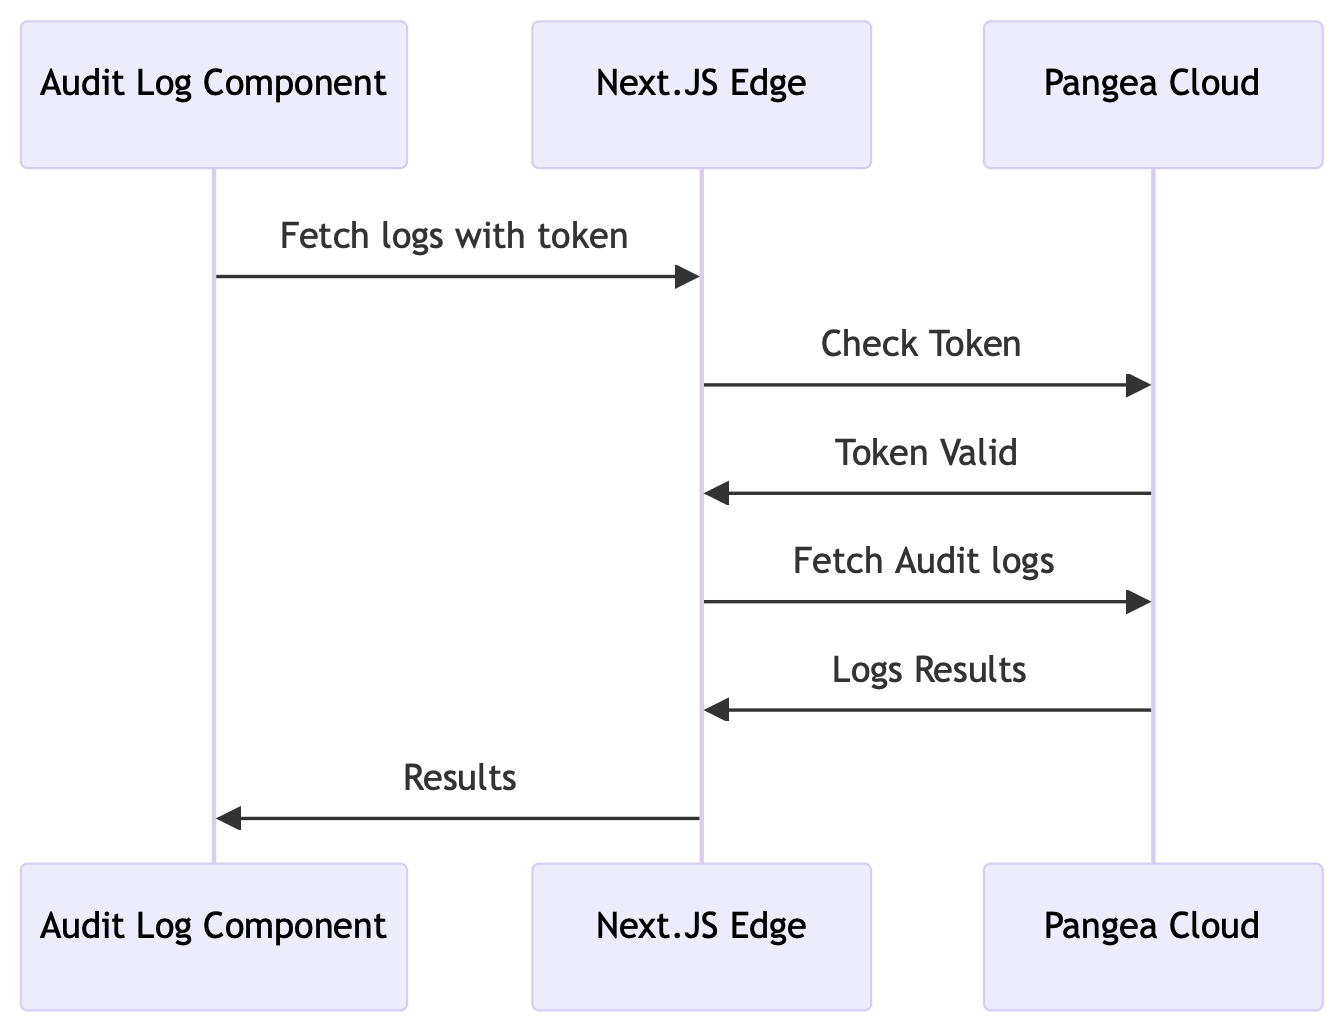
The following is a diagram describing the flow:
After configuring AuthN, enable Secure Share by clicking on Secure Share in the Pangea User Console sidebar and ensure your AuthN service token is updated with Share permissions. Do the same for Audit by clicking on Secure Audit Log in the sidebar.
We're using a single service token to simplify this tutorial.
Branding
Optionally, you can customize the branding of Pangea components by editing values on the Pangea User Console Branding page.
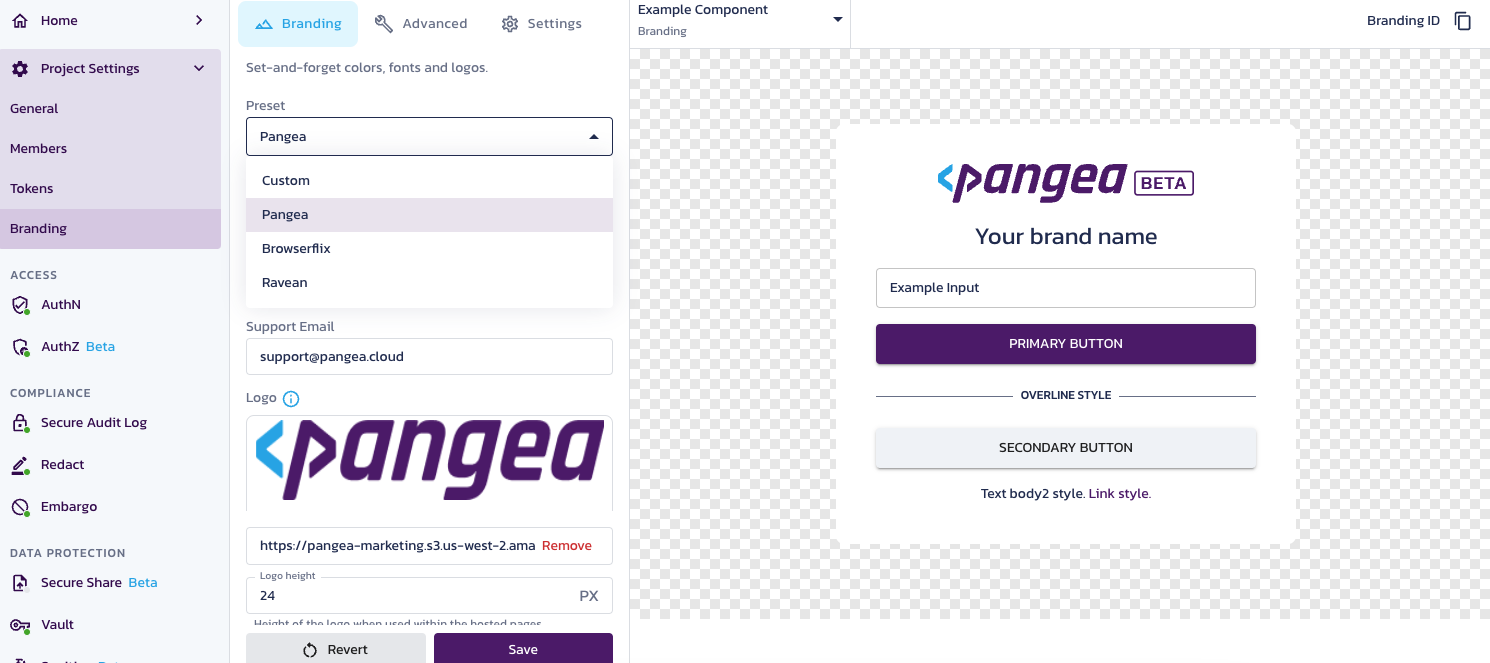
In this tutorial, we use example screenshots with the Pangea preset.
Add Pangea AuthProvider
Install Pangea AuthProvider . Make sure you are still in the transfer-app folder and run the following:
npx install-peerdeps --yarn @pangeacyber/react-mui-audit-log-viewer@0.0.x
yarn add @pangeacyber/react-auth@0.0.x
yarn add @pangeacyber/react-mui-branding@0.0.x
This tutorial uses MUI components along with emotion for styling, since the Pangea Audit Log Viewer component is built on MUI. install-peerdeps is a library that will install the peer dependencies of the above packages for you.
This component will handle redirects and manage the token for you. Using the information from the AuthN page as in the screenshot above, you can install the component. You can use the NEXT_PUBLIC_ prefix with environment variables. In this tutorial, you will directly paste these values instead.
None of the values you are copying are secrets, so exposing them in the browser is not a problem.
Create a reusable helper component that you can use across multiple pages to redirect the users to the login screen if they are not signed in. The component will use Pangea AuthProvider component, which will provide a React Context with access to a function that performs the following actions:
- Check if users are authenticated
- Redirect users to the login page
- Logout users
- Check if the user session is being fetched
To do so, create a file called app/Protected.tsx with the following code.
In the file examples, fill in the variable placeholders, such as <Pangea Domain>. Use the values in your Pangea project as shown on the AuthN Overview page in the Pangea User Console.
import React from "react";
import CircularProgress from "@mui/material/CircularProgress";
import Alert from "@mui/material/Alert";
import Box from "@mui/material/Box";

import { AuthProvider, useAuth } from "@pangeacyber/react-auth";

export interface ProtectedProps {
  children: React.ReactNode;
}

const Protected: React.FC<ProtectedProps> = ({ children }) => {
  return (
    <AuthProvider
      loginUrl="<hosted page url>"
      config={{
        domain: "<Pangea Domain>",
        clientToken: "<Client Token>",
      }}
    >
      <RedirectIfNotLoggedIn>{children}</RedirectIfNotLoggedIn>
    </AuthProvider>
  );
};

export default Protected;

const RedirectIfNotLoggedIn: React.FC<ProtectedProps> = ({ children }) => {
  const { authenticated, loading, error, login } = useAuth();

  // Loading occurs when the frontend makes a request to the Pangea AuthN service,
  // passing the code (provided in the URL via redirect),
  // and is waiting for the session token
  if (loading) {
    return (
      <Box sx={{ display: "flex" }}>
        <CircularProgress />
      </Box>
    );
  }

  // An error would occur if the user attempts to provide a bad code
  if (error) {
    return (
      <Box sx={{ display: "flex" }}>
       <Alert severity="error">{error}</Alert>
      </Box>
    );
  }

  if (!authenticated) {
    // Login is our redirect function that changes window.location to the hosted page and performs
    // other things underneath the hood
    login();
  }

  return children;
};
Wrap your top-level components in the Protected component, and add "use client" to the top of those files. "use client" makes React's createContext available to the component, otherwise you will get a compilation error.
Start with app/page.tsx. The top of the file should look like the following:
"use client";

import Image from "next/image";
import styles from "./page.module.css";
import Protected from "./Protected.tsx";

export default function Home() {
  return (
    <Protected>
      <main className={styles.main}>...</main>
    </Protected>
  );
}
Save the file, and then you can test the login flow via yarn dev. You should be redirected to your Pangea-hosted login page. Sign up and then sign in to confirm that the login works.
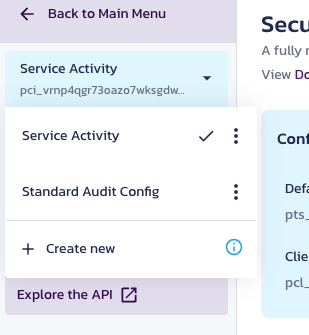
Enable Audit service
Navigate to the Pangea User Console and make sure your Secure Audit Log service is enabled by clicking on it in the navigation sidebar. If prompted to configure the service, accept the defaults for a new configuration that is created; you will not use it in this tutorial. Instead, your app will read logs from the built-in Service Activity configuration. You can access it by selecting this configuration in the top left-hand corner of the navigation sidebar:
Add authentication middleware for checking edge runtime calls
Now that you have enabled authentication, you can utilize our Audit Log component.
To render Audit Log components, you need to provide audit data from Pangea by interacting with the Secure Audit Log service.
As of April 23rd, 2024, you cannot directly call Pangea APIs using user session tokens, which are the tokens you created during the hosted login flow.
Since you are deploying to Cloudflare Pages using Next.js, you can create backend functions using Next.js Edge Runtime , which will fetch the log data from the Pangea backend service activity log (logs from calling services in Pangea).
First, create a file called .env.local. Add a secret PANGEA_TOKEN and assign it the Default Token value from the Configuration Details for AuthN in the Pangea User Console:
PANGEA_TOKEN=<service token>
This will allow you to make calls to all services protected by the token.
Create a file called middleware.ts and add the following code to it. Remember to populate the <Pangea Domain> placeholder with the Domain value from your AuthN Configuration Details in the Pangea User Console.
import { NextRequest, NextResponse } from "next/server";

const serviceToken = process.env.PANGEA_TOKEN;
const domain = "<Pangea Domain>";

export async function middleware(req: NextRequest) {
  if (!req.nextUrl.pathname.startsWith("/api/")) {
    return NextResponse.next();
  }
  const token = req.headers.get("Authorization");
  if (!token) {
    return new NextResponse(null, { status: 403 });
  }
  const resp = await fetch(`https://authn.${domain}/v2/client/token/check`, {
    method: "POST",
    headers: {
      Authorization: `Bearer ${serviceToken}`,
    },
    body: JSON.stringify({
      token,
    }),
  });
  if (resp.status !== 200) {
    return new NextResponse(null, { status: 403 });
  }
  return NextResponse.next();
}
This code ensures the token is valid by making a call to the AuthN service.
Test it with curl:
curl -v localhost:3000/api/hello
This should return a 403.
To test the functionality of protected routes, use your user's session token, saved in your browser's local storage after you sign in. You can open your browser's developer tools (these vary from browser to browser) and run the following command in your web tools console:
JSON.parse(localStorage.getItem("pangea-session")).user.active_token.token;
In Chrome, it should look like this:
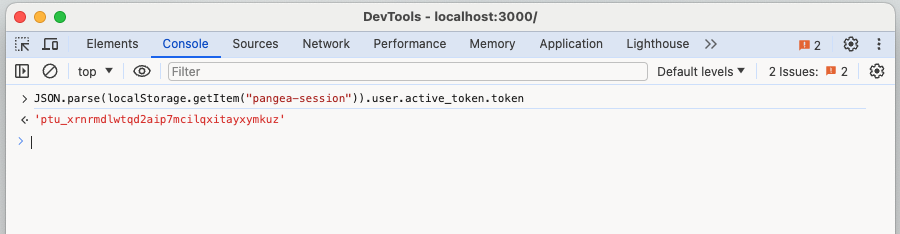
This particular token has been invalidated so it is safe to share for demonstration purposes.
You can then use that token in conjunction with a curl command to test if your middleware allows for authenticated requests:
curl -v -H "Authorization: <token copied from browser>" localhost:3000/api/hello
You should get a response with a status code of 200 and a body saying Hello World.
This is the default API edge function that comes with the Cloudflare Next.js template.
Generally, you can use JWTs with cached Pangea JWKs, but caching and other performance optimizations are beyond the scope of this tutorial. In the example above, we opted out of including the Bearer prefix before the session token for added simplicity.
Add Audit proxy & component
Pangea offers a Secure Audit Log React component , which can be used to quickly add a user-friendly view of audit logs created in Pangea.
You will need Config ID and Domain values from the Service Activity configuration in your Secure Audit Service in the Pangea User Console to populate <Pangea Domain> and <Config ID> placeholders in the file. Use the copy button to save values in clipboard.
In api/audit/route.ts:
import type { NextRequest } from "next/server";

const serviceToken = process.env.PANGEA_TOKEN;
const domain = "<Pangea Domain>";
const activityServiceConfig = "<Config ID>";

export const runtime = "edge";

export async function POST(request: NextRequest) {
  const body: any = await request.json();
  // You'll be using the same endpoint to route all of the component's calls
  // In this case, use the v1/results endpoint when the page changes
  // In the bettertransfer.dev app we used query params, which is also possible
  const path = "id" in body ? "results" : "search";
  const resp = await fetch(`https://audit.${domain}/v1/${path}`, {
    method: "POST",
    headers: {
      Authorization: `Bearer ${serviceToken}`,
    },
    body: JSON.stringify({
      config_id: activityServiceConfig,
      // Optionally add the id to the payload if it's present
      ...(body.id && { id: body.id }),
    }),
  });

  // Internal error - this should work unless something is misconfigured
  if (resp.status !== 200) {
    const text = await resp.text();
    throw new Error(text);
  }

  const data: { result: any } = await resp.json();
  return new Response(JSON.stringify(data.result));
}
This is making a call on behalf of authenticated users without filtering or changing any of the results. You can take a look at the `v1/search and v1/results API endpoints documentation for details.
You can test this endpoint using curl, with the same process we used before to test api/hello.
# You use an empty object here to avoid some edge cases in the code to
# keep things clear
curl -v -H "Authorization: <token>" localhost:3000/api/audit -d '{}'
You can also use the result ID to test the call to v1/results.
curl -v -H "Authorization: <token>" localhost:3000/api/audit -d '{"id": "<id from api/audit result>"}'
To add the Audit functionality to the home page, in app/page.tsx, remove all of the Next.js boilerplate, and add the Pangea AuditLogViewer and BrandingThemeProvider components.
Pangea offers the ability to customize the branding of both hosted pages and components on the Branding page in the Pangea User Console.
To populate the variable placeholders in app/page.tsx (<Branding ID>, <Client Token>, and <Pangea Domain>), copy the corresponding values from the Configuration Details for the AuthN service in the Pangea User Console:
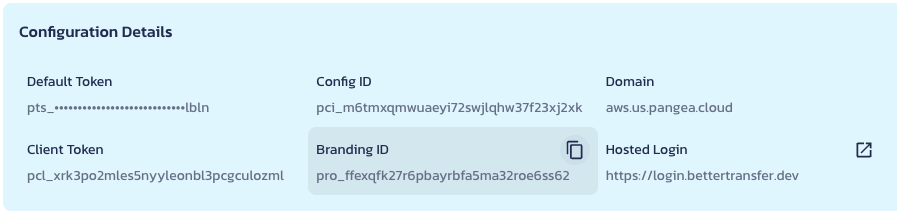
You should end up with an app/page.tsx file that looks like this:
"use client";

import Protected from "./Protected";
import { AuditLogViewer } from "@pangeacyber/react-mui-audit-log-viewer";
import { useAuth } from "@pangeacyber/react-auth";
import { BrandingThemeProvider } from "@pangeacyber/react-mui-branding";
import { Button, Container } from "@mui/material";

export default function Home() {
  return (
    <Protected>
      <main>
        <AuditView />
      </main>
    </Protected>
  );
}

const AuditView: React.FC = () => {
  const { getToken, logout } = useAuth();
  const token = getToken();
  const proxy = async(body: any): Promise<any> => {
    const resp = await fetch("/api/audit", {
      method: "POST",
      body: JSON.stringify(body),
      headers: {
        Authorization: token!!,
      },
    });
    return resp.json();
  }

  return (
    <BrandingThemeProvider
      brandingId="<Branding ID>"
      auth={{
        clientToken: "<Client Token>",
        domain: "<Pangea Domain>",
      }}
    >
      <Container maxWidth="md" sx={{ padding: "2rem" }}>
        <Button variant="contained" onClick={logout}>Logout</Button>
        <AuditLogViewer
          sx={{ marginTop: "1rem" }}
          onSearch={proxy}
          onPageChange={proxy}
        />
      </Container>
    </BrandingThemeProvider>
  );
};
Your home screen should now look like this:
You may also notice that a logout button has been added.
As of April 23rd, 2024, the Pangea branding component is missing type declarations in the published package. You will need to disable strict in tsconfig.json by setting "strict": false to compile a deployable version of this app.
Integrate Secure Share
To add sharing functionality to the app, use the pre-built React Secure Share component which offers a componentized view of files available to a given user.
Similar to the Audit component, you need to create a proxy to access the files through the Next.js edge runtime.
Create a file named app/api/share/route.ts and add a basic proxy that forwards the client's request to Pangea Secure Share, authorizing the request with the service token. Remember to populate the <Pangea Domain> placeholder with the Domain value from your AuthN Configuration Details in the Pangea User Console.
import type { NextRequest } from "next/server";

const serviceToken = process.env.PANGEA_TOKEN;
const domain = "<Pangea Domain>";
const shareVersion = "v1beta";

export const runtime = "edge";

// We've added this type of declaration since the template uses the
// `@cloudflare/workers-types/2023-07-01` typeset which did not include duplex
// in the RequestInit interface used by fetch
declare global {
  // This extends the existing RequestInit type, Cloudflare
  interface RequestInit {
    duplex?: "half" | "full";
  }
}

export async function POST(request: NextRequest) {
  // We pass the path using query params to avoid any path funny business
  // using edge functions
  const path = request.nextUrl.searchParams.get("path");
  const url = `https://share.${domain}/${shareVersion}/${path}`;
  const contentType = request.headers.get("Content-Type") || "application/json";
  const headers = {
    Authorization: `Bearer ${serviceToken}`,
  };

  if (contentType.startsWith("multipart/form-data")) {
    // FormData is a bit finicky
    const formData = await request.formData();
    const resp = await fetch(url, {
      method: "POST",
      body: formData,
      headers,
    });
    return new Response(resp.body, {
      status: resp.status,
      statusText: resp.statusText,
    });
  }
  const resp = await fetch(url, {
    method: "POST",
    headers,
    body: request.body,
    duplex: "half",
  });
  return new Response(resp.body, {
    status: resp.status,
    statusText: resp.statusText,
  });
}
Next, install the Secure Share React component:
yarn add @pangeacyber/react-mui-store-file-viewer@0.0.x
Create a pages/share.tsx file which will house the component. The file content is shown below. Remember to populate the placeholders with the respective values from your AuthN Configuration Details in the Pangea User Console.
"use client";

import Protected from "../app/Protected";
import {
  StoreProxyApiRef,
  StoreFileViewer,
} from "@pangeacyber/react-mui-store-file-viewer";
import { useAuth } from "@pangeacyber/react-auth";
import { BrandingThemeProvider } from "@pangeacyber/react-mui-branding";
import { Button, Container } from "@mui/material";

export default function Share() {
  return (
    <Protected>
      <ShareView />
    </Protected>
  );
}

const ShareView: React.FC = () => {
  const { getToken, logout } = useAuth();
  const token = getToken();
  const proxy = makeProxy(token!!);

  return (
    <BrandingThemeProvider
      brandingId="<Branding ID>"
      auth={{
        clientToken: "<Client Token>",
        domain: "<Pangea Domain>",
      }}
    >
      <Container maxWidth="md" sx={{ padding: "2rem" }}>
        {/* Note we've added a button to navigate to the audit page */}
        <Button component="a" href="/" variant="contained">
          Audit
        </Button>

        <Button variant="contained" color="secondary" onClick={logout}>
          Logout
        </Button>
        <hr />
        {/* We'll add a max count of 7 with the default of 1 for share links
            that way by default, share links are used once.
        */}
        <StoreFileViewer
          apiRef={proxy}
          configurations={{
            settings: {
              defaultAccessCount: 1,
              maxAccessCount: 7,
            },
          }}
        />
      </Container>
    </BrandingThemeProvider>
  );
};

// We proxy all calls through the edge runtime
const makeProxy = (token: string): StoreProxyApiRef => {
  const proxyCall = (queryParam: string, method: string = "POST") => {
    return async (data: any): Promise<any> => {
      const url = new URL("/api/share", window.location.origin);
      url.searchParams.append("path", queryParam);

      const body: BodyInit =
        data instanceof FormData ? (data as FormData) : JSON.stringify(data);

      const resp = await fetch(url.toString(), {
        method,
        body,
        headers: {
          Authorization: token!!,
        },
      });
      console.log(resp);
      return resp.json();
    };
  };

  return {
    list: proxyCall("list"),
    get: proxyCall("get"),
    getArchive: proxyCall("get_archive"),
    share: {
      list: proxyCall("share/link/list"),
      get: proxyCall("share/link/get"),
      delete: proxyCall("share/link/delete"),
      create: proxyCall("share/link/create"),
      send: proxyCall("share/link/send"),
    },
    delete: proxyCall("delete"),
    update: proxyCall("update"),
    upload: proxyCall("put"),
    folderCreate: proxyCall("folder/create"),
  };
};
Add a navigation button to the Audit component in app/page.tsx:
...BrandingThemeProvider
      <Container maxWidth="md" sx={{ padding: "2rem" }}>
        <Button component="a" href="/share" variant="contained">Share</Button>{" "}
        <Button variant="contained" color="secondary" onClick={logout}>Logout</Button>
        <AuditLogViewer
...the rest of the file
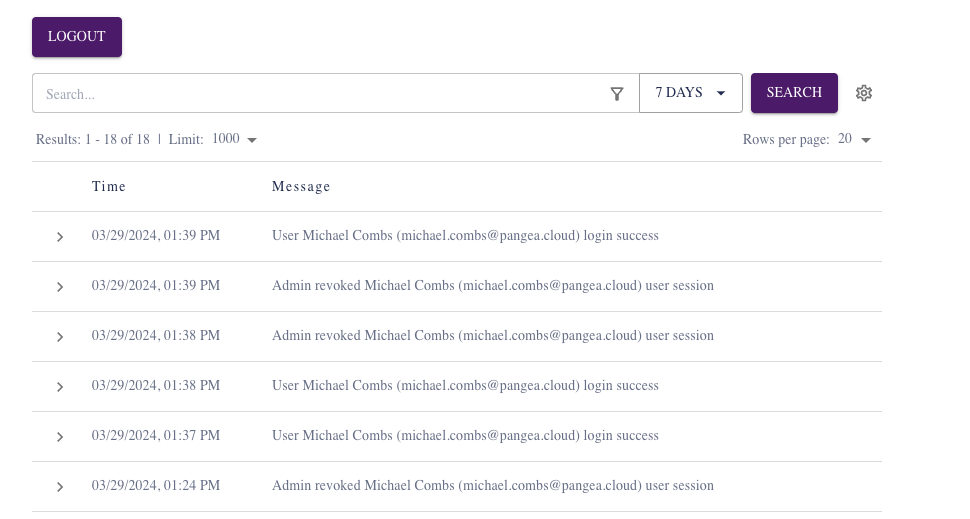
Test it with yarn dev (you might need to restart your app if it has been running). On the home page, click the new SHARE button. The Secure Share page should look similar to the following:
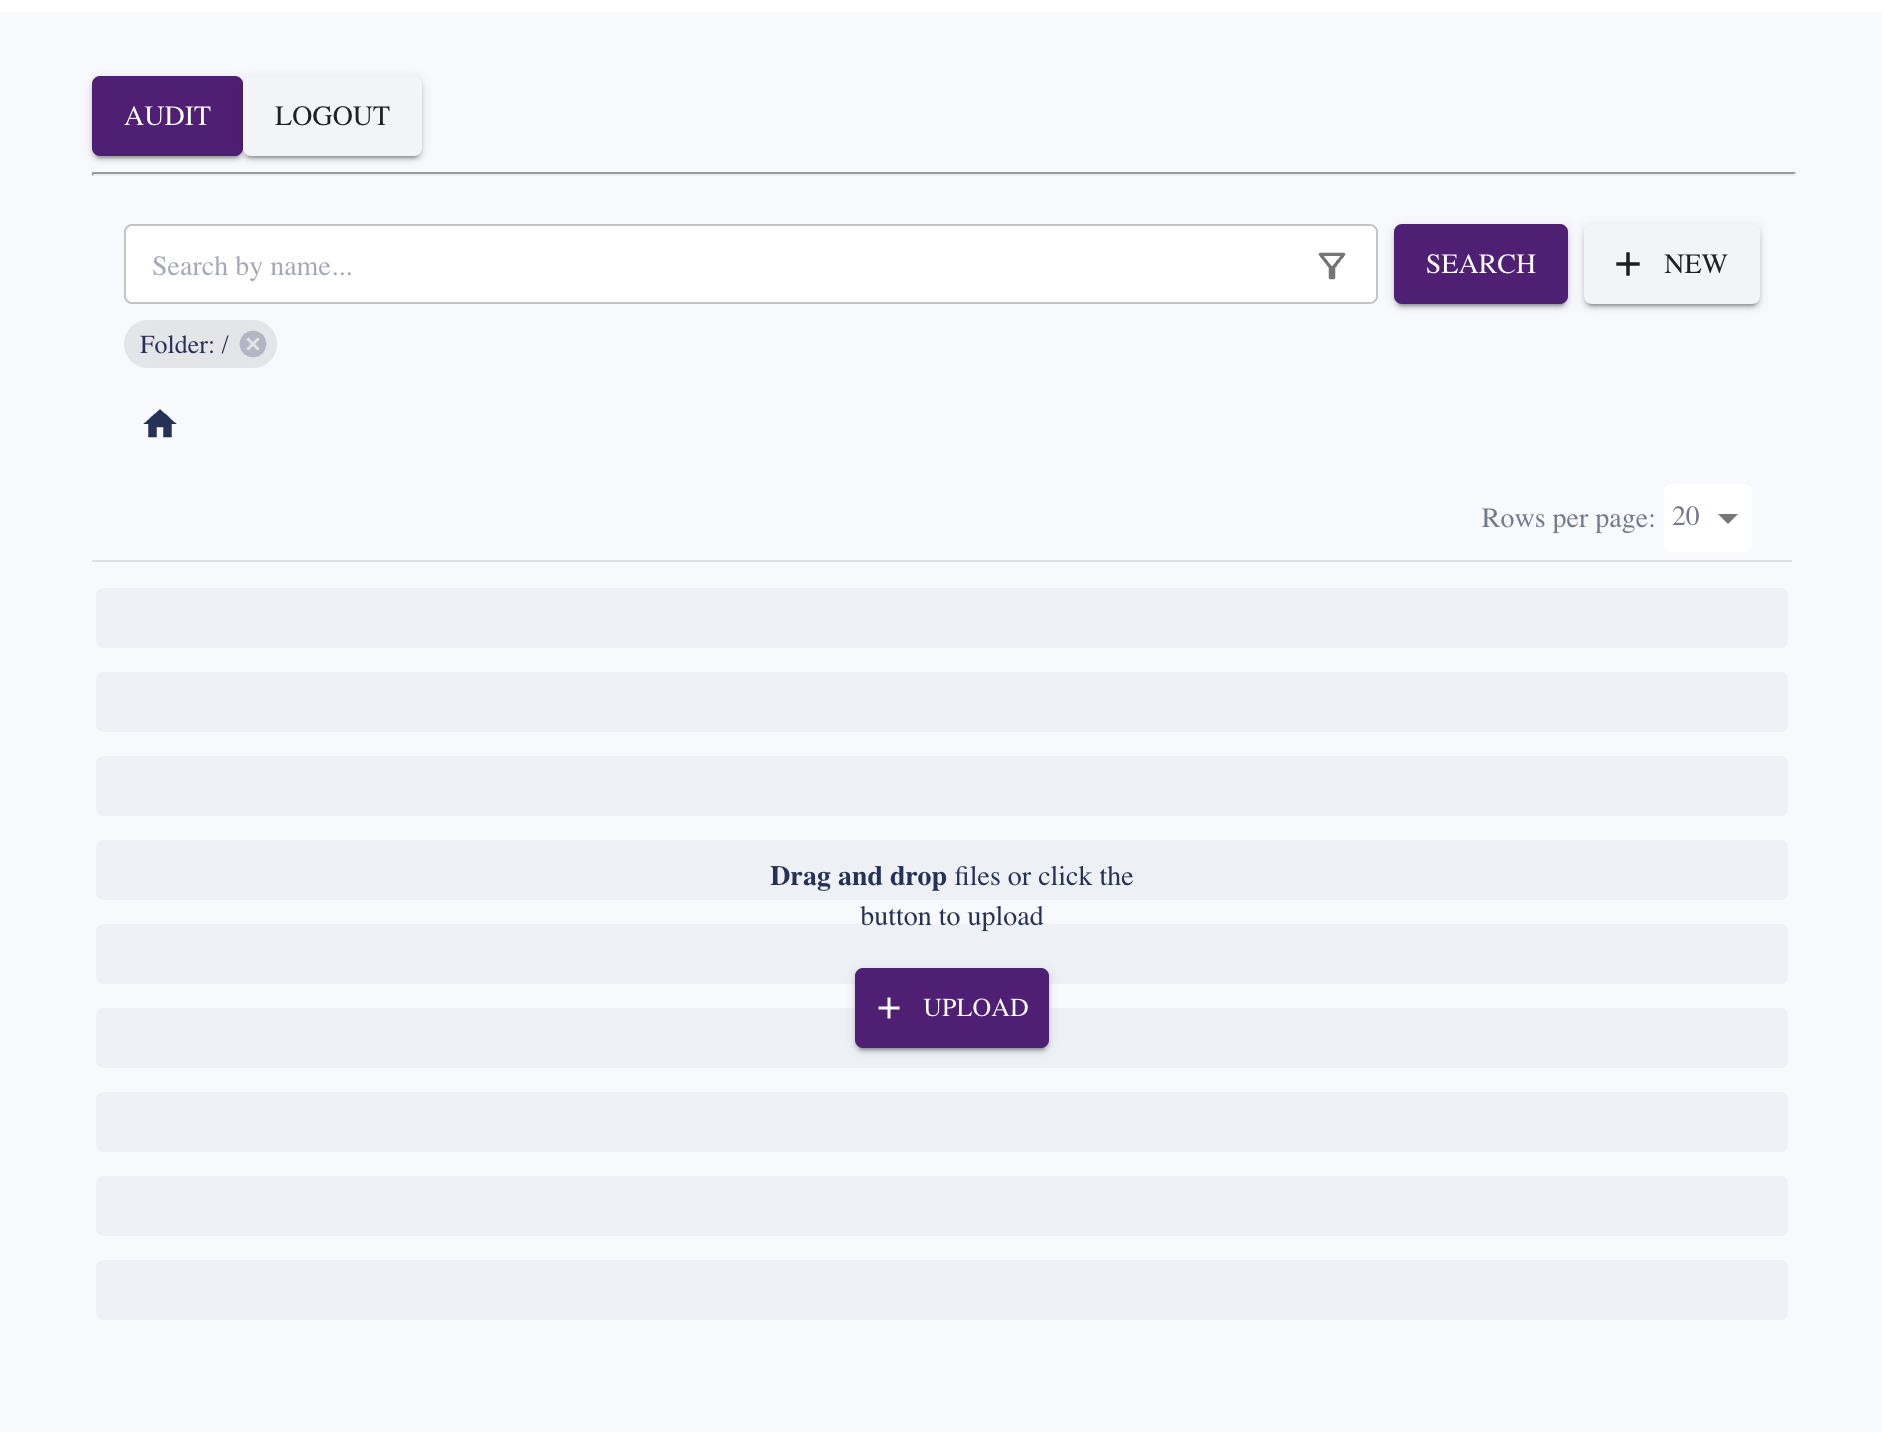
You have completed the main coding aspects of this tutorial, and can now move on to deploying them to your custom domain.
Deploying the App
DNS & CName
To set yourself up to deploy this app using a custom domain name, start by first creating a custom domain entry in Cloudflare.
yarn wrangler login
yarn deploy
The above command will sign you in and walk you through creating an account if you have not already decided to deploy the app when you installed it locally.
By running deploy, you will create the initial instance of the app in Cloudflare's backend.
Go to the Cloudflare dashboard , click on Workers & Pages in the sidebar on the left, then click on your app's name.
Click on the Custom Domains panel and click the Set up a custom domain button. Add your domain name here and click Continue. You will see a Begin DNS transfer button - click that and re-enter your domain name. You can proceed with the free plan for now. Click Continue, then click Continue again to be taken to the third step of the DNS wizard where you will see your assigned Cloudflare nameservers.
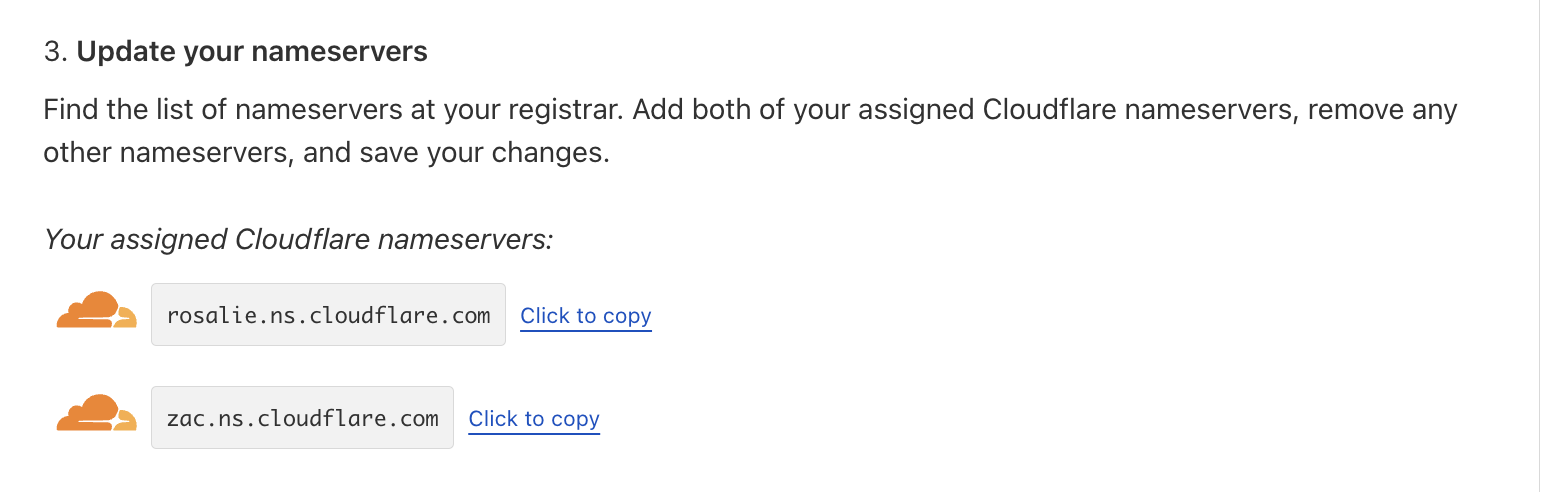
Copy those names and create NS Records in your selected registrar pointing to those DNS servers. This will allow Cloudflare to manage your domain.
After creating those records, click Check nameservers now in the wizard. After Cloudflare has successfully been assigned to manage your domain, click Continue.
Upload secret to Cloudflare
Finally, to get your app working in production, you'll need to add your secrets to the app by going back to the app page and clicking on the Settings panel.
In the Production section, click the Add variables button and add a variable named PANGEA_TOKEN, then paste your Pangea token with permissions to both Audit and AuthN (the same one you are using in .env.local). Click Encrypt and then save the value.
Add Redirect & Deploy
Finally, you just need to add our app's URL redirect to Pangea AuthN like we did with http://localhost:3000.
Deploy your app:
yarn deploy
This should direct you to the Pangea-hosted login page, where you can sign in, and then view your audit logs in the app.