Learn how to set up an authorization schema with inherited permissions that will mold to your needs.
Authorization for Healthcare
Designing authorization is fundamentally a challenge. Not only do you have to understand your problem and domain fully but you also need to understand the limits of your tools. If you get either wrong - or maybe just not as correct as you should - you can cause embarrassment, security vulnerabilities, or even trigger regulatory consequences.
Pangea's AuthZ was built with a different approach that is both simple and elegant: requirements change so your permissions management system should make it easy to match those changes. Some of that change comes from better understanding of the problem and constraints but other change comes from maturity of your product, the use cases it serves, and what customers need. Regardless of the reason, your tools have to absorb that change with as little re-architecture as possible.
In most applications, authorization generally starts with a role-based (RBAC) approach. As new concepts like ownership are defined, the organization moves to a relationship-based (ReBAC) model. Continuing to layer additional permissions on top of these concepts can lead to a time-consuming and expensive rebuild of your permissioning system. Pangea AuthZ allows for these changes and also simplifies permissions by adding the concept of "inherited permissions" to create hierarchies instead of having to write explicit policies for every level.
An existing authorization system can also be refined using attribute-based access control (ABAC) in AuthZ. Check out our documentation on
attribute-based access control for more information.This tutorial will show how layering parent/child relationships and inheritance onto an RBAC system tunes the controls in order to limit access to the least permissions necessary.
Our Patient Management System
To show how AuthZ uses these concepts and molds itself to your needs, this tutorial will walk through an example using a Patient Management System or Patient Portal. The rest of this tutorial will use our out-of-the-box “Patient Management System/Patient Portal” schema, available by default with Pangea AuthZ. You can load it yourself via the Pangea User Console by visiting AuthZ >> General >> Reset Authorization Schema.
This will replace any schema you already have. If you want to walk through the tutorial without changing your current schema, create a new project and add the Patient Management System/Patient Portal schema to AuthZ in that project.
Authorization Step 1: Defining relations
When creating an app, it is important to decide on an authorization system. Almost all authorization systems begin with a role-based access control (RBAC) system. RBAC is easy to understand because there are clear lines of responsibility. Once those are defined it is easier to build policy from there.
In a healthcare scenario, the first permissions using this approach will look like this:
- Doctors can manage (create, read, update, and delete) patients and records.
- Nurses can create, read, and update patient records.
- Administrators can manage patients but not read records.
- Patients can read their records.
Applying a simple role-based approach seems correct here. We can create a role - doctor, nurse, administrator, patient - for each of those and assign them access. But when examining the system a little closer, we can identify our first issues:
- Doctors should be able to manage records for their patients but not any patient.
- Nurses should be able to access records for patients but not any patient.
- Patients should only be able to read their own records.
- And so on...
Unfortunately, a role-based approach only works on types of resources, not individual ones. We need to add a mechanism to filter access based on specific items, which comes from relationships.
The gaps in our role-based approach point to the need for relationships. We need to assign patients to doctors, nurses to units, records to patients, and even patients to other patients. With most authorization systems, you would need to go back to the beginning and restructure your entire app, but with AuthZ, you can seamlessly layer relationship-based policies on top of role-based policies.
Before we explore the implementation, we have a few questions to consider:
- How do we designate records belonging to a specific patient?
- How do we limit a doctor’s access only to their patients?
- How do we limit a nurse’s access only to their patients?
- How do we grant access to one patient’s record to another patient (i.e. parents can see their children's records)?
All of these questions point at the missing concepts of “ownership”, “assignment”, or “parent-child” relationships. The good news is that our database schema already has the concept of foreign key relationships, so we can determine:
- Which records link to which patient (ownership)
- Patients assigned to a group of doctors and nurses (assignment)
- Patients assigned to a room (assignment)
- Users have access to their records (assignment) and may be guardians for other patients (parent-child)
From an object-oriented perspective, these are “has a” relations instead of “is a” relations.
You can check out the predefined relationships on the Resource Types page. This is how the patient resource type is defined:
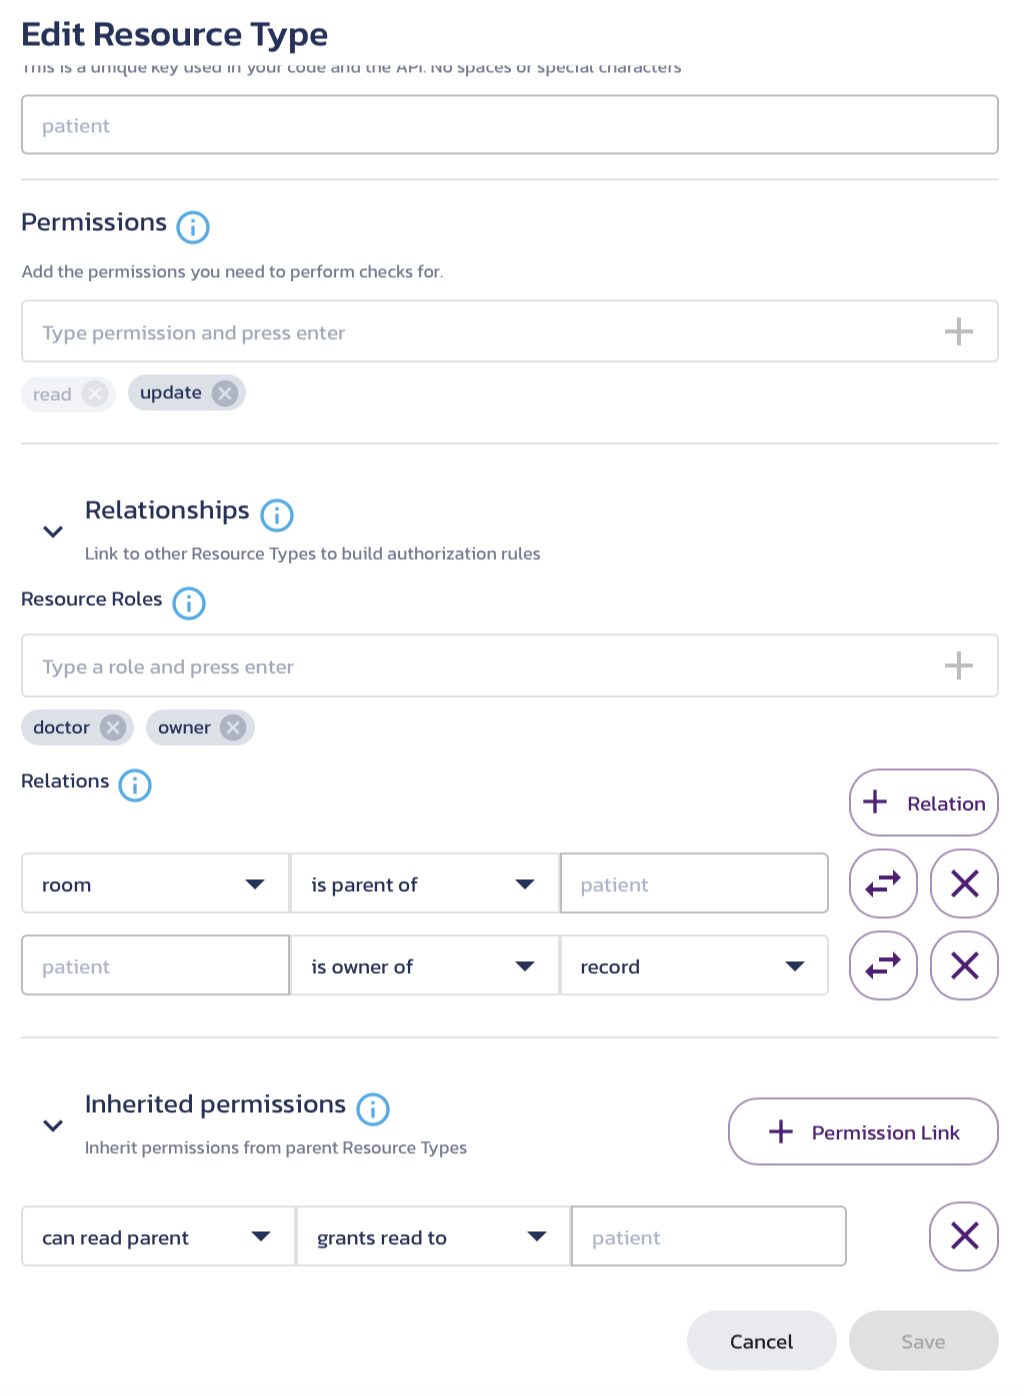
These relationships let us be more specific and detailed in our authorization rules from above:
- A facility has units.
- Units have rooms.
- Administrators can manage patients and assign them to rooms but not read records.
- Nurses are assigned to a unit and can create, read, and update patients in that unit.
- Doctors can fully manage (create, read, update, and delete) their patient's records.
- Patients can read their records.
- Patients can read their children's records.
Now we have a more robust model using data we already had in the system.
Notice that we never assigned nurses to patients. In practice, a nurse is not assigned an individual patient. They are assigned a unit and therefore, we will use our inherited permissions capability to build a policy that evaluates as:
- You can read records if you have
readaccess to the patient who owns them. - You have
readaccess to the patient if you havereadaccess to the room they are assigned. - You have
readaccess to the room if you havereadaccess to the unit they are in - A nurse has
readaccess to the unit, and so inherits access to patients through the described access inheritance above.
In practice, a nurse’s access looks like this, with the circular checkmarks indicating inherited permissions:
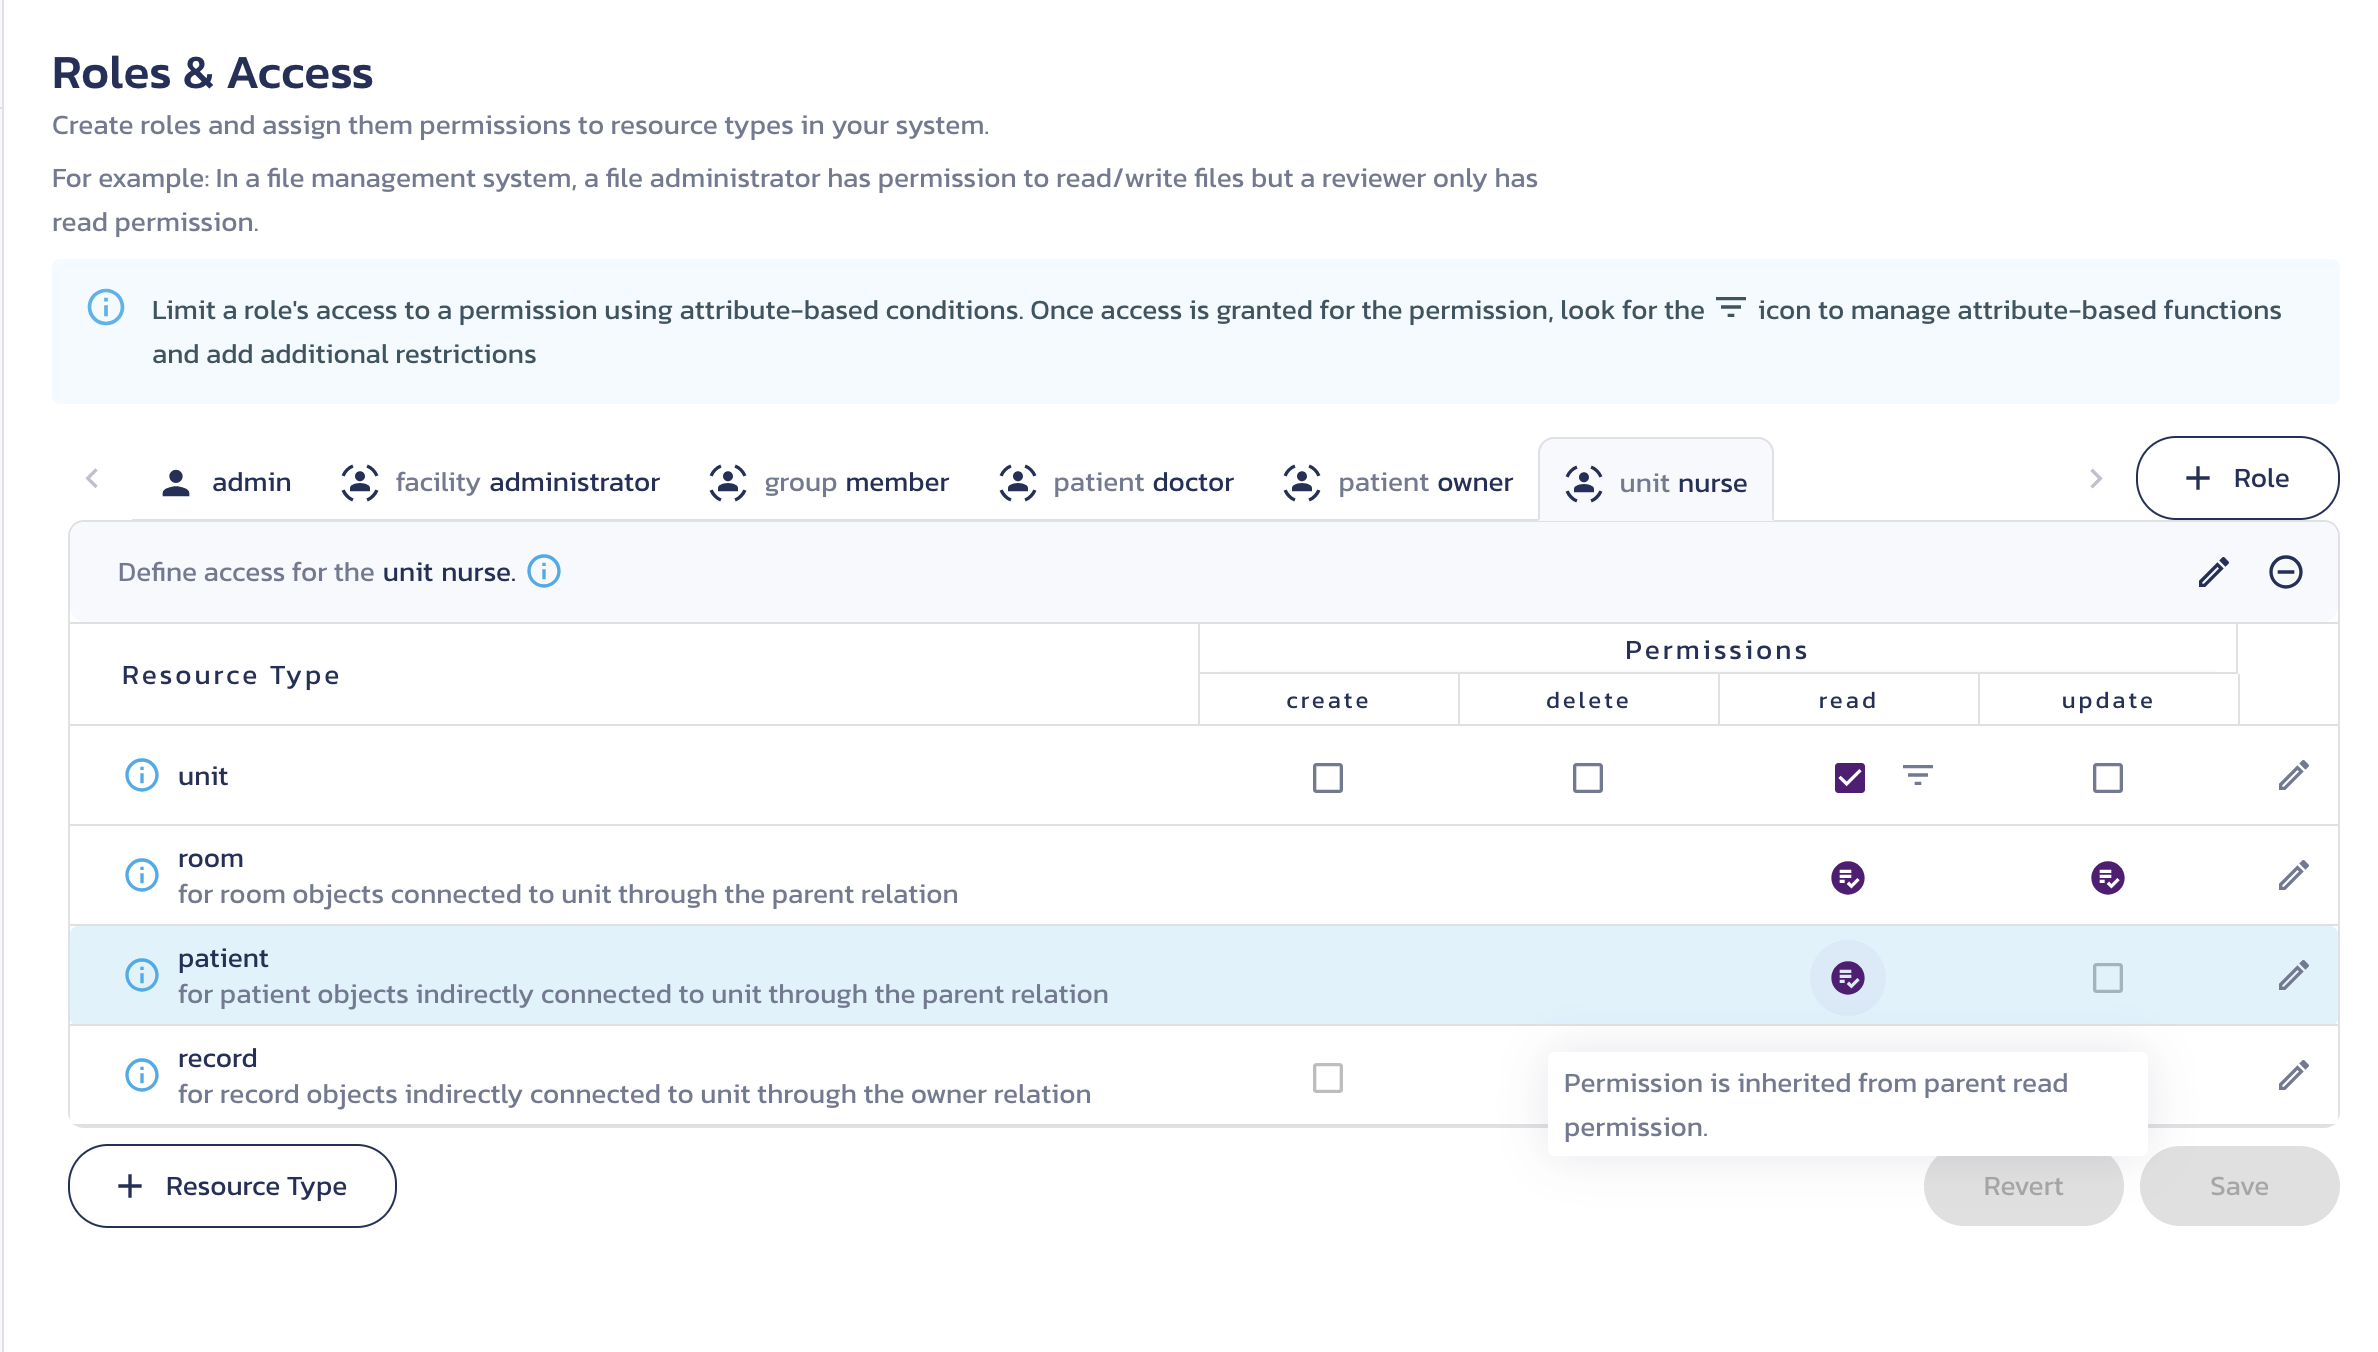
The best part of this structure is that when a nurse moves from one unit to another, they automatically lose access to the patients in their original unit and receive access to the new ones. A work assignment immediately translates into access control.
Our Patient Management System implements these fine-grained access controls, showcasing the advantages of having a robust authorization layer on top of your healthcare app.
Authorization step 2: Resource types and relations
After deciding on an authorization system, you need to define your resource types and relations.
A Patient Management System contains a single portal for nurses, patients, doctors, and administrators to collect and share information with strict access controls throughout. To assign permissions to these actors, we need to create roles. These roles will be linked to the permissions and resource types that apply to them. If we were starting from scratch, we would need to define all of the user roles and resource types of the system.
All of the user roles listed above have different functions and would need to be defined separately.
User roles:
- Nurses (displayed as
unit nursein the Roles & Access page) - Doctors (displayed as
patient doctorin the Roles & Access page) - Administrators (displayed as
facility administratorin the Roles & Access page) - Patient records owner (displayed as
patient ownerin the Roles & Access page)
Where the user roles are located makes a difference to their permissions (i.e. a nurse in the Intensive Care Unit (ICU) shouldn't have permissions on the patients in the maternity unit), so if we were setting this up, we would need to make sure we add in location resource types on the Resource Types page of AuthZ as well to give more granular permissions.
Location resource types:
- Hospital
- Unit
- Room
Next, we would need to define how the resource types are connected. For example, an admin must be able to bill for tests but never see the results. A doctor must have access to all the medical information of their patients but not the billing. A nurse must know about the patients under their care but not another patient in a different unit. There are more rules but we will describe them as we go.
Important resource types data:
- A hospital is a facility.
- A facility has a number of units, like the Intensive Care Unit, Emergency Room, etc.
- A unit has a number of rooms.
- A patient is in a room.
- A patient has records, test results, etc.
- A doctor treats patients, regardless of their unit.
- A nurse treats patients, but only within their unit.
Thus, you need these additional resource types:
- Patient
- Record
You can view all resource types in the Patient Management System/Patient Portal schema on the AuthZ Resource Types page in your Pangea User Console. Note that some resource types have roles specifically assigned to them. These are resource type-specific roles, meaning that the role's permissions are scoped to particular resources. For example, a role assigned to the patient resource type would only have permissions for specific patients and not all patients.
While this tutorial is limited to Pangea's AuthZ service, you could plug in AuthN for the users to authenticate, Redact to limit the information stored or displayed, Vault to protect credentials, and Secure Audit Log to monitor the overall system.
Authorization Step 3: Resource Roles
Within Pangea AuthZ, there are two types of roles: global and resource.
When you assign access for a resource type and action to a global role, the assigned user can take that action on any resources of that type.
When you assign access for a resource type and action to a resource role, the assigned user can take that action only on the associated resources of that type.
It is the difference between the following statements:
A doctor can manage any record;
vs
A doctor can manage the records of their patients.
The combination of relationships and roles working together is key to most access control systems.
The Roles & Access page provides a view for each defined role and their access.
There are two different role types: global and resource-type-specific. A global role has permissions on all resources of that resource type. For instance, the admin is a global role. If create access is provided to the admin role on records, all users with the admin role will be able to create records for any patient.
Resource-type-specific roles allow a more granular access control by only allowing access to specific resources of a resource type. For instance, if you click on the patient owner role, it should have the following permissions:
- Patient -
readandupdateaccess - Record -
readandupdateaccess
This reads as “For any Patients owned by this User, they may update the Patient information, and also read and update the Records owned by that Patient.” This prevents the user from being able to read or update patients or records not owned by that specific user.
If you look at the other roles you will see the following permissions:
patient doctor role
- Patient -
readandupdateaccess - Record -
createandupdateaccess
unit nurse role
- Unit -
readaccess
facility administrator role
- Facility -
is_admin,read, andupdateaccess
These permissions give the following abilities:
- Allows the doctor to manage their patient and their patient's records
- Allows the nurse to manage a unit's patients and their records through inherited permissions on their assigned unit
- Allows the administrator to manage the overall facility, adding patients, units, and rooms as needed
This is how a nurse’s permissions are represented within AuthZ:
This is how a doctor’s permissions are represented within AuthZ:
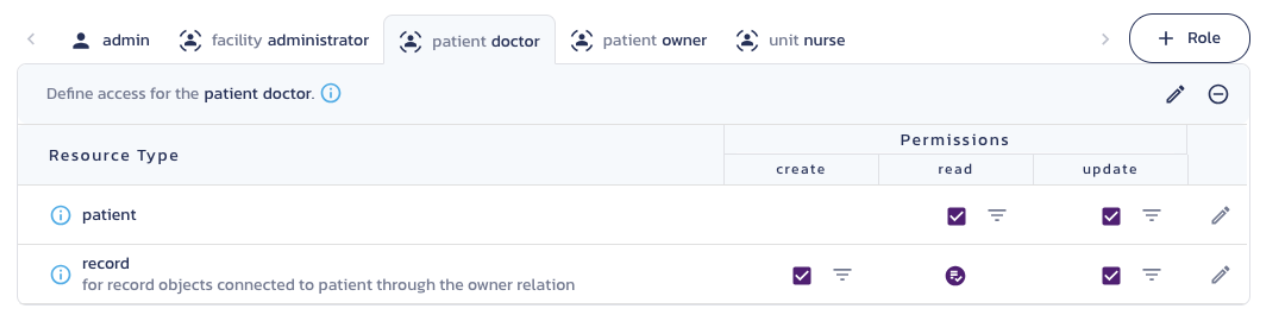
Notice how the doctor and nurse have similar access to the patient but through entirely different approaches. The nurse receives access through their unit assignment while the doctor receives direct access.
Authorization Step 4: Inherited Permissions
Now that we have viewed role permissions, we will now look at the inherited permissions, which is the next step in defining an authorization schema in AuthZ. Navigate back to the Resource Types page.
Although no changes need to be made to this schema at this time, here is the process for adding inherited permissions to a resource type.
- Click the pencil-shaped edit icon beside the resource type you want to edit.
- In the Edit Resource Type modal that displays, click Inherited permissions to expand the section.
- Click + Permission Link to add a new inherited permission.
- Create the required inherited permissions, and then click Save.
You can view the inherited permissions for each resource type by hovering over the pill labeled with a number and the word inherited beside the resource type in the Relations column. The number is how many inherited permissions are defined for that resource type.
The following inherited permissions that come preloaded with this schema:
Patient:
- "can
readparent grantsreadtopatient"
Record:
- "can
readowner grantsreadtorecord"
Room:
- "can
readparent grantsreadtoroom" - "can
readparent grantsupdatetoroom"
Unit:
- "can
is_adminparent grantscreatetounit" - "can
is_adminparent grantsdeletetounit" - "can
is_adminparent grantsreadtounit" - "can
is_adminparent grantsupdatetounit"
For the “parent” relationship, Pangea does not limit on how many parents a resource can have. From a business rules perspective, a room is only in one unit but a patient record could have numerous users as parents. Your app should enforce the limits it expects.
Testing the preloaded policies
The proper process after defining the resources and assigning roles and relations is to test the policies to make sure users can view and update the data they expect and only the data they expect.
Starting with the simplest check of preloaded data, we should see if doctor dorian can read information about patient harvey:
curl -sSLX POST 'https://authz.aws.us.pangea.cloud/v1/check' \
-H 'Authorization: Bearer TOKEN' \
-H 'Content-Type: application/json' \
-d '{"subject":{"type":"user","id":"dorian"},"action":"read", "resource":{"type":"patient","id":"harvey"}}'
And we get "allowed": false.
{
  "request_id": "prq_vca...xfn",
  "request_time": "2024-07-11T18:59:01.807636Z",
  "response_time": "2024-07-11T18:59:01.859390Z",
  "status": "Success",
  "summary": "Denied",
  "result": {
    "allowed": false,
    "depth": 0,
    "schema_id": "pzs_px6...hon",
    "schema_version": 31
  }
}
Reviewing our data model, we see that we do not give doctors access to every patient, but only to their own. Therefore, we have to assign the patient harvey to the doctor dorian:
curl -sSLX POST 'https://authz.aws.us.pangea.cloud/v1/tuple/create' \
-H 'Authorization: Bearer TOKEN' \
-H 'Content-Type: application/json' \
-d '{"tuples":[{
	"resource":{"type":"patient","id":"harvey"},
	"subject":{"type":"user","id":"dorian"},
	"relation":"doctor"
}]}'
Now we perform the same check again:
curl -sSLX POST 'https://authz.aws.us.pangea.cloud/v1/check' \
-H 'Authorization: Bearer TOKEN' \
-H 'Content-Type: application/json' \
-d '{"subject":{"type":"user","id":"dorian"},"action":"read", "resource":{"type":"patient","id":"harvey"}}'
This time, we get "allowed": true as seen here:
{
  "request_id": "prq_u4u...f55",
  "request_time": "2024-07-11T19:18:48.470423Z",
  "response_time": "2024-07-11T19:18:48.571002Z",
  "status": "Success",
  "summary": "Allowed",
  "result": {
    "allowed": true,
    "depth": 2,
    "schema_id": "pzs_px6...hon",
    "schema_version": 31
  }
}
We also currently have Dorian assigned as Ben’s doctor. Due to our data model, he should have access to Ben’s records - record1 and record2. We can use record1 to test.
curl -sSLX POST 'https://authz.aws.us.pangea.cloud/v1/check' \
-H 'Authorization: Bearer TOKEN' \
-H 'Content-Type: application/json' \
-d '{"resource":{"id":"record1","type":"record"},"subject":{"type":"user","id":"dorian"},"action":"read"}'
Looking at the response, Dorian is allowed, which is what we expected.
{
    "request_id":"prq_c6q...wov"
    "request_time":"2024-07-11T19:18:50.324923Z"
    "response_time":"2024-07-11T19:18:50.422381Z"
    "status":"Success"
    "summary":"Allowed"
    "result":{
        "allowed":true
        "depth":3
        "schema_id":"pzs_px6...hon"
        "schema_version":1
    }
}
Alternatively, you can check if user Jordan has read access to Ben’s records but does not have delete access. First, we will check read access:
curl -sSLX POST 'https://authz.aws.us.pangea.cloud/v1/check' \
-H 'Authorization: Bearer TOKEN' \
-H 'Content-Type: application/json' \
-d '{"resource":{"id":"ben","type":"patient"},"subject":{"type":"user","id":"Jordan"},"action":"delete"}'
Which was allowed:
{
    "request_id":"prq_c6q...wov"
    "request_time":"2024-07-11T19:18:50.324923Z"
    "response_time":"2024-07-11T19:18:50.422381Z"
    "status":"Success"
    "summary":"Allowed"
    "result":{
        "allowed":true
        "depth":2
        "schema_id":"pzs_px6...hon"
        "schema_version":1
    }
}
Next, we will check for delete access:
curl -sSLX POST 'https://authz.aws.us.pangea.cloud/v1/check' \
-H 'Authorization: Bearer pts_mqnsrm...chukh5' \
-H 'Content-Type: application/json' \
-d '{"resource":{"id":"record1","type":"record"},"subject":{"type":"user","id":"jordan"},"action":"read"}'
Here, we see that it is denied as we expected, because even though Jordan is an owner of Ben's records, she should not be able to delete them, because that can have significant consequences.
{
    "request_id":"prq_c6q...wov"
    "request_time":"2024-07-11T19:18:50.324923Z"
    "response_time":"2024-07-11T19:18:50.422381Z"
    "status":"Success"
    "summary":"Denied"
    "result":{
        "allowed":false
        "depth":0
        "schema_id":"pzs_px6...hon"
        "schema_version":1
    }
}
Modifying the schema
It is easy to modify this schema to make changes to permissions to match your individual needs. Here, we provide a few thoughts for some modifications that might be made to customize this schema to match real world scenarios.
Add the ability to create patients
One simple thing to add would be the ability to create new patients. It is very common for a new patient to come into a hospital, so the ability to add patients can be very important. If you check the current schema for patients by clicking the pencil-shaped Edit icon by the patient resource type on the Resource Types page, it looks like this:
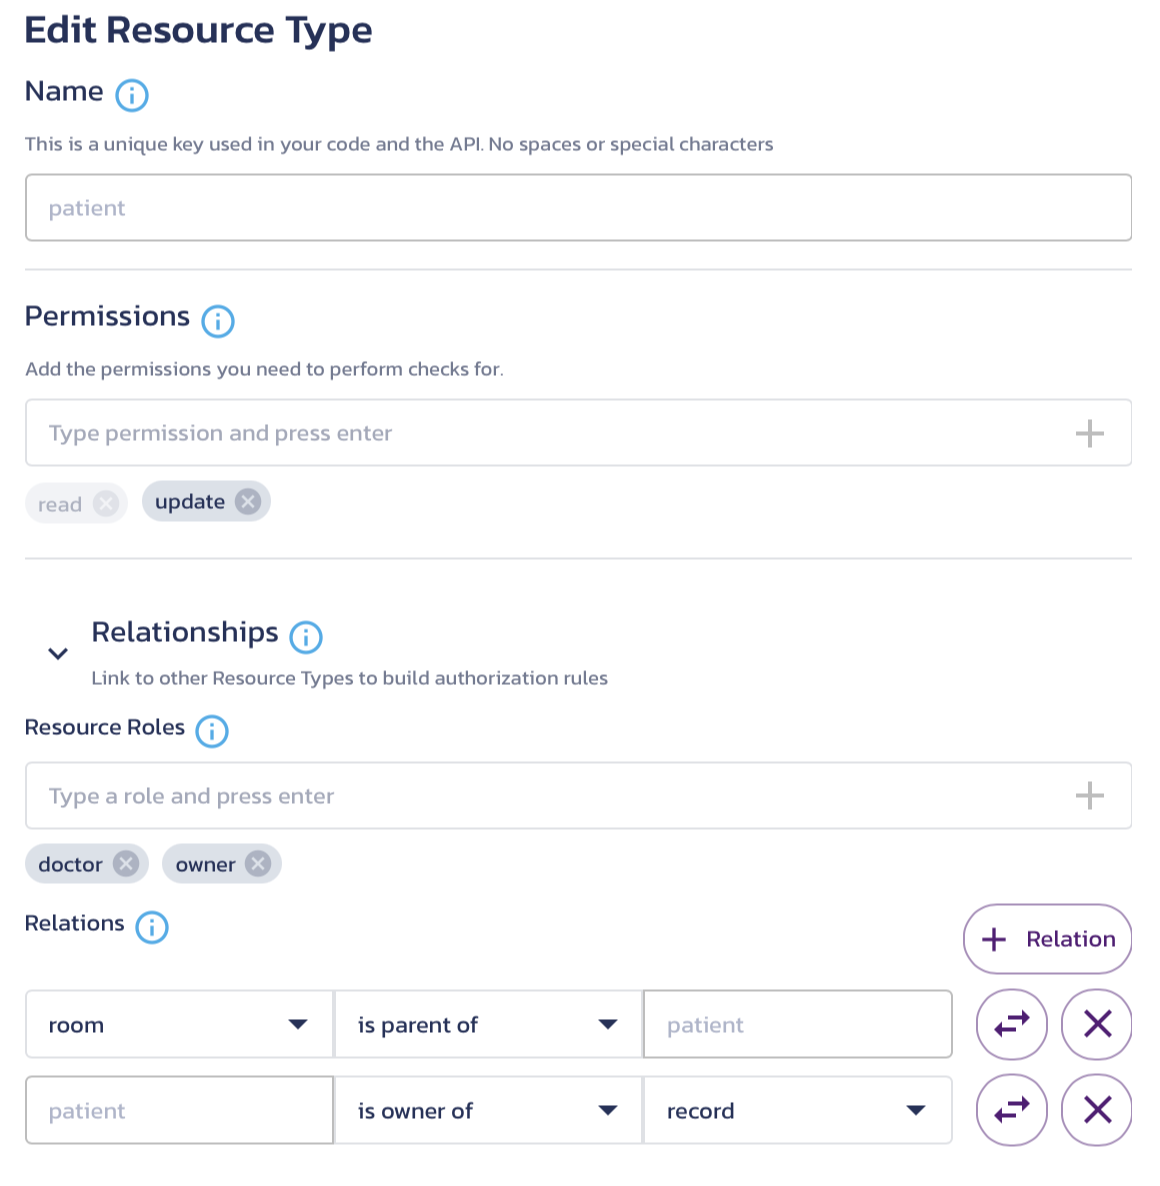
As you can see, there are no permissions available to create new patients. This is a simple fix. In the Permissions box, type create and press Enter. This makes it display in the Roles & Access page for any role that has permissions on the patient resource type.
Now we need to add it to a role so that there is a role that can create new patients.
We can create a global role with a name of receptionist on the Roles & Access page. This would be similar to a hospital system where all patients check in at a main lobby before proceeding to their unit. The receptionist would then need to have access to create all patients, but no ability to read any patient's records. A receptionist who is able to create patients for all units of a hospital system is a fairly common scenario.
Create and define a unit receptionist role
- On the left-hand navigation, click Roles & Access.
- On the right side, click + Role.
- In the modal that displays, type
receptionistin the Name box. - Click Save. The receptionist role displays among the role tabs.
It still doesn't have permission to create new patients, however. We need to fix that.
- Click the receptionist role.
- Check the create box beside patient resource type.
Next, we want to assign a receptionist so we can make a check against our schema to verify we set it up correctly.
Assign a receptionist
- On the left-hand navigation, click Assigned Roles & Relations.
- On the right side, click + Assign.
- Create the following statement: user
toriis a receptionist. - Click Save.
You can also assign the receptionist role to Tori using the APIs with the following call:
curl -sSLX POST 'https://authz.aws.us.pangea.cloud/v1/tuple/create' \
-H 'Authorization: Bearer <your_token>' \
-H 'Content-Type: application/json' \
-d '{"tuples":[{"resource":{"type":"role"},"subject":{"type":"user","id":"tori"},"relation":"receptionist"}]}'
Add a different facility type
Another modification that might be desired is to have multiple facility types. The current schema assumes that all roles and relations belong to a single type of facility, all with the same permissions.
Let's assume that you have multiple medical facility types in a single city and you have some doctors that require privileges on both types. Maybe the privileges for doctor roles are different at each facility type: they have privileges on patients at Sacred Heart, but they also work at a specific medical facility: such as a family medicine facility, a cancer center, or other specialized medical facility. Doctors at a specialized facility might need to have privileges on all patients of the facility, instead of just individual patients. This enables them to consult on the patients of other doctors when needed. With this type of setup, more privileges need to be defined.
To create this sort of schema, we need to add an additional resource type: specialty_facility. This allows us to create different permissions for this new type of facility than the preloaded resource types.
Define the specialty facility resource type
To create a new resource type, simply follow these instructions.
- Navigate to the AuthZ Resource Types page.
- Click + Resource Type to add a new resource type.
- In the Name field, type
specialty_facility.
Since this is a facility, we will need administrators with admin permissions.
- In Permissions, type
is_adminand press Enter to add admin permissions. - Click Relationships to expand the section.
- In the Resource Roles field, type
doctorand press Enter to add the doctor role to the facility. - As discussed above, we also need admin roles. In the Resource Roles field, type
administratorand press Enter. - The facility will also have nurses, so we need to add them as well. In the Resource Roles field, type
nurseand press Enter. - In Relations, make the following statement: "
specialty_facilityis parent ofpatient". - Click Save to save the new resource type.
This links the various user roles to the facility as well.
Define permissions for the added roles
Now we need to define the permissions that the user roles have on this new resource type. We will start with the specialty_facility doctor role. This role will be a little different from the patient doctor role.
- Navigate to the Roles & Access page.
- Select the specialty_facility doctor role.
- Click the read check box beside the patient resource type. The record resource type automatically adds the read permission based on the inherited permissions on the resource type.
- Click Save to save the permissions.
Now that the doctor role has been added, we can define the specialty_facility administrator role. We will define it similarly to the one already in the schema.
- Select the specialty_facility administrator role.
- Click the is_admin, read and update check boxes beside the specialty_facility resource type. The patient and record resource types automatically add the read permission based on the inherited permissions on the resource types, similar to when we set up permissions on the specialty_facility doctor role.
- Click Save to save the permissions.
Last of all, we need to define the specialty_facility nurse role. Since a nurse at a specialized facility might have more responsibilities, we will also give them update permissions on patients as well.
- Select the specialty_facility nurse role.
- Click the read and update check boxes beside the patient resource type. The record resource type automatically adds the read permission based on the inherited permissions on the resource type, similar to when we set up permissions on the specialty_facility doctor role.
- Click Save to save the permissions.
Assign the specialty facility resource type
Now that the specialty facility resource type is defined, we want to test it to make sure it works properly. In order to test it, we need to assign a facility that uses the specialty_facility resource type, and assign a doctor to this facility.
- Click Assigned Roles & Relations.
- Click + Assign.
Now that we have the modal open, we want to create a facility called "SH_Cancer". This is a specialized cancer facility.
- Create the following statement in the Assignment section: "user
dorianis a "doctor" for specialty_facilitySH_Cancer". This will add SH_Cancer as another facility that Dorian can access. It will also allow him read access to their patients.
Now we should assign a patient to the facility.
- Click + Assign and create the following statement: "specialty_facility
SH_Canceris a "parent" for patientjohn".
Dorian will now be able to view John's records, but John doesn't have any yet. Let's create a record for John.
- Click + Assign and create the following statement: "patient
johnis a "owner" for recordjohn_record1".
Now we need to assign a nurse to the specialty facility. Since nurses don't generally serve at multiple locations, we should create a new nurse instead of adding an assignment to an existing nurse.
- Click + Assign and create the following statement: "user
kathyis a "nurse" for specialty_facilitySH_Cancer"
Modified schema checks
After modifying the schema, it is time to check that everything is working as we expect. Let's test the receptionist that we created.
In a deployed app, you would be able to create and update any patients of the hospital system. However, due to certain limitations for the console, we cannot do a check of create because the Playground checks require a resource name, but it doesn't make sense to allow the Playground to actually create assigned roles or relations, so create calls will always fail. So let's do a check if our receptionist can update a patient.
curl -sSLX POST 'https://authz.aws.us.pangea.cloud/v1/check' \
-H 'Authorization: Bearer TOKEN' \
-H 'Content-Type: application/json' \
-d '{"subject":{"type":"user","id":"tori"},"action":"update", "resource":{"type":"patient","id":"ben"}}'
This should return "Permission Allowed". Since receptionist is a global role, we did not have to assign Ben as a patient to Tori like we had to do for Harvey with Dorian, she has update access on all patients.
{
    "request_id":"prq_pte...2it"
    "request_time":"2024-07-11T19:18:48.278923Z"
    "response_time":"2024-07-11T19:18:48.387381Z"
    "status":"Success"
    "summary":"Allowed"
    "result":{
        "allowed":true
        "depth":5
        "schema_id":"pzs_px6...hon"
        "schema_version":6
        }
}
And it works as we expected. Next we can test our specialty facility checks. First, we will check that Dorian can read the patient we set up in the SH_Cancer facility.
curl -sSLX POST 'https://authz.aws.us.pangea.cloud/v1/check' \
-H 'Authorization: Bearer TOKEN' \
-H 'Content-Type: application/json' \
-d '{"subject":{"type":"user","id":"dorian"},"action":"read", "resource":{"type":"record","id":"john_record1"}}'
This should return "Permission Allowed". After performing the check, we get the following:
{
    "request_id":"prq_p63...2pq"
    "request_time":"2024-07-11T19:18:50.324923Z"
    "response_time":"2024-07-11T19:18:50.422381Z"
    "status":"Success"
    "summary":"Allowed"
    "result":{
        "allowed":true
        "depth":5
        "schema_id":"pzs_px6...hon"
        "schema_version":6
        }
}
It returned "allowed": true for Dorian's access to John's records. This verifies that Dorian has read permissions on John as well, because we did not give Dorian read access to John's records directly, we gave Dorian inherited permissions to John's records through read permissions on John as Dorian's patient.
Next, we should run a check on the nurses to make sure that we set up the nurses properly. Let's check if the nurse can also read John's records.
curl -sSLX POST 'https://authz.aws.us.pangea.cloud/v1/check' \
-H 'Authorization: Bearer TOKEN' \
-H 'Content-Type: application/json' \
-d '{"subject":{"type":"user","id":"kathy"},"action":"read", "resource":{"type":"record","id":"john_record1"}}'
This should resolve as allowed because we gave nurses at the specialized facilities read access to patient's records.
{
    "request_id":"prq_p53...19d"
    "request_time":"2024-07-11T19:18:51.374963Z"
    "response_time":"2024-07-11T19:18:51.462631Z"
    "status":"Success"
    "summary":"Allowed"
    "result":{
        "allowed":true
        "depth":5
        "schema_id":"pzs_px6...hon"
        "schema_version":6
        }
}
This also displays "allowed": true, therefore Kathy also has read access to both John and his records. We should also make sure that Kathy can update the patient since it is not related to her read permissions on John.
curl -sSLX POST 'https://authz.aws.us.pangea.cloud/v1/check' \
-H 'Authorization: Bearer TOKEN' \
-H 'Content-Type: application/json' \
-d '{"subject":{"type":"user","id":"kathy"},"action":"update", "resource":{"type":"patient","id":"john"}}'
This should resolve as allowed because we gave nurses at the specialized facilities update access to patient's records.
{
    "request_id":"prq_te3...1rq"
    "request_time":"2024-07-11T19:18:53.174963Z"
    "response_time":"2024-07-11T19:18:53.263531Z"
    "status":"Success"
    "summary":"Allowed"
    "result":{
        "allowed":true
        "depth":5
        "schema_id":"pzs_px6...hon"
        "schema_version":6
        }
}
We should now check that Kathy is unable to access Sacred Heart's patients, because she is not a nurse at the main Sacred Heart facility, but at the Cancer center.
curl -sSLX POST 'https://authz.aws.us.pangea.cloud/v1/check' \
-H 'Authorization: Bearer TOKEN' \
-H 'Content-Type: application/json' \
-d '{"subject":{"type":"user","id":"kathy"},"action":"read", "resource":{"type":"patient","id":"ben"}}'
This request should resolve as "allowed":false. If not, we have set up the schema poorly and need to go back and make some changes.
{
    "request_id":"prq_uoe...w5t4"
    "request_time":"2024-07-11T19:18:54.193285Z"
    "response_time":"2024-07-11T19:18:54.282934Z"
    "status":"Success"
    "summary":"Denied"
    "result":{
        "allowed":false
        "depth":0
        "schema_id":"pzs_px6...hon"
        "schema_version":9
    }
}
We got back the expected "allowed":false results. Now we know that nurses are not able to read or update patients at the main hospital, just at their facility.
There were quite a few steps to get here but we did this design up front and now as the system changes, the data grows, or your authorization policy evolves over time, your downstream apps inherit these policies. More importantly, because there is only one implementation, developers can reuse this between applications and not have to constantly understand, implement, and maintain their own authorization policies in their own apps, which may lead to mistakes and policy drift.
Places to extend our AuthZ policies
If you are working in healthcare with SMART on FHIR or more general Electronic Health Record (EHR) capabilities, you will include more resources, more roles, and more fine-grained capabilities based on those resources. Make sure to carefully consider the actions that individual roles should and should not be able to take on each resource type, and on the individual instances for each resource.
We recommend mapping out permissions (including inherited permissions), parent/child relationships, and ownership, similarly to how we defined them in this tutorial. After you get the resource types mapped out, you can create individual instances of resources to use in test cases and make sure your configuration performs as expected.
To explore our pre-packed Healthcare AuthZ model, you can load it into the Pangea User Console > AuthZ >> General >> Reset Authorization Schema.
Was this article helpful?