How-to guide
Overview
This guide intends to help you understand how to set up your authorization schema in AuthZ. We aim to achieve this by walking you through the process of creating a schema for a blog website that includes multiple writers, an editor, and a user administrator.
This guide assumes that you activated your AuthZ service with the Blank Schema option.
Define the resource types
First, you need to define all of the resource types you will use in your schema on the
Resource Types page. This guide will require the following resource types:user(pre-defined) - Resource type (created automatically) for the author, editor, user administrator, and administrator users (will be used to define roles on the Roles & Access page)blog_post- Resource type for blogs to be created, edited, or deleted by usersimage- Resource type for images that can be added to a blog post to enhance visual appealtopic- Resource type for topics that can associated with a blog post (this type will not be used to restrict access, but rather to assist with filtering and searching for blog posts)
To define the resource type for images:
- Navigate to AuthZ Resource Types in the Pangea User Console.
- Since this is your first resource type (if you started with the Blank Schema option when you activated AuthZ), fill out the form. For subsequent resource types, you will click + Resource Type.
- Type
imageinto the Name input. - Click Save.
To define the resource types for topics:
- Click + Resource Type.
- Type
topicinto the Name input. - Click Save.
To define the resource type for blog posts:
- Click + Resource Type.
- Type
blog_postinto the Name input. - Expand the Relationships section.
- In the Resource Roles, type
parentand click + or hit Enter. - Under Relations, click + Relation to add a new relation. Select
is parent ofin the middle drop-down menu, then selectimagein the third drop-down menu.
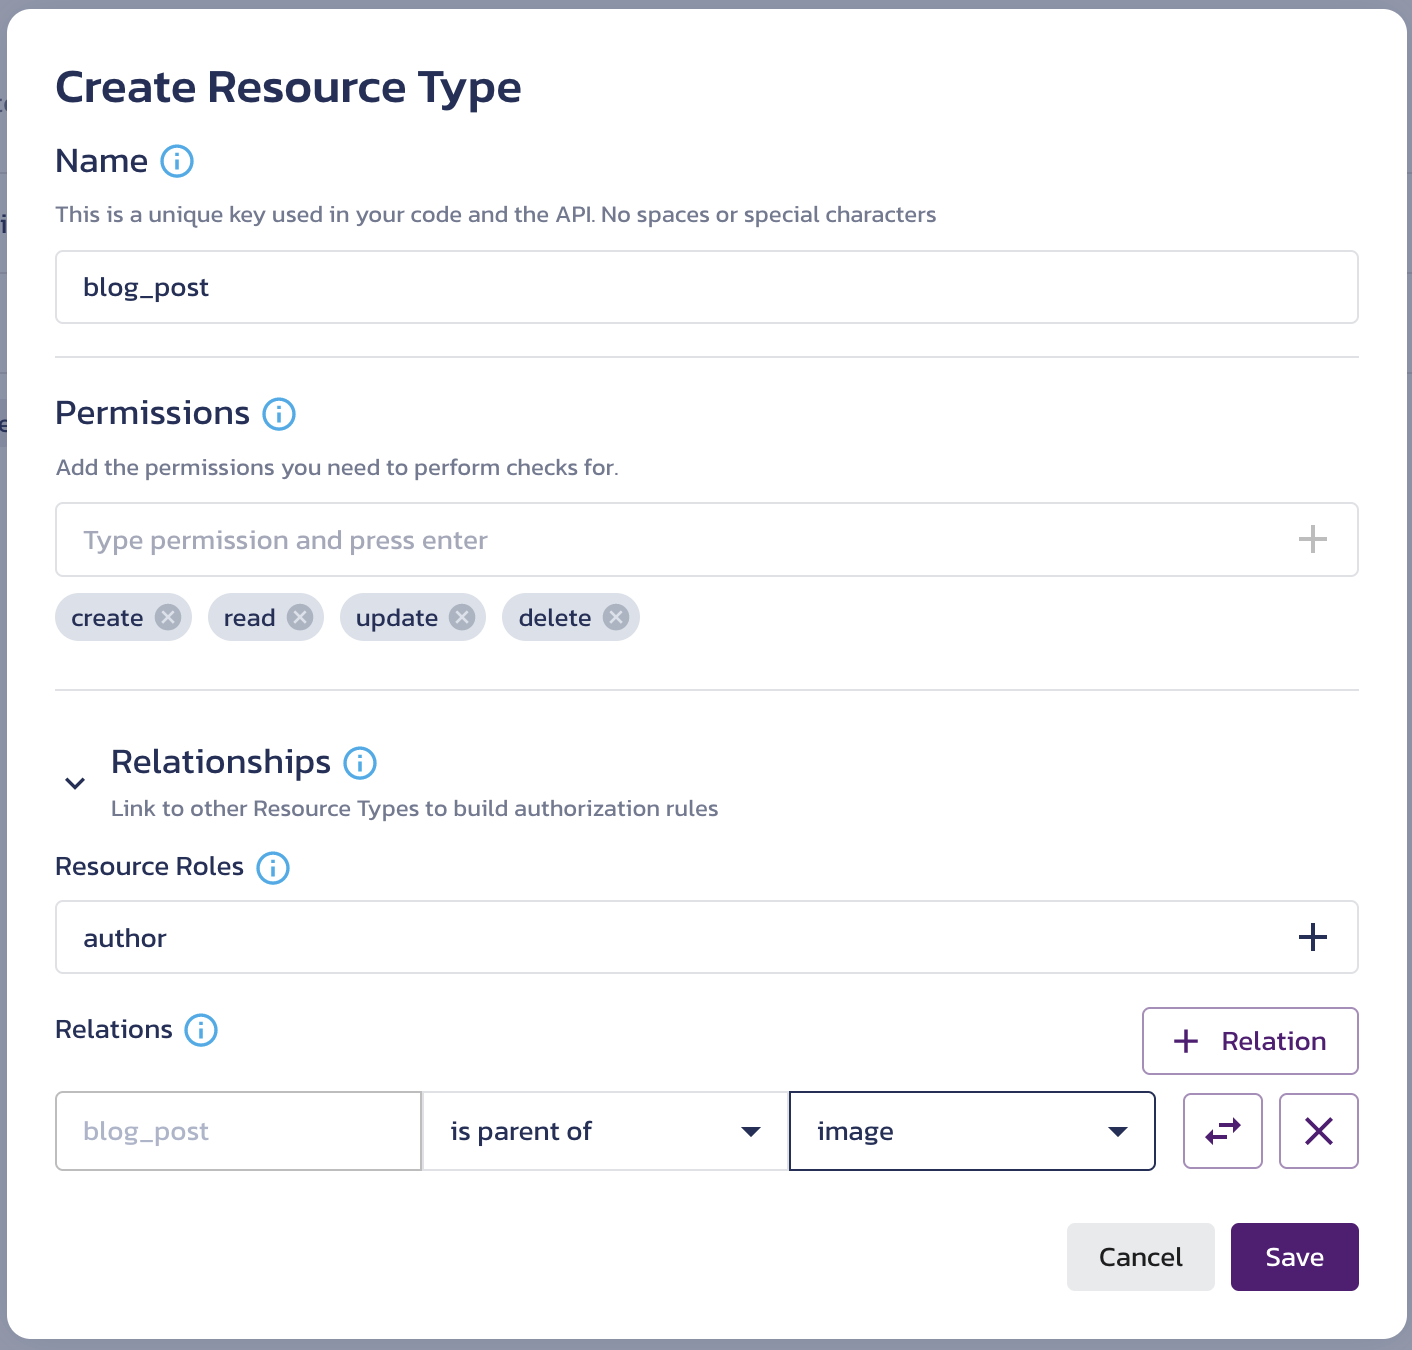
- Click Save.
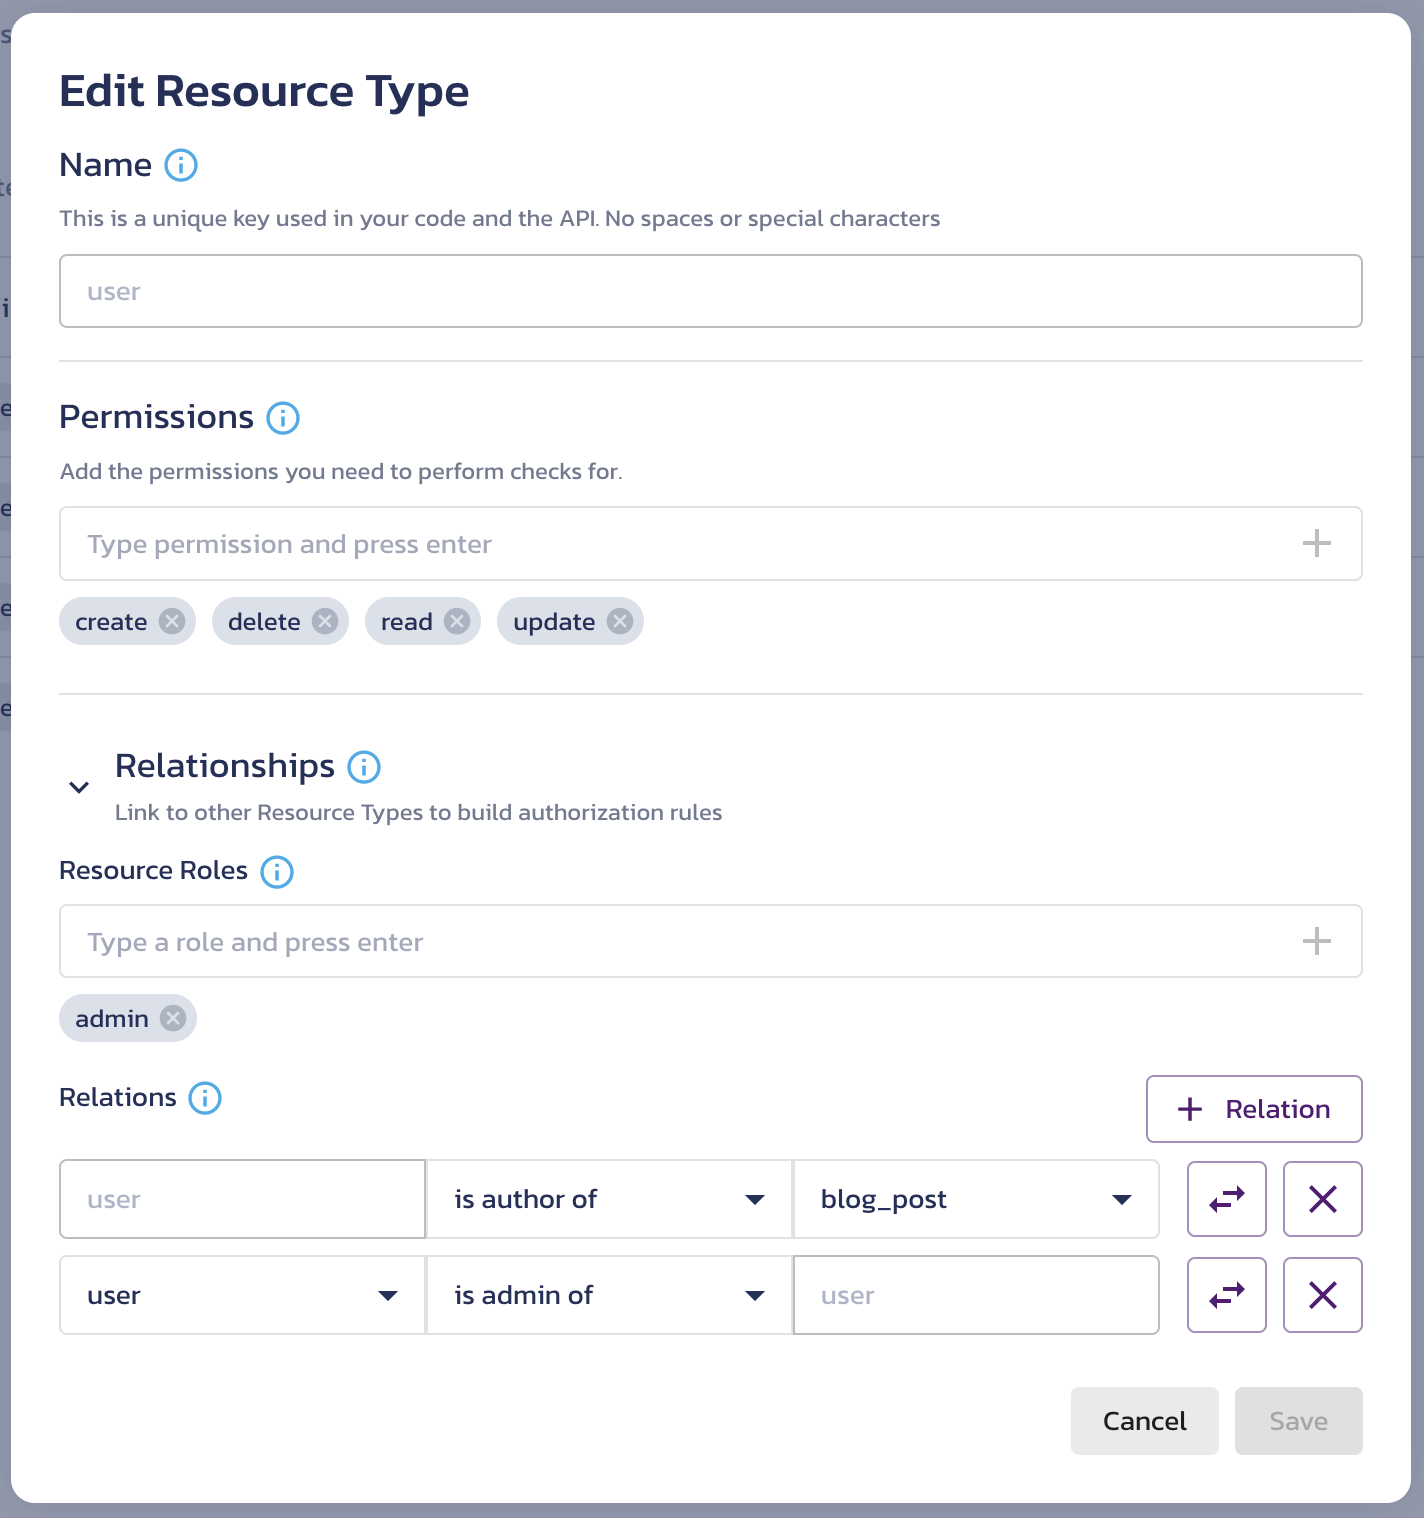
The user resource type included in the blank schema layout may not have any permissions defined by default. You will also need to create a user resource type-specific admin role so that user administrators can manage users assigned to them.
- Click the pencil icon for the
userresource type. - In the Permissions input, type in a permission, such as
create,read,update, anddelete. For each permission, click the + button or hit Enter. - Expand the Relationships section if necessary.
- Note that in the Relationships section, there is already a relation defined:
useris author ofblog_post. This is because you created a blog post resource type-specific role, and every role you create can be assigned to a user. - Next, create a user administrator role, by typing
admininto the Resource Roles input and clicking the + button or hitting Enter. - Click Save.
- Because you created a new role, the
userresource type now has an additional relationship defined:useris admin ofuser. If you reopen the Edit Resource Type dialog for theuserresource type, you will see it under Relationships:
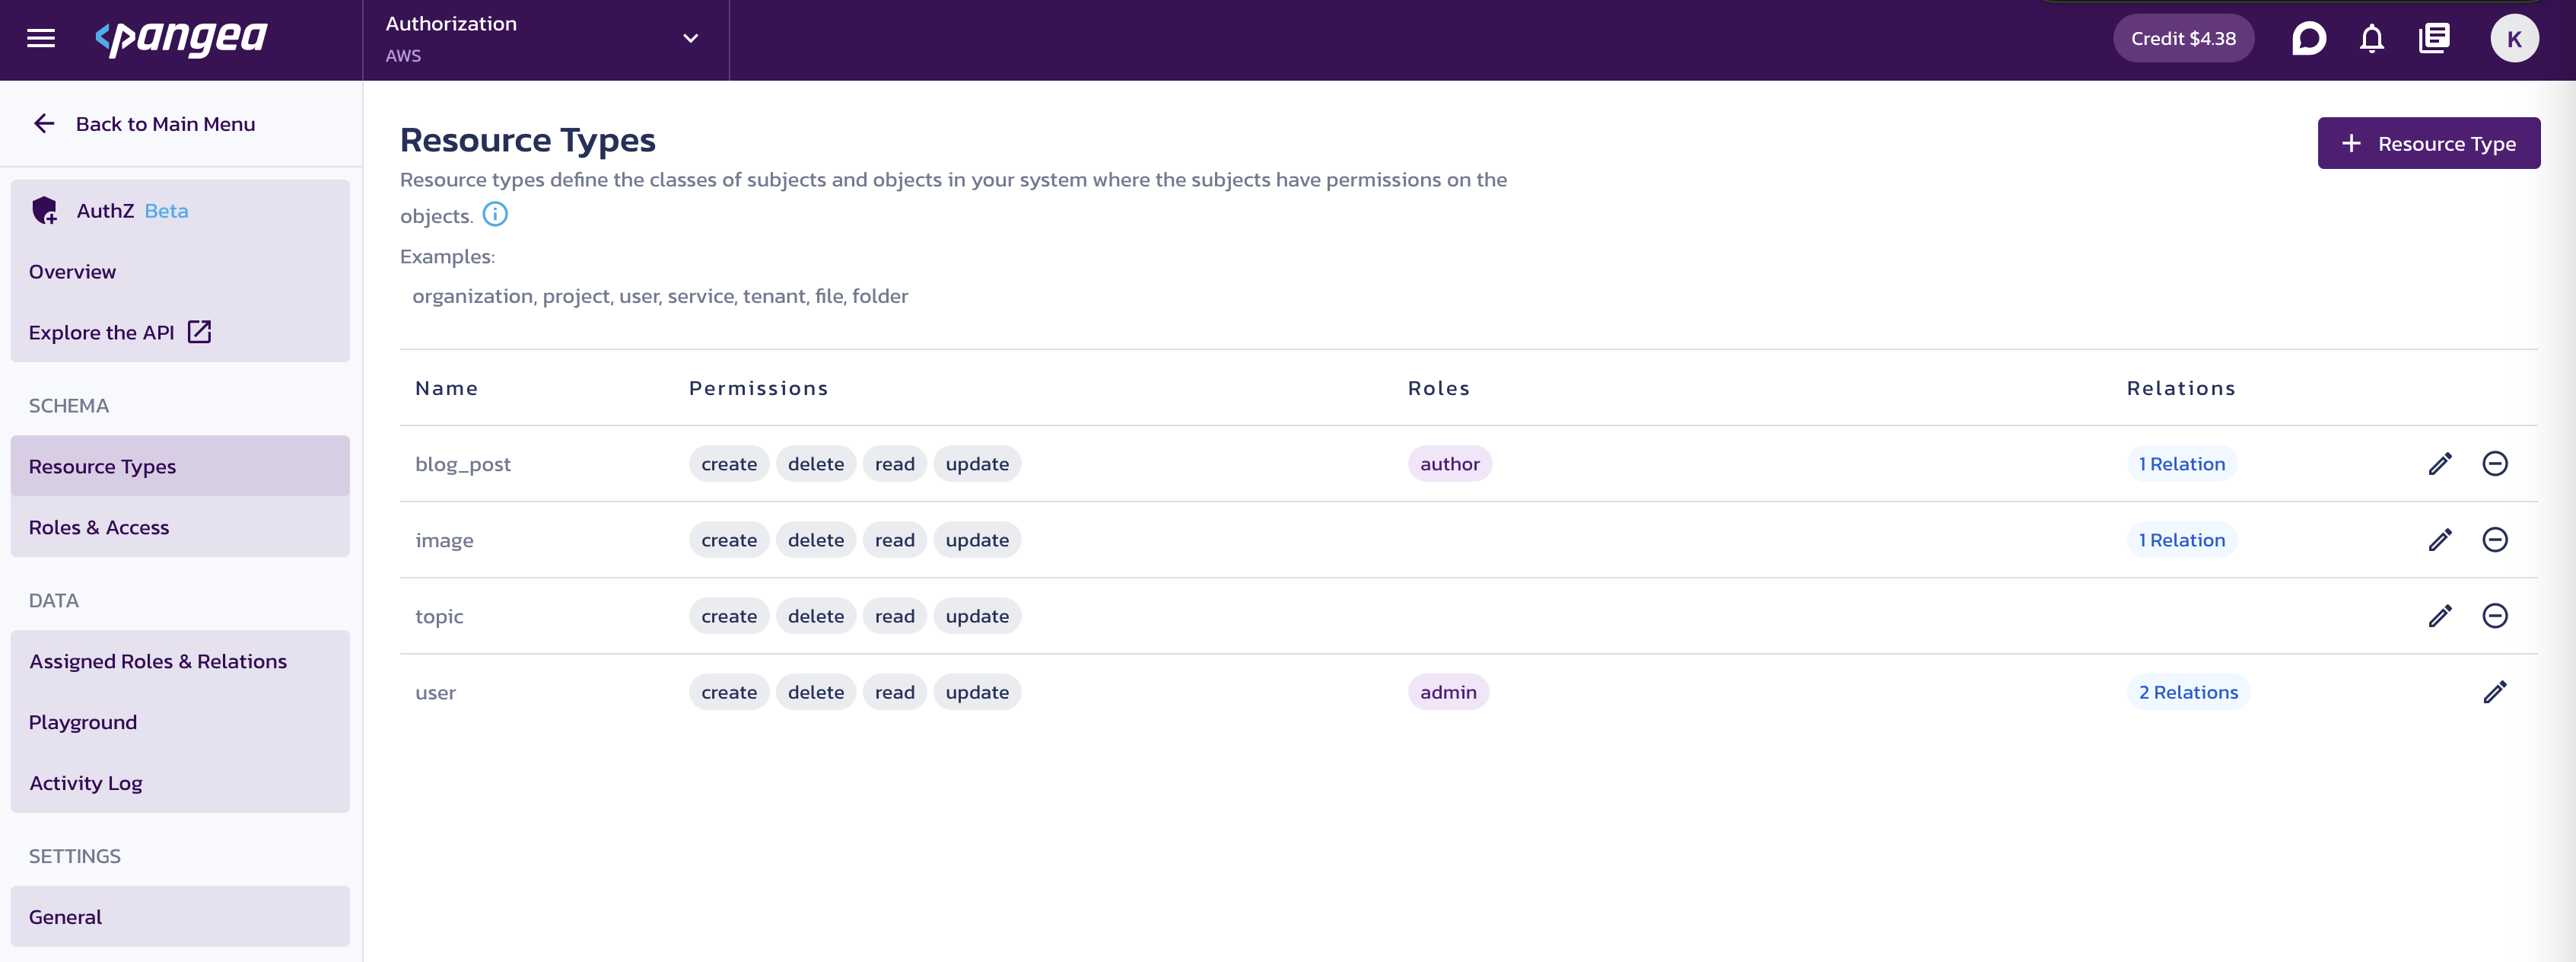
The final resource type list should look like the following:
Define your roles
The next step is to define the roles for your schema on the Roles & Access page. Note that you will already have defined the resource type-specific roles on the page:
blog_post authoruser admin
The resource type-specific permissions, such as permissions for managing blog posts by their authors, can only be applied to an existing object and cannot be extended to creating a new object. However, a role not associated with a resource type can bear permission to create any resource. Use the + Role button, provide a name, leave the Resource Type Relationship (Optional) section unpopulated, and click Save for each of the following roles unspecific to any resource type:
admin- Provide full access to everything, including creating and deleting userseditor- Allow to edit blog posts and full access to images and topicsauthor- Allow to create a blog post
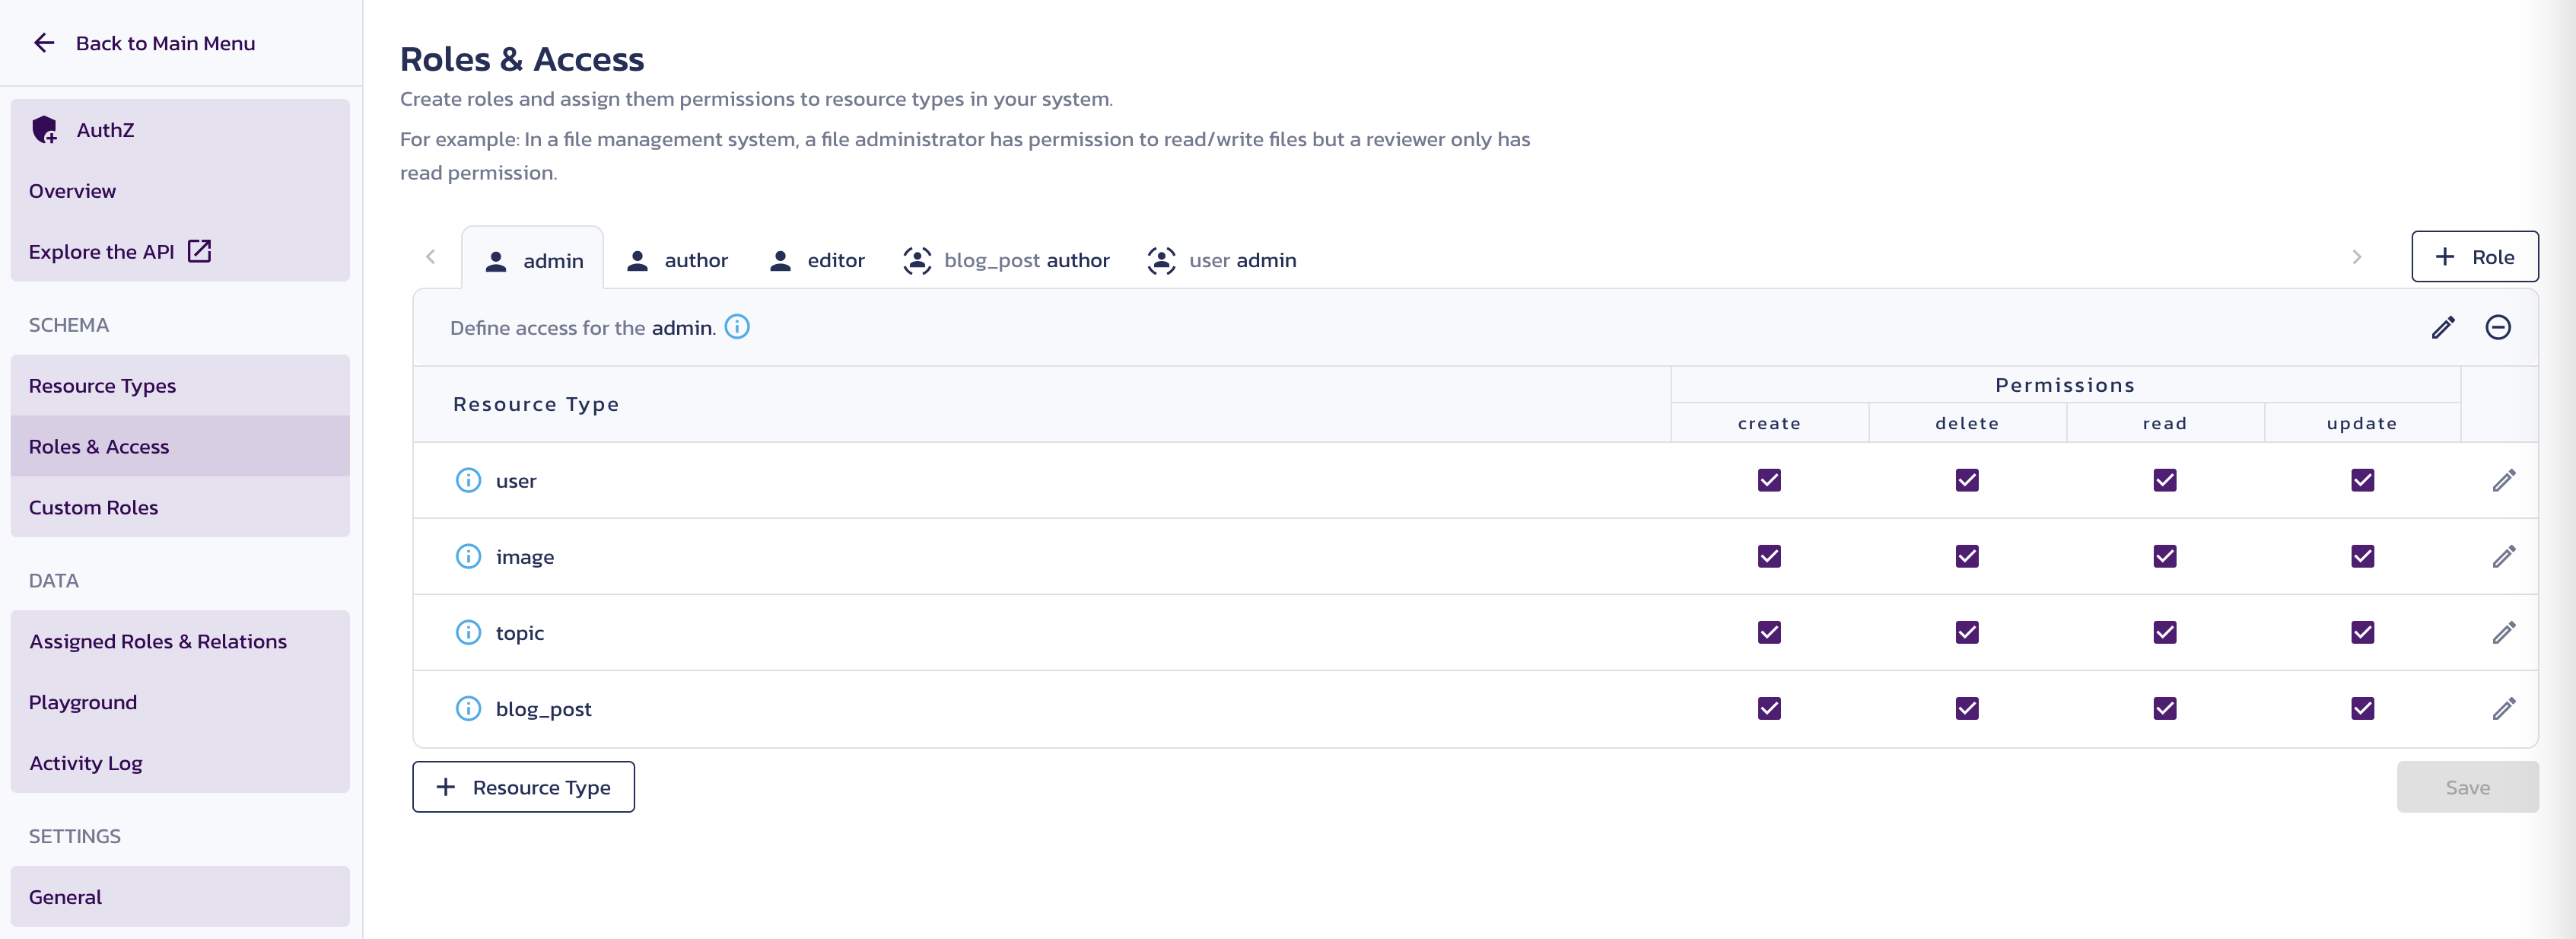
Assign the permissions to each role:
- For the
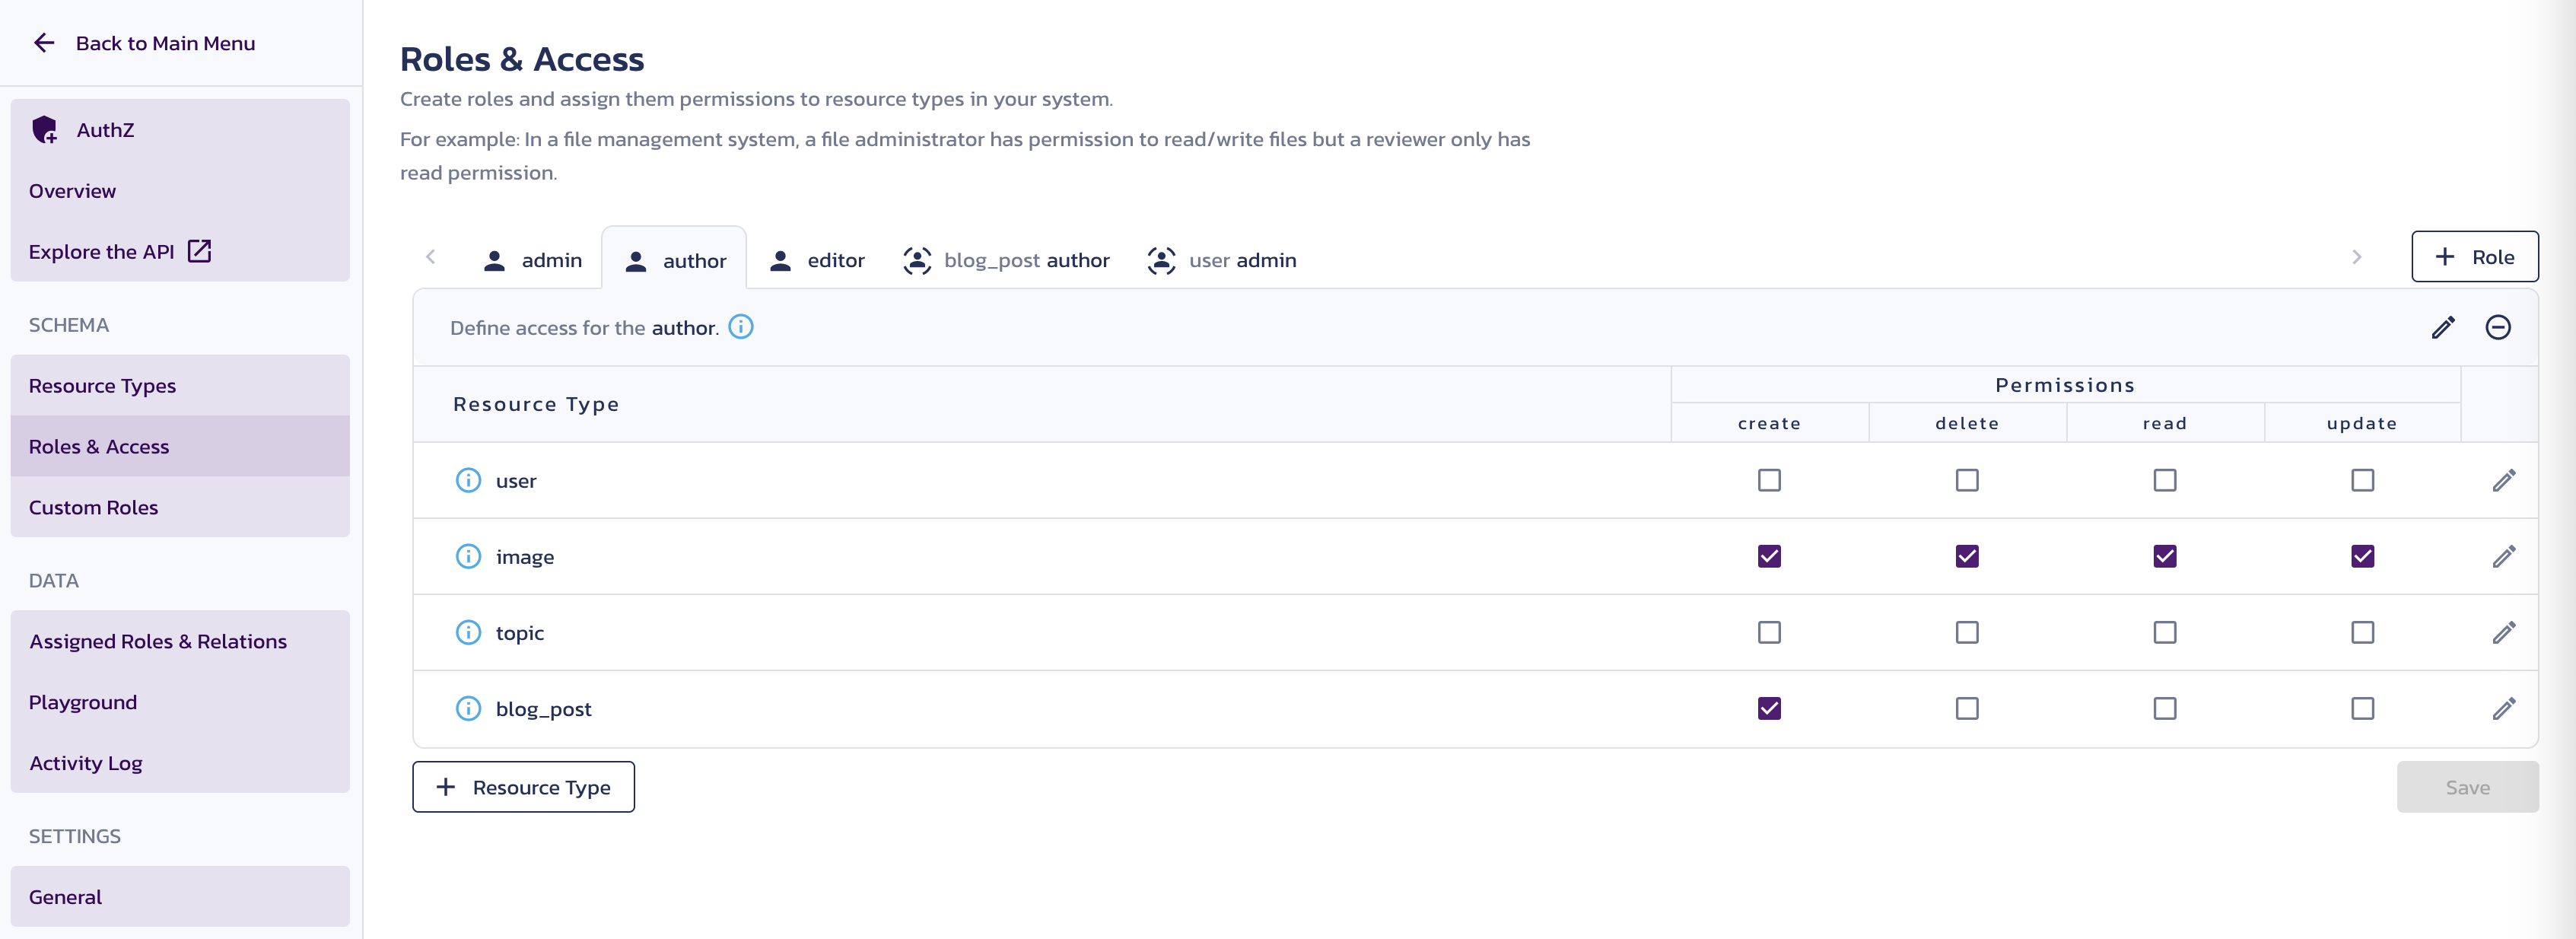
adminrole, select all checkboxes for all resource types. - For the
authorrole select thecreatecheckbox for theblog_postandimageresource types. - For the
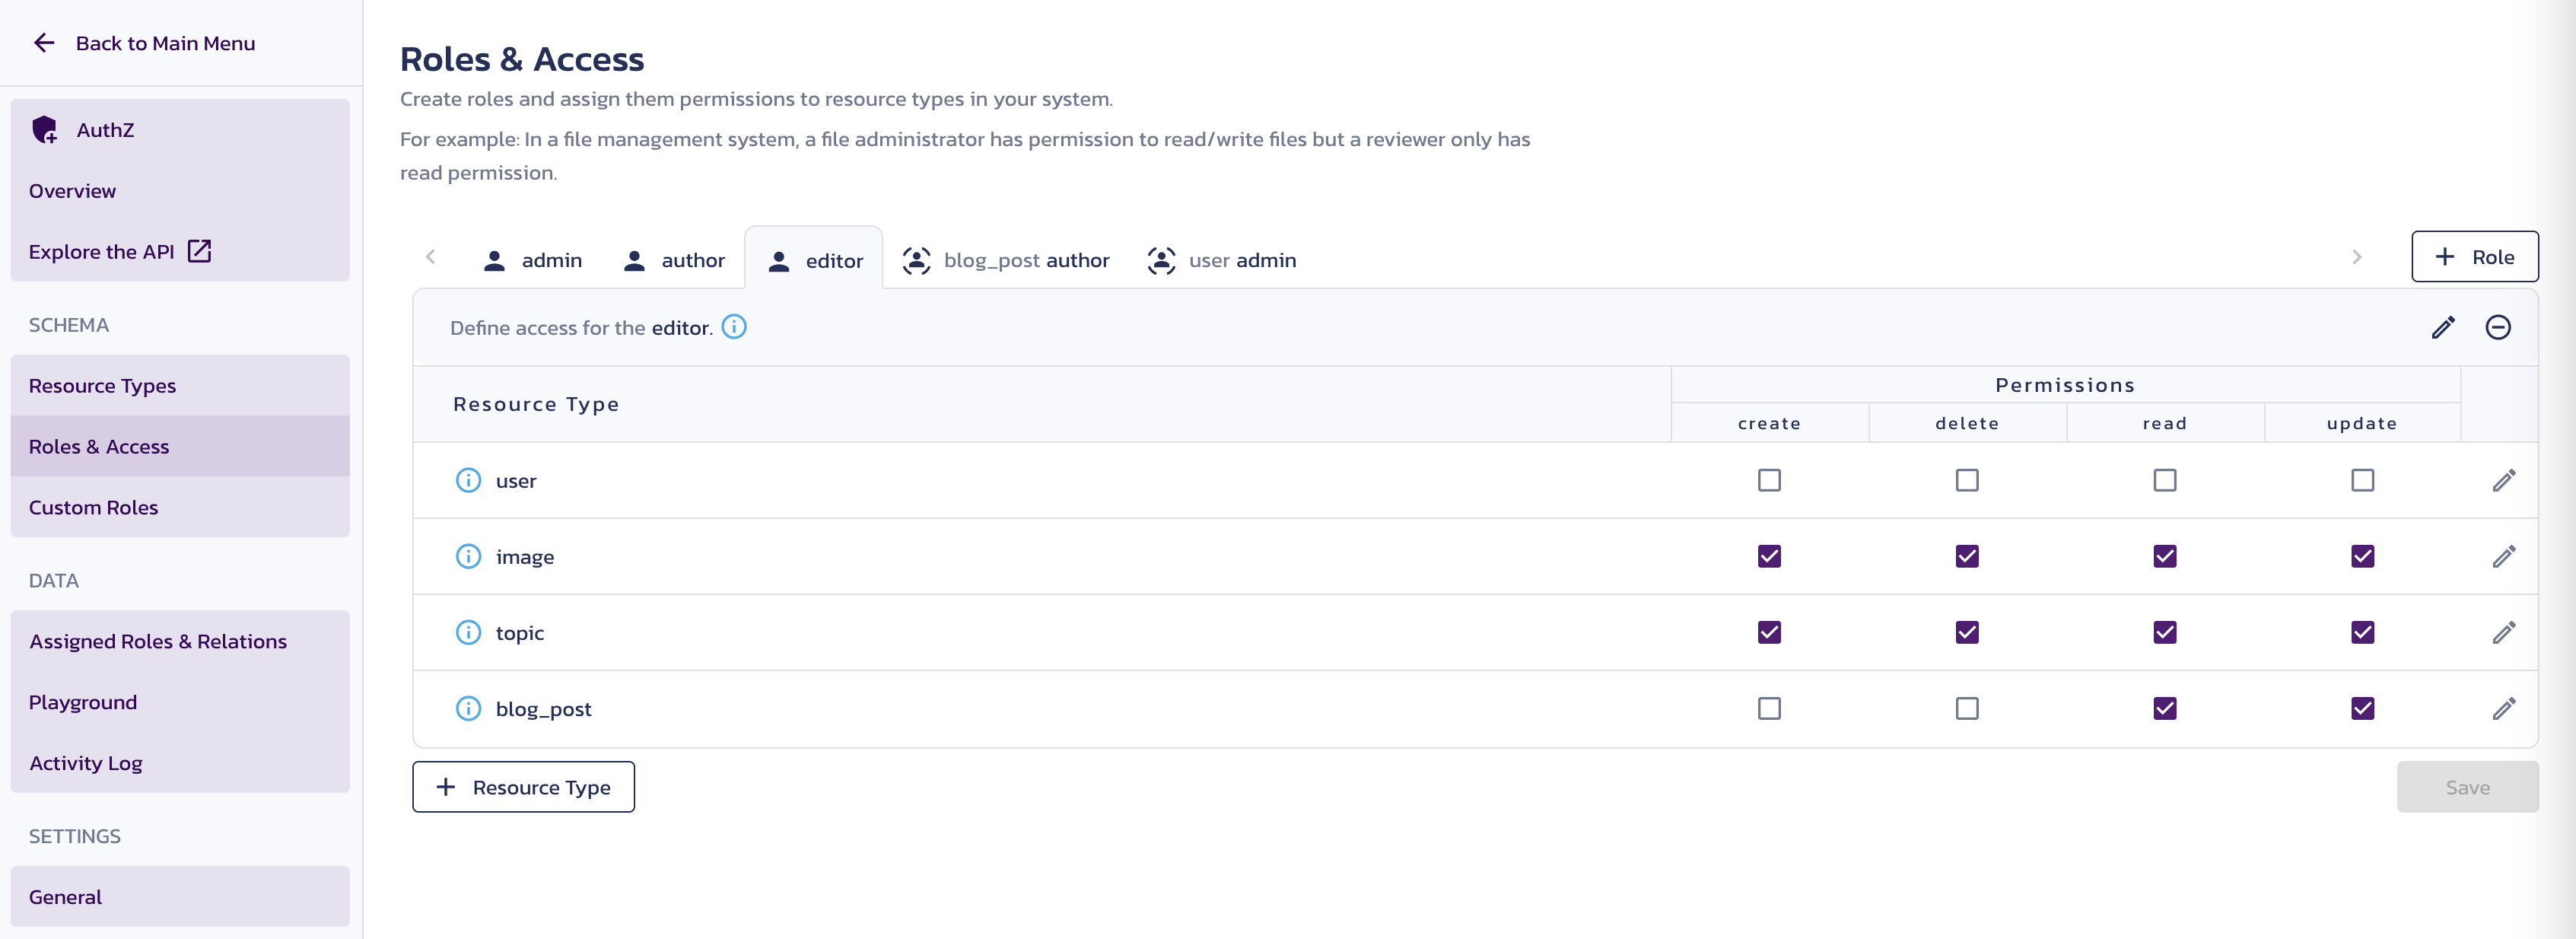
editorrole select all checkboxes for theimageandtopicsresource types, as well asreadandupdatecheckboxes for theblog_postresource type. - For the
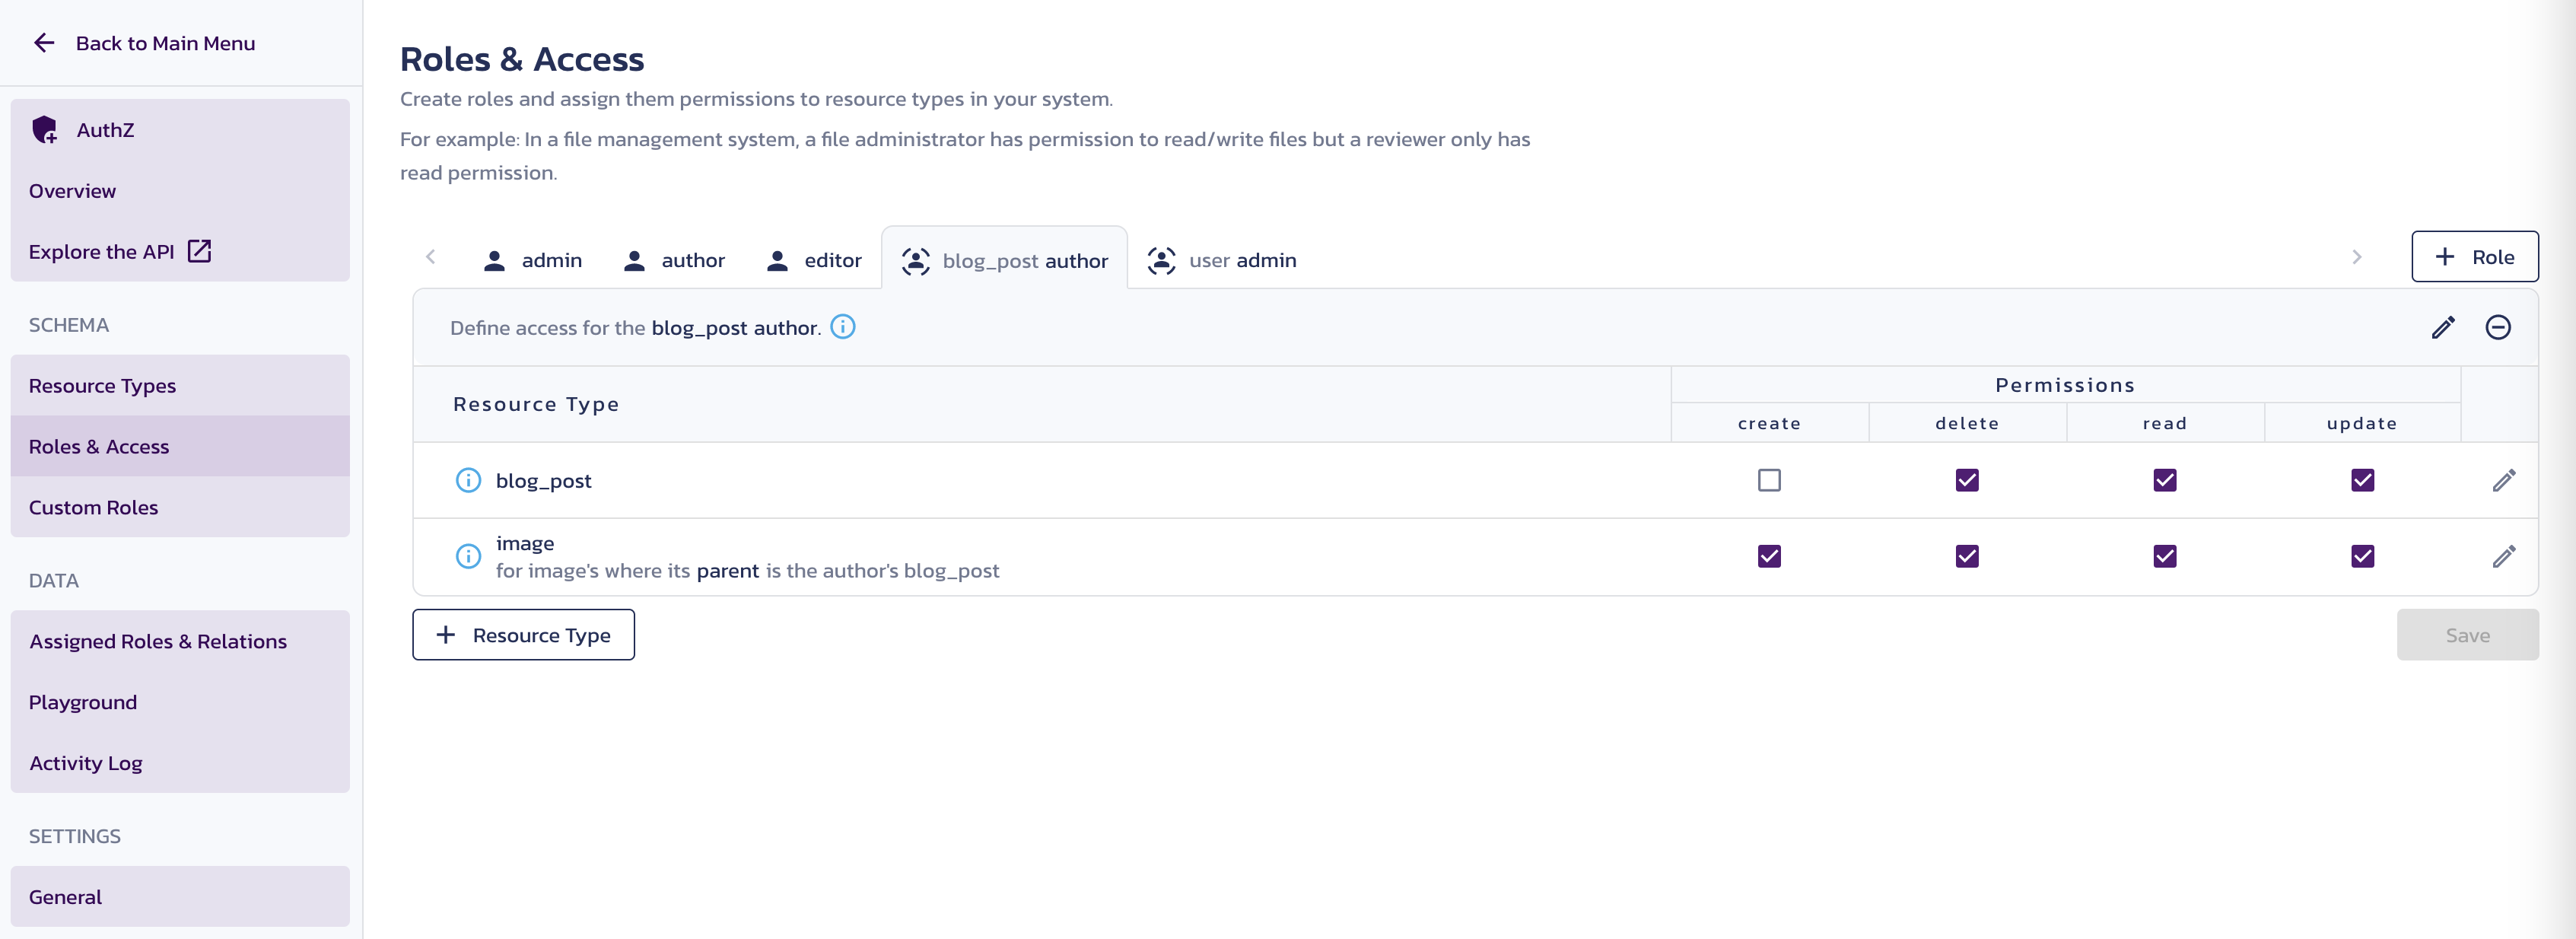
blog_post authorrole select theread,update, anddeletecheckboxes for theblog_postandimageresource types. - For the
user adminrole, select theread,update, anddeletecheckboxes for theuserresource types.
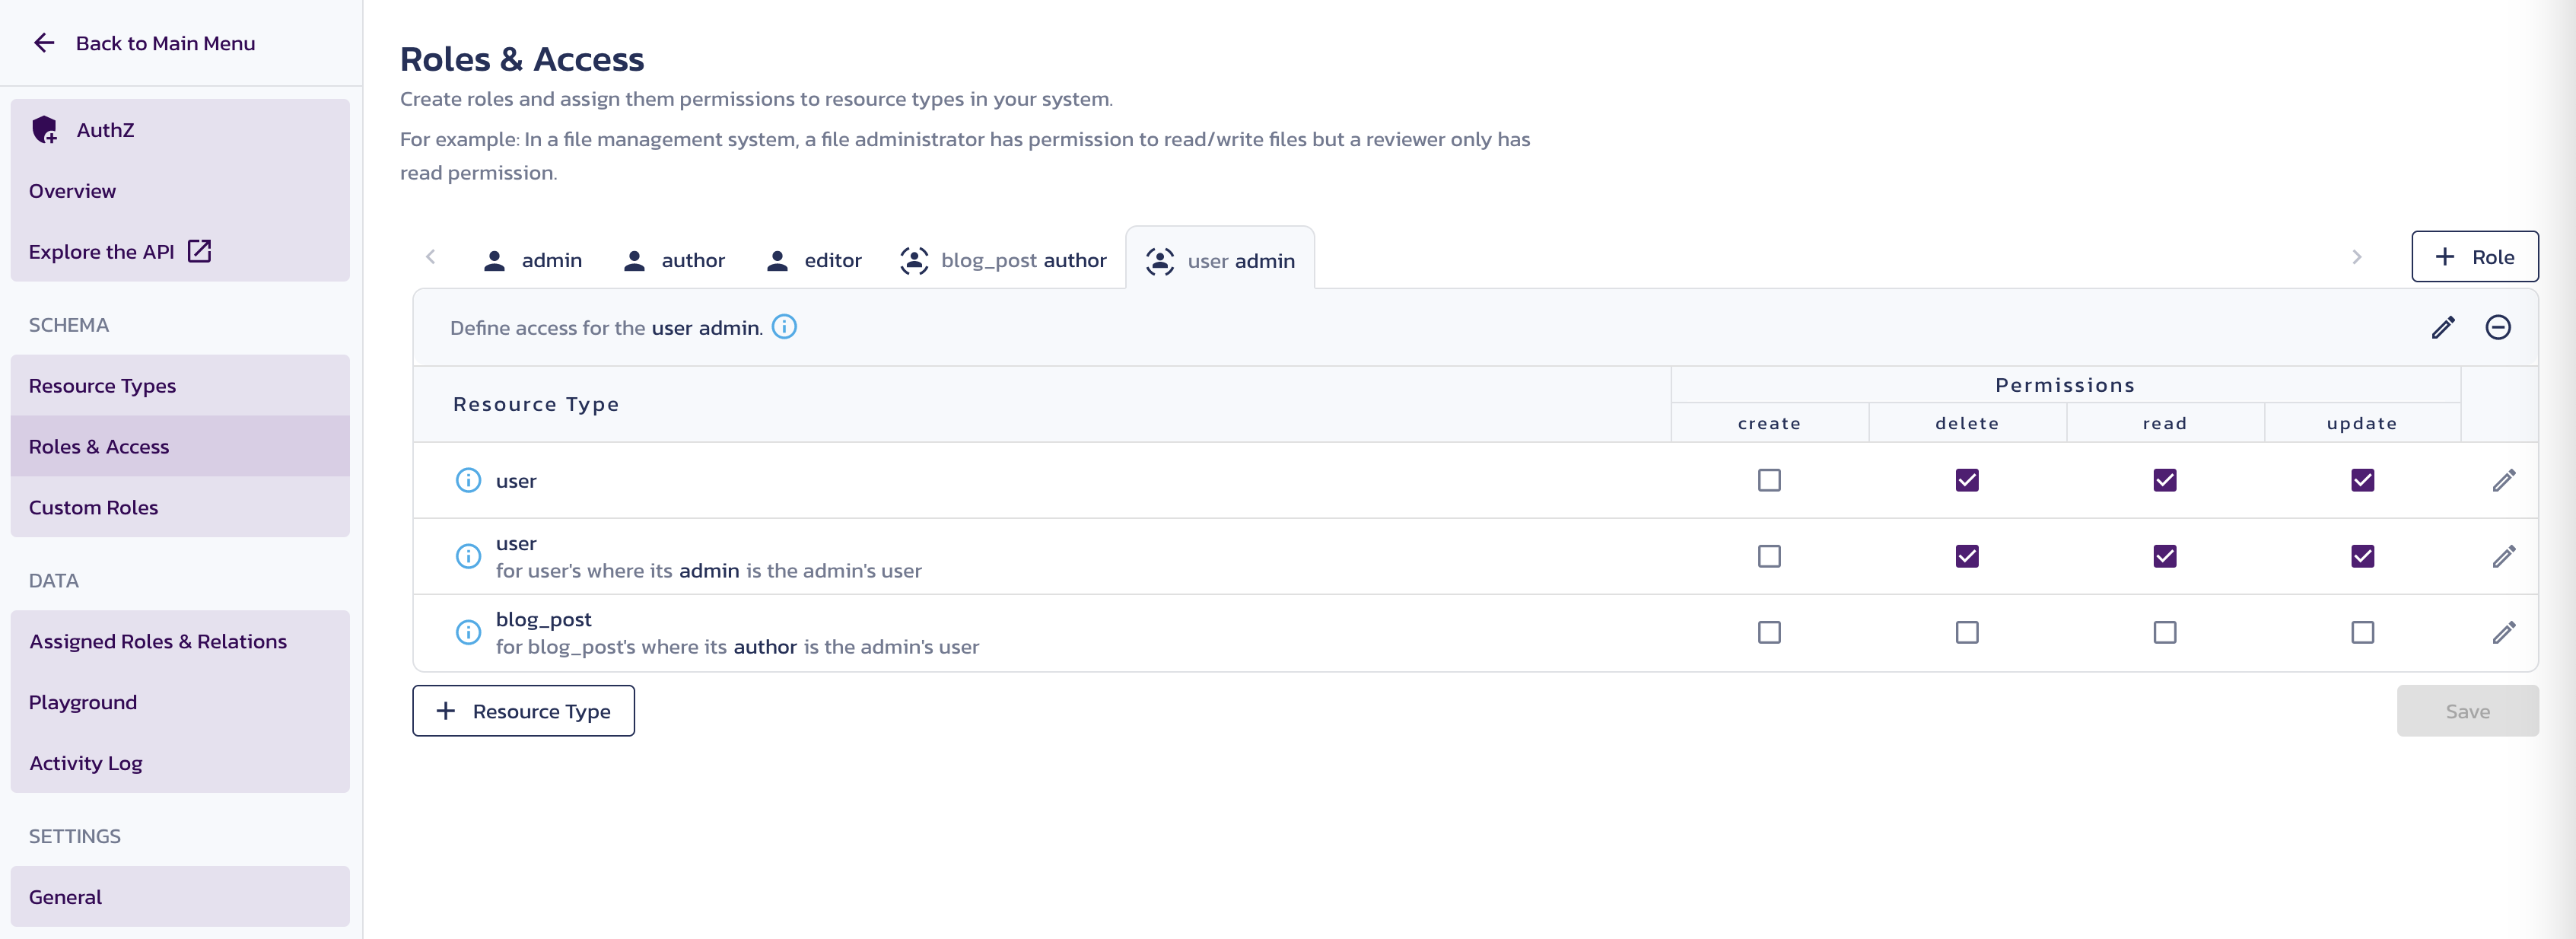
Add relations to the roles and resource types
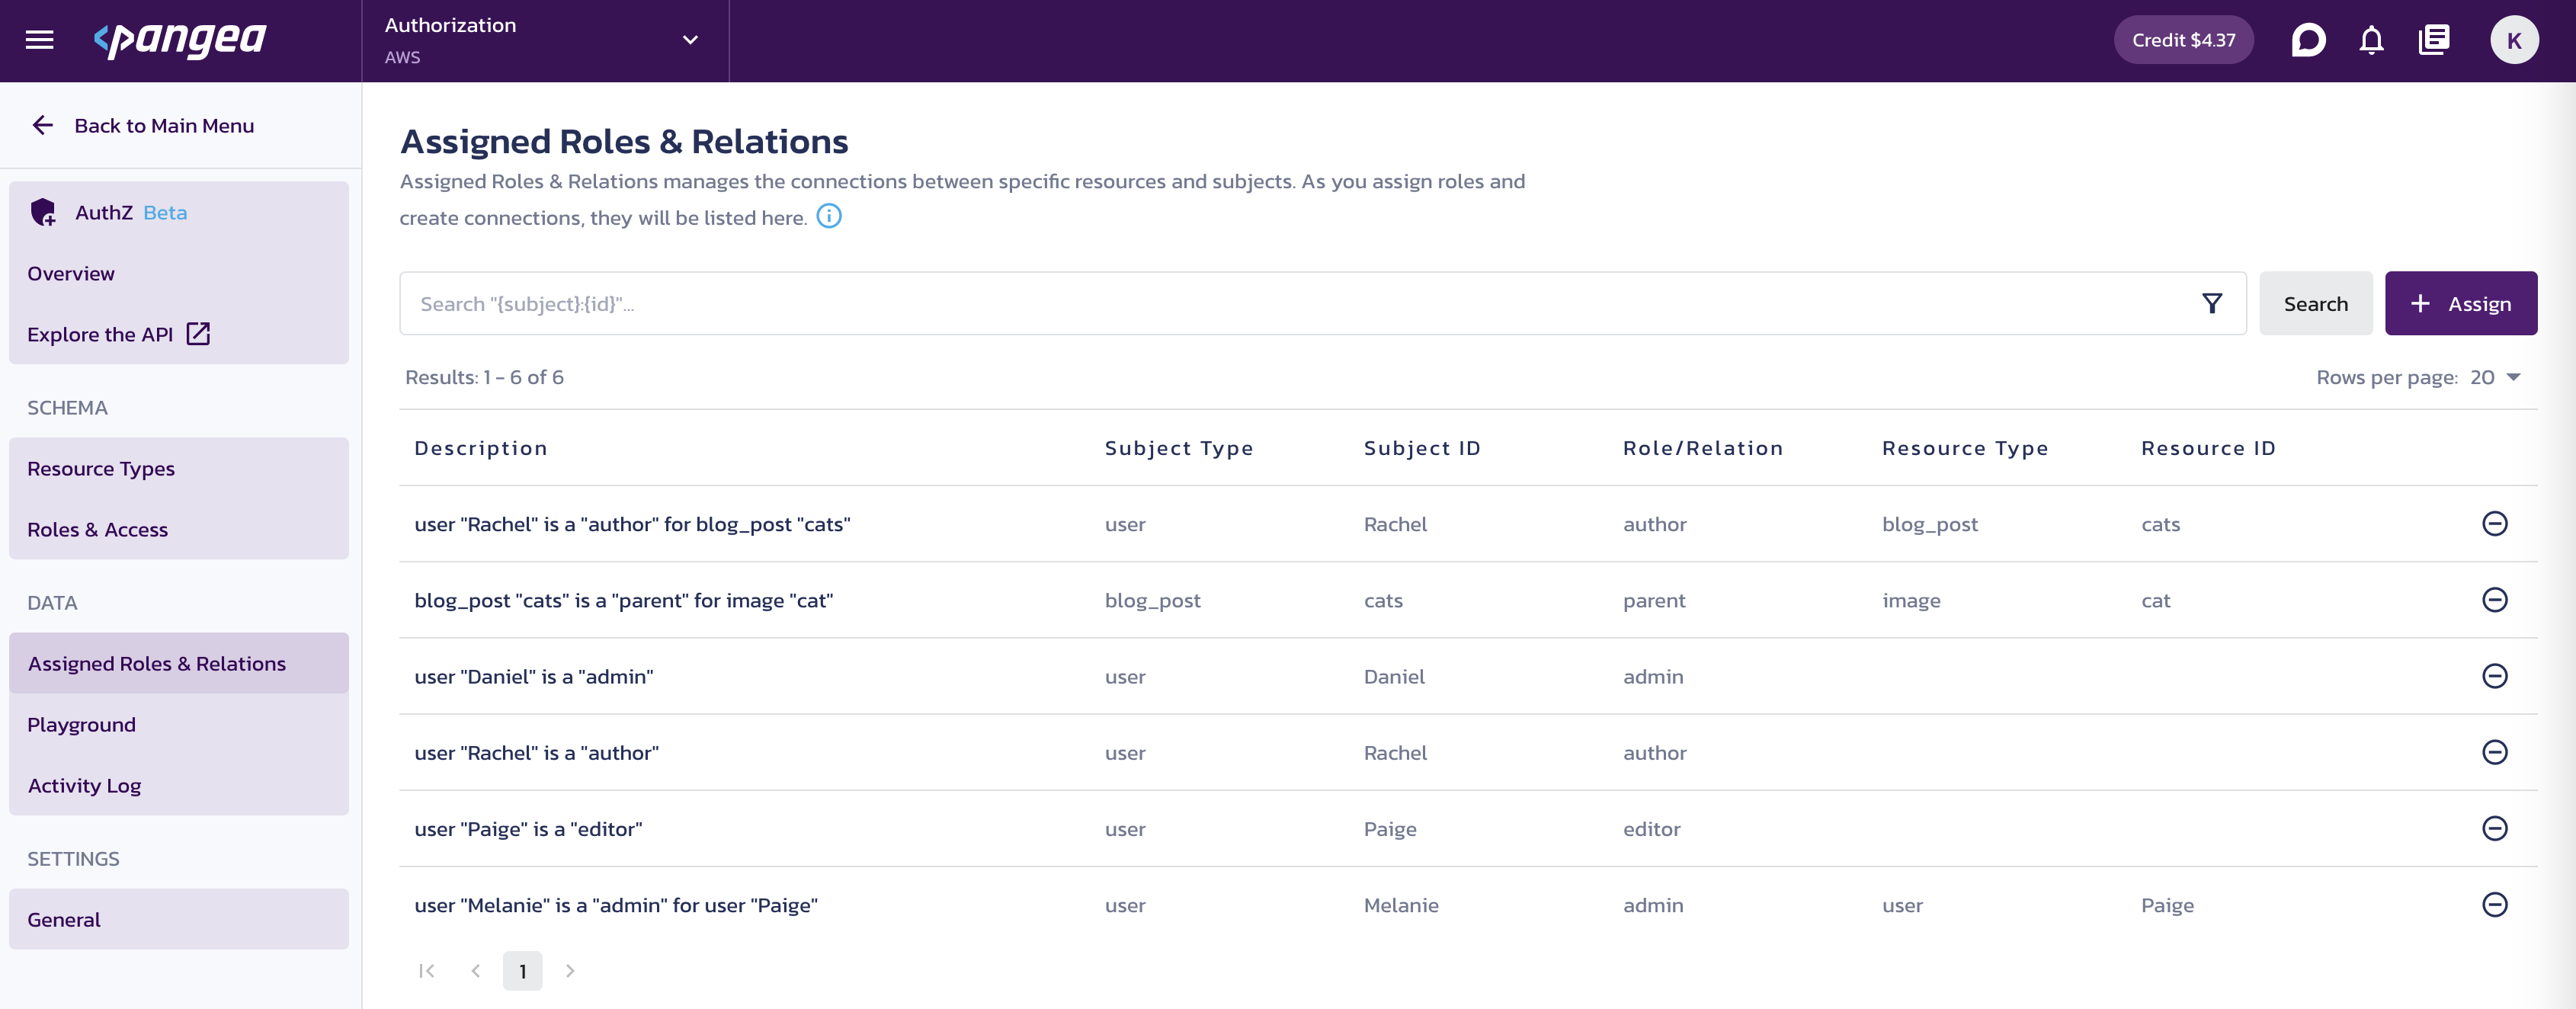
To test your AuthZ configuration, you can map the roles and resource types to subjects and objects in your application data on the Assigned Roles & Relations page. The first time you visit this page, you will be prompted to create an assignment:
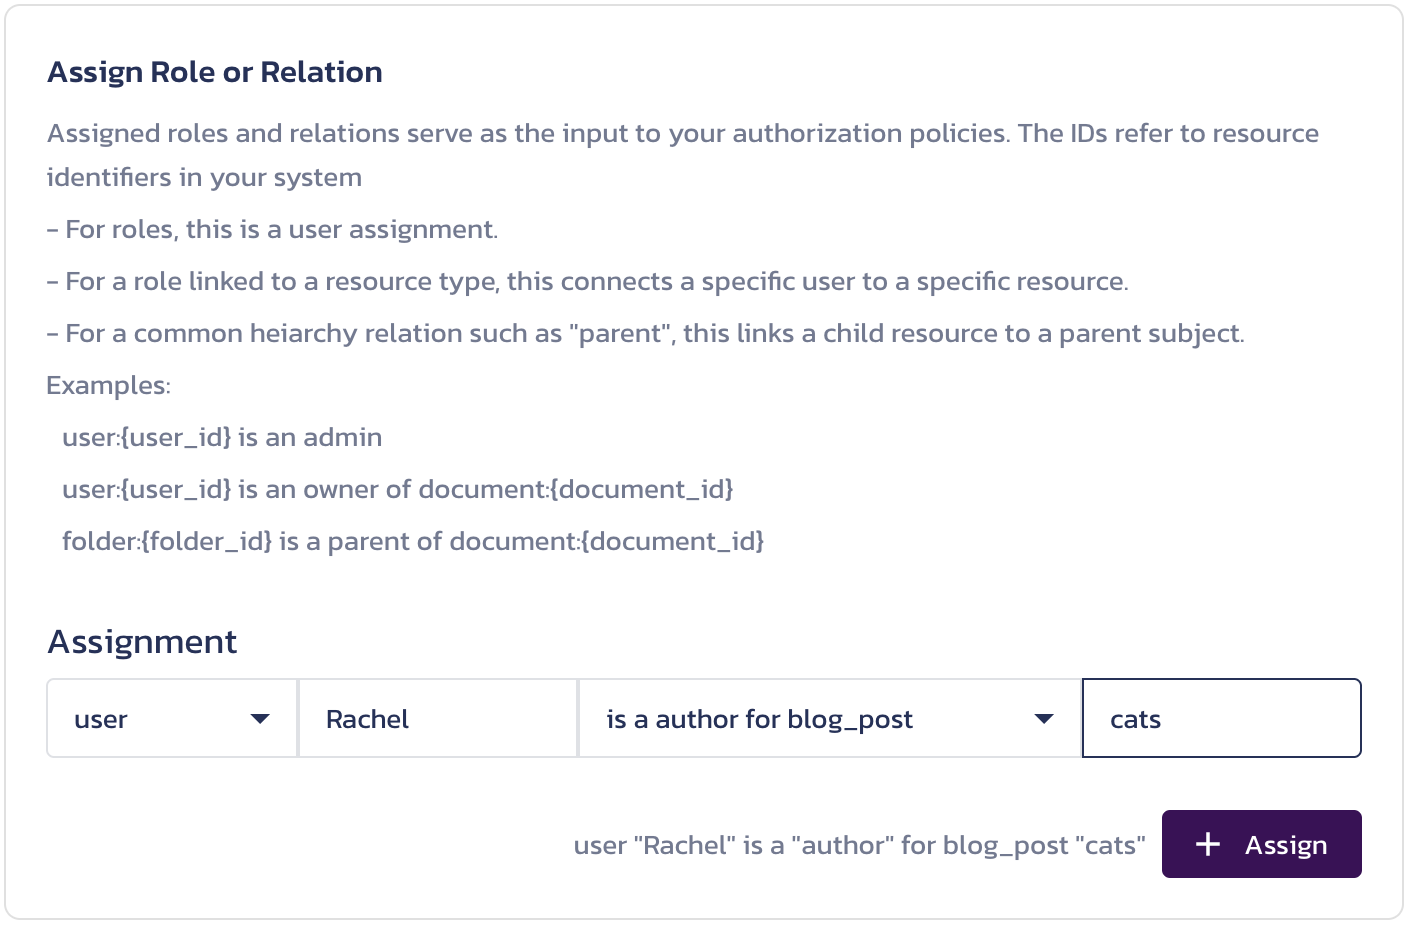
Save your assignment by clicking the + Assign button in the dialog.
For future assignments, use the + Assign button on the page.
Create the following assignments using the subject and relation dropdowns, providing data identifiers in the corresponding inputs:
userRachelis a authoruserRachelis a author for blog_postcatsblog_postcatsis a parent for imagecatuserPaigeis a editoruserMelanieis a admin for userPaigeuserDanielis a admin
Verify AuthZ configuration
You can test your configuration using the Playground page in the Pangea User Console.
On the Playground page, under Check Permissions, specify your conditions to test using the autocomplete as a guide and click the Check button:
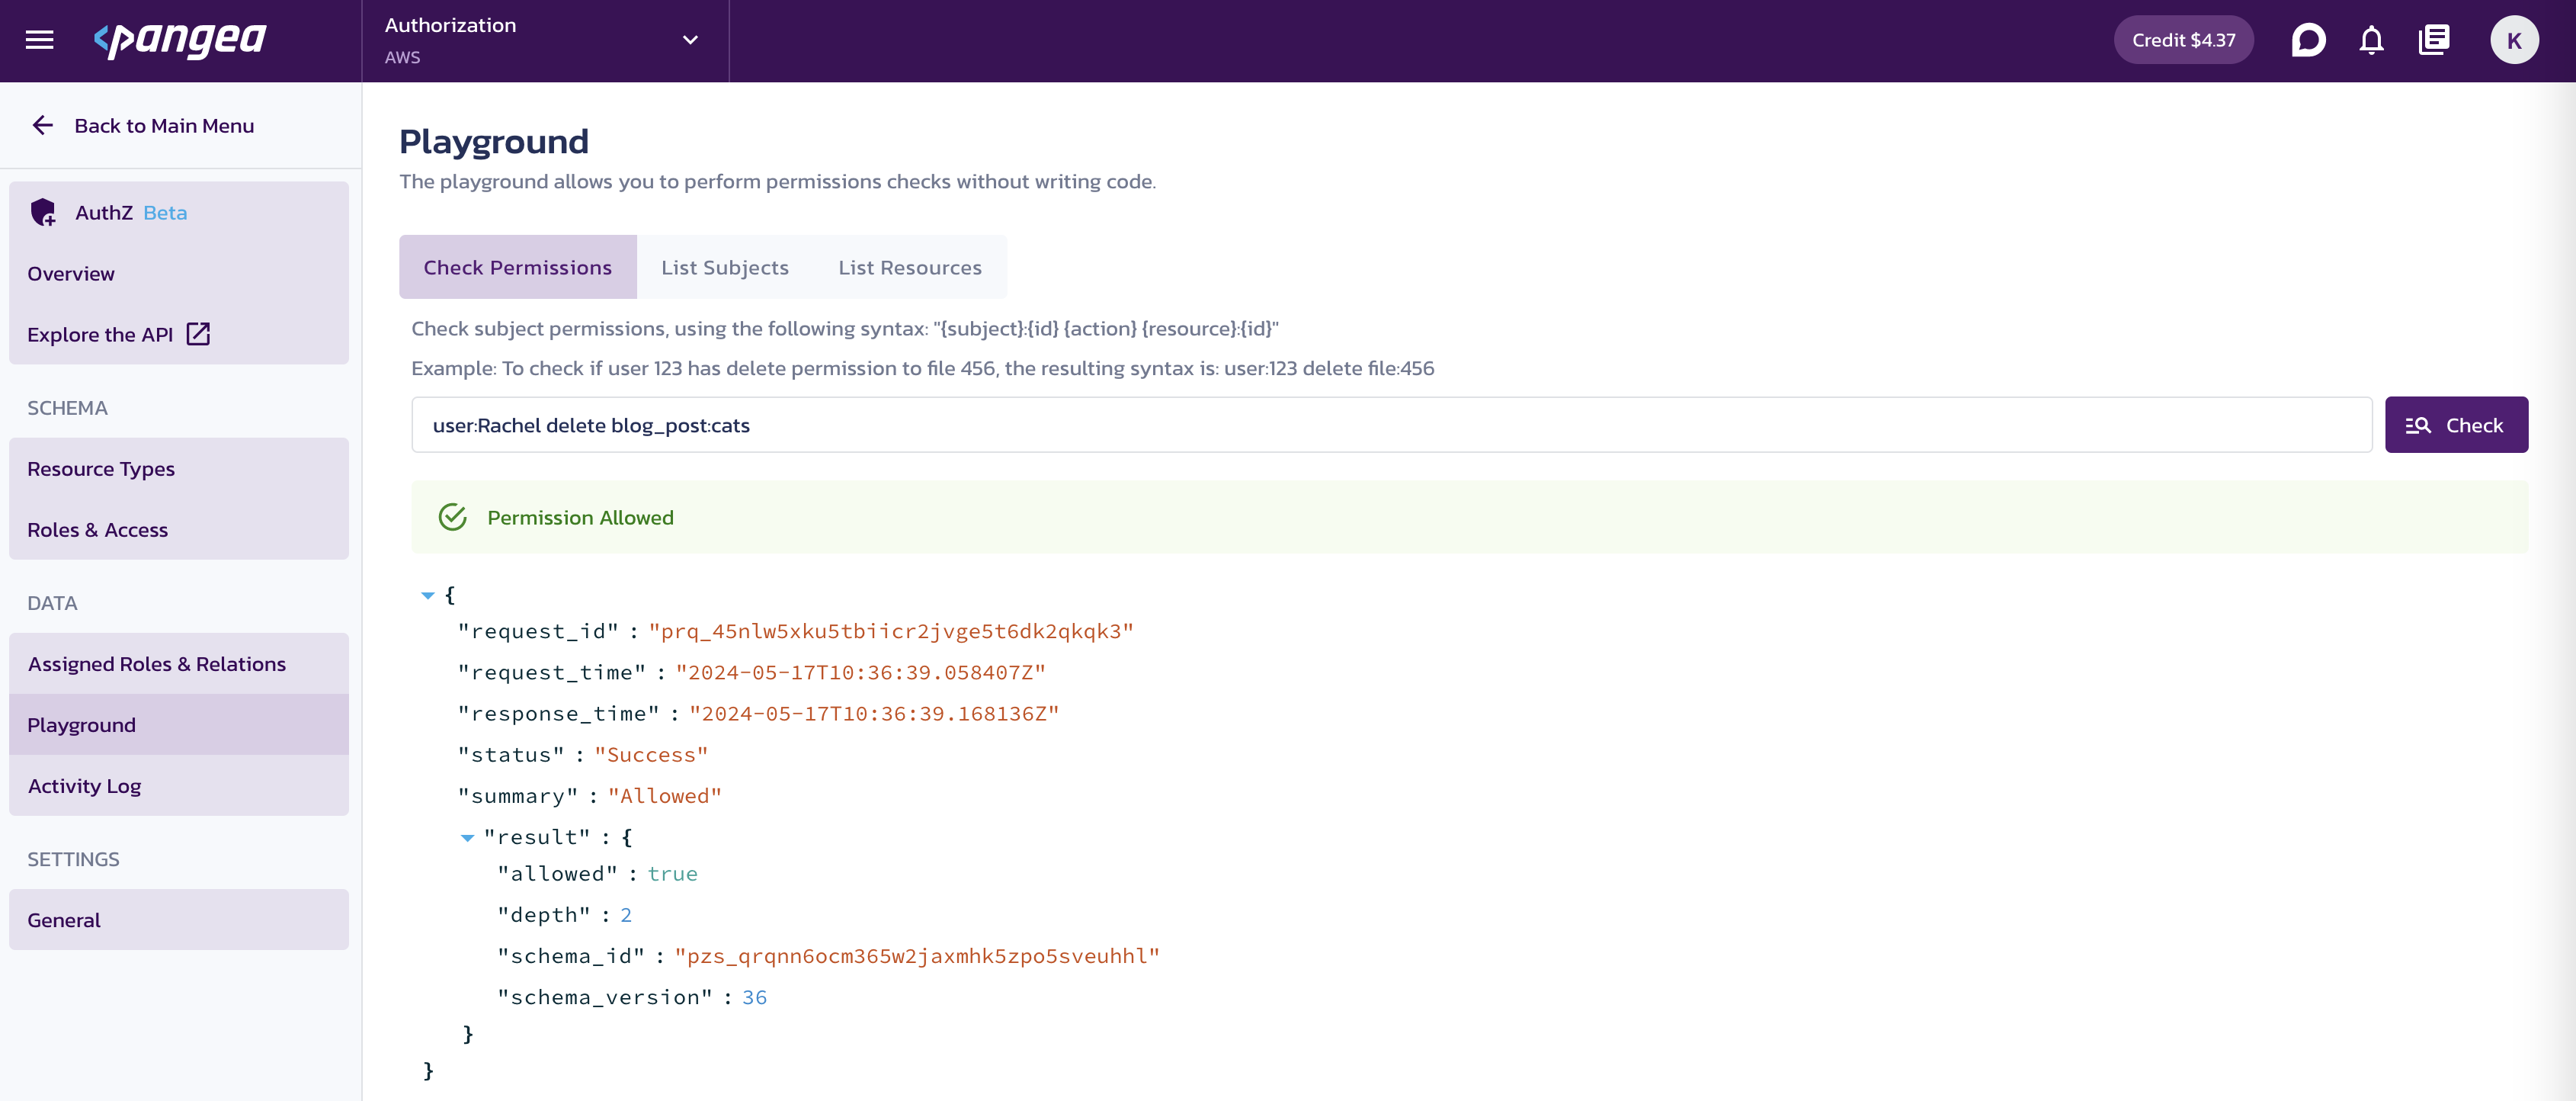
Example checks that should result in "Allowed":
- "user:Rachel create blog_post"
- "user:Rachel delete blog_post:cats"
- "user:Rachel create image"
- "user:Paige update blog_post:pangolins"
- "user:Daniel create user"
Example checks that should result in "Denied":
- "user:Rachel update blog_post:pangolins"
- "user:Rachel create topic"
- "user:Paige delete blog_post:cats"
Sample code for your app
This section assumes that you have installed the necessary tools and have configured your environment for using AuthZ in whichever language below that you use, as outlined in the Getting Started guide. You can also explore our AuthZ SDK documentation as well.
Before coding with this example, make sure you have exported the required token and domain variables to your environment. To do so, run the following commands in a bash terminal, replacing yourServiceDomain and yourAccessToken with your Domain and Default Token copied from the AuthZ page in your Pangea User Console.
export PANGEA_DOMAIN="yourServiceDomain"
export PANGEA_AUTHZ_TOKEN="yourAccessToken"
Before running this code, install the SDK:
pip3 install pangea-sdk
or
poetry add pangea-sdk
Run this example to assign and check permissions:
from os import getenv
from secrets import token_hex

from pangea.config import PangeaConfig
from pangea.services import AuthZ
from pangea.services.authz import Resource, Subject, Tuple

pangea_domain = getenv("PANGEA_DOMAIN", "aws.us.pangea.cloud")
pangea_authz_token = getenv("PANGEA_AUTHZ_TOKEN", "")

# Create AuthZ client
authz = AuthZ(token=pangea_authz_token, config=PangeaConfig(domain=pangea_domain))

# Assign roles and relations
print("Assigning roles and relations...")

authz.tuple_create(
  [
    Tuple(
      resource=Resource(type="role"),
      relation="author",
      subject=Subject(type="user", id="Rachel")
    ),
    Tuple(
      resource=Resource(type="blog_post", id="cats"),
      relation="author",
      subject=Subject(type="user", id="Rachel")
    ),
    Tuple(
      resource=Resource(type="image", id="cat"),
      relation="parent",
      subject=Subject(type="blog_post", id="cats")
    ),
    Tuple(
      resource=Resource(type="role"),
      relation="editor",
      subject=Subject(type="user", id="Paige")
    ),
    Tuple(
      resource=Resource(type="user", id="Rachel"),
      relation="admin",
      subject=Subject(type="user", id="Melanie")
    ),
    Tuple(
      resource=Resource(type="user", id="Paige"),
      relation="admin",
      subject=Subject(type="user", id="Melanie")
    ),
    Tuple(
      resource=Resource(type="role"),
      relation="admin",
      subject=Subject(type="user", id="Daniel")
    )
  ]
)

# Check permissions
print("Checking permissions...")

check_response = authz.check(
  resource=Resource(type="blog_post"),
  action="create",
  subject=Subject(type="user", id="Rachel"),
)
print(f"'user' 'Rachel' can 'create' 'blog_post': '{check_response.result.allowed}'")

check_response = authz.check(
  resource=Resource(type="blog_post", id="cats"),
  action="delete",
  subject=Subject(type="user", id="Rachel"),
)
print(f"'user' 'Rachel' can 'delete' 'blog_post' 'cats': '{check_response.result.allowed}'")

check_response = authz.check(
  resource=Resource(type="user", id="Rachel"),
  action="delete",
  subject=Subject(type="user", id="Melanie"),
)
print(f"'user' 'Melanie' can 'delete' 'user' 'Rachel': '{check_response.result.allowed}'")

check_response = authz.check(
  resource=Resource(type="user"),
  action="delete",
  subject=Subject(type="user", id="Daniel"),
)
print(f"'user' 'Daniel' can 'delete' any 'user': '{check_response.result.allowed}'")

# Unassign permissions
print("Unassigning roles and relations...")

authz.tuple_delete(
  [
    Tuple(
      resource=Resource(type="user", id="Rachel"),
      relation="admin",
      subject=Subject(type="user", id="Melanie")
    )
  ]
)

# Check permissions
check_response = authz.check(
  resource=Resource(type="user", id="Rachel"),
  action="delete",
  subject=Subject(type="user", id="Melanie"),
)
print(f"'user' 'Melanie' can 'delete' 'user' 'Rachel': '{check_response.result.allowed}'")
Next steps
Pangea offers the ability to integrate services for additional functionalities. For example, you can send audit log data to Pangea for verification and recording:
def send_audit_log(action, message):
  audit_client = Audit(config=pangaea_config)
  audit_client.log(action=action, message=message)
Was this article helpful?