Security Controls
Manage authentication security policies with
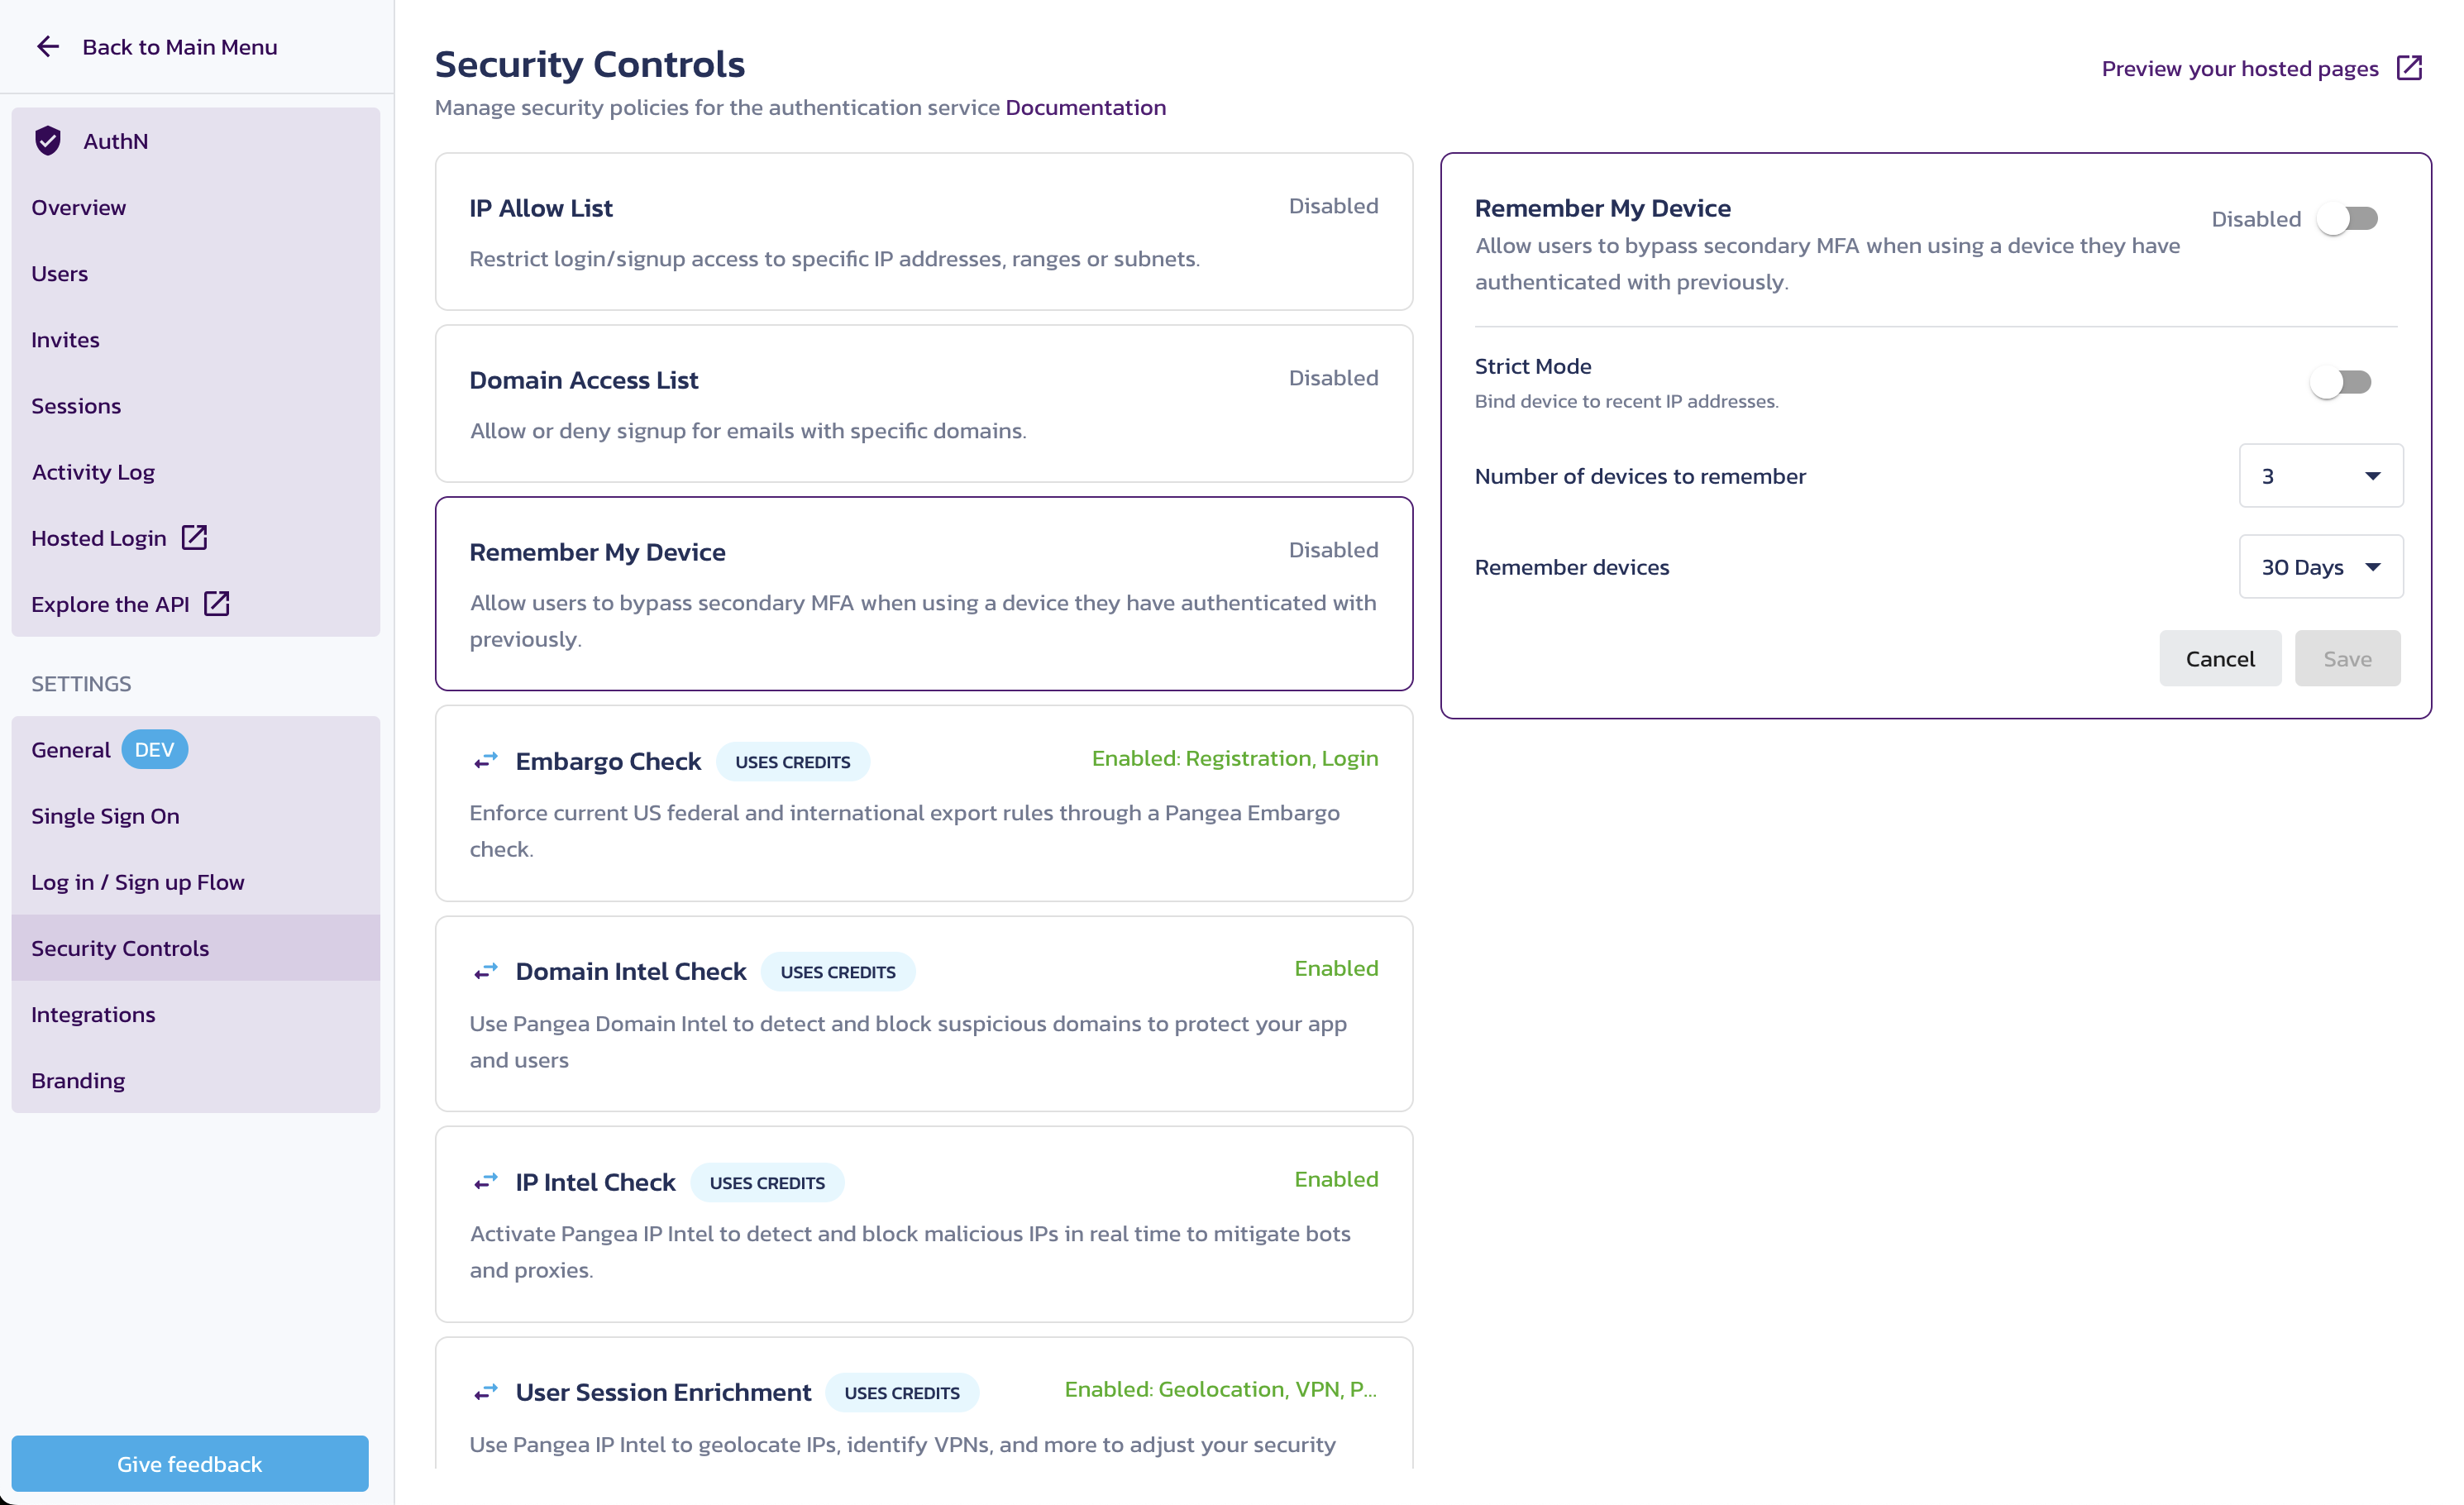
Security Controls in the Pangea User ConsoleIP Allow List
You can restrict access to specific IP addresses, ranges, or subnets. By default, it is set to Disabled. Use the toggle switch to enable or disable this setting and it autosaves the settings.
-
Allowed IP Addresses: Click + IP Address to add an allowed IP address. In the Add IP address window, enter the IP address inside the IP address box. The allowed IP entries must be a single IP, a CIDR, or an IP range. The following IP addresses/entries are allowed:
- 192.168.0.1 (single IP)
- 192.168.0.0/24 (CIDR)
- 192.168.0.100 - 192.168.0.200 (IP range)
Now, click Save to see the IP address listed in the Allowed IP Addresses pane. To remove an IP address from the Allowed IP Addresses pane, hover your mouse over the IP address and click (⊖).
Domain Access List
You can allow or deny signups for emails with specific domains. By default, it is set to Disabled.
Add a domain to the list:
- Click + Domain Name to add a domain. Click Save to add the domain to the list.
Remove a domain from the list:
- Click the minus (-) button to remove a domain.
Allow access only from specific domains:
- In the Match Action drop-down menu, select Allow. Click the toggle to set it to Enabled. This restricts sign-up access to only the email domains in the list.
Deny access from specific domains:
- In the Match Action drop-down menu, select Deny. Click the toggle to Enabled. This denies sign-up access to all email domains in the list.
Disable the Domain Access List:
- Click the toggle to Disabled. This allows email sign-up access to any domain.
Remember My Device
As part of the login flow, you can allow your end users to temporarily bypass the multi-factor authentication (MFA) step by enabling Remember My Device under Security Controls in the Pangea User Console. By default, it is set to Disabled.
How it works
-
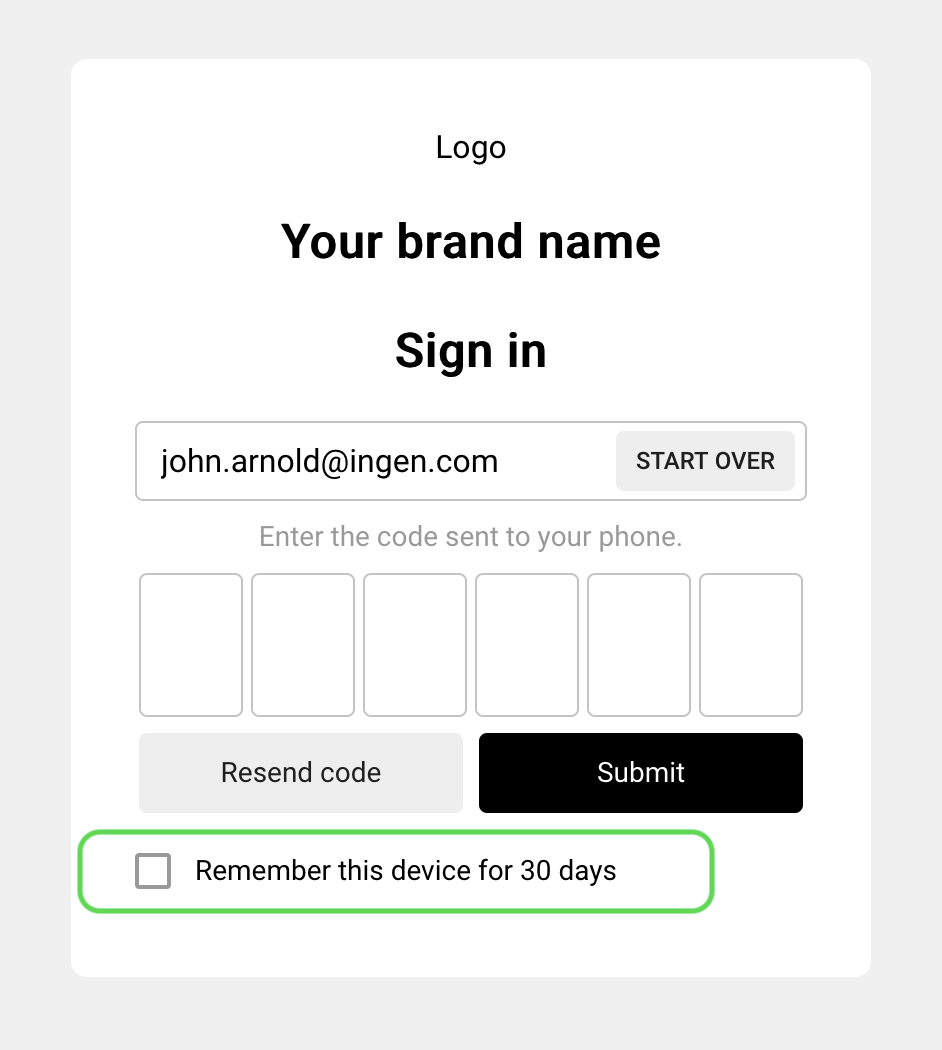
After Remember My Device is enabled, end users will see the Remember this device for <number> days checkbox during the login flow. During authentication, when a user checks the box, a cookie is added to the device to identify it during future authentications within the specified period.
-
Until the cookie expires, the user will be able to sign in without MFA in that browser.
note:With one-time verification codes, be sure to check the Remember this device ... box before entering the code, since the dialog is automatically submitted as soon as the code is entered.
-
Upon the next user login, Pangea will have the ability to authenticate the user without enforcing MFA because the user's device is recognized via the stored cookie and, optionally, its IP address.
Remember My Device settings
Select Remember My Device under Security Controls in the Pangea User Console to change its settings.

- Remember My Device enables or disables the conditional bypassing MFA.
- Strict Mode binds the device cookie to the IP address.
- When enabled, the user can skip MFA only if Pangea recognizes both the cookie and the user’s current IP address.
- When disabled, only the cookie is evaluated to allow the user to skip MFA, and the IP address is not considered.
- Number of devices to remember sets the maximum number of user devices (more specifically, browsers or browser profiles) to remember.
- For example, Chrome and Safari on the same machine would count as two different devices.
- The default number of devices to remember is 3, but it can be set as high as 15.
- Remember devices specifies the number of days the cookie is stored from the first time Pangea encounters the device (not the most recent login). The default is set to 30 Days, which will trigger MFA every 30 days.
Once enabled, “Remember My Device” becomes visible in the Hosted Page flow. For example:

Embargo Check
Block logins and/or registrations from the current configuration of Pangea Embargo countries based on the client IP of where the request originated.
User Registrations - Blocks users from countries listed in the Embargo list from registering with your app.
User Login - Blocks users from the countries listed in your Embargo settings from logging in to your app.
Domain Intel Check
Detects and blocks suspicious domains from authenticating with your app.
IP Intel Check
Detects and blocks suspicious IPs from being able to register for or authenticate to your app based on the client IP of where the request originated.
User Session Enrichment
Geolocates user IPs, identifies VPNs, proxy servers, and IP reputations, and attaches that information to the token for your application. You can then use the information within your application to make decisions on user permissions, application behavior, or more.
Impossible Travel
As part of the login flow, you can enable Impossible Travel to detect and block login attempts from locations that are too far apart to travel within the time window between sign-ins.
When Impossible Travel is enabled, AuthN geolocates the user’s IP address after each successful login and temporarily stores it. On the next login attempt, AuthN geolocates the new IP address and calculates the distance from the previous location. If the distance implies travel at a velocity faster than the defined limit, the second login attempt will be blocked.
For example, if a user signs in from a New York City IP address and then tries to sign in from Paris just minutes later, the second attempt will be blocked.
By default, the Velocity limit is set to 300 kilometers (180 miles) per hour, but you can change this value in the settings.
To use Impossible Travel, you must enable Geolocation under User Session Enrichment.
Failed Login Policy
Temporarily disable a user's account access after a certain number of failed attempts in a specific time frame.
-
Click the toggle to Enabled. This enables locking the user account after the specified criteria are met.
-
Failed Login Attempts: Sets the number of failed attempts before the account is locked.
note:Failed captcha attempts do not increment the Failed login attempts counter.
-
Failed Logins Timeframe: A maximum amount of time between the first failed attempt and the last failed attempt to cause the lockout. If the last failed attempt occurs after the maximum amount of time, the account will not be locked because the counter resets.
For instance, if the lockout is set to five failed attempts in five minutes, and a user fails at the following intervals:
- First attempt: 11:00:00
- Second attempt: 11:01:00
- Third attempt: 11:01:30
- Fourth attempt: 11:03:38
- Fifth attempt: 11:05:11
- Sixth attempt: 11:05:49
The account does not get locked because 11:05:11 is after the five-minute mark from the first attempt, so the lockout counter resets at 11:05:00 and increments to 1 during the fifth attempt.
-
Amount of Time User is Locked Out: Sets the length of time the account remains locked due to the account lockout policy.
Was this article helpful?