OAuth Server
Learn how to configure the Authorization Server in AuthN to manage access to your APIs
You can use AuthN's OAuth 2
Authorization Server (AS) to define and manage access to your online resources, such as services and APIs. During authorization flows, a client application requests an access token from the AS. Permissions associated with the access token can be expressed via its scope . The client application can then use the access token to authorize requests to your Resource Server (RS).Token values can be either an opaque string or a signed JSON Web Token (JWT). You can choose the type of active tokens in your Pangea project in AuthN Session Configuration within the
General section in the Pangea User Console. The RS can introspect an opaque access token to verify its issuer, audience, scopes, expiration, and other details, or read it from the signed JWT before granting access to a protected resource.To set up the OAuth Server, Enable AuthN and navigate to the OAuth Server settings page in the Pangea User Console.
Audience
You can specify the intended audience for the access tokens issued by the AS. A list of the audience values you defined will be included in the token introspection results.
For example, an access token audience may contain an identifier of the RS or an API. In this case, permissions associated with the access token only apply at the RS or API matching the audience value. If there is no match, it may indicate a misrouting issue or a malicious access attempt, and access should be denied.
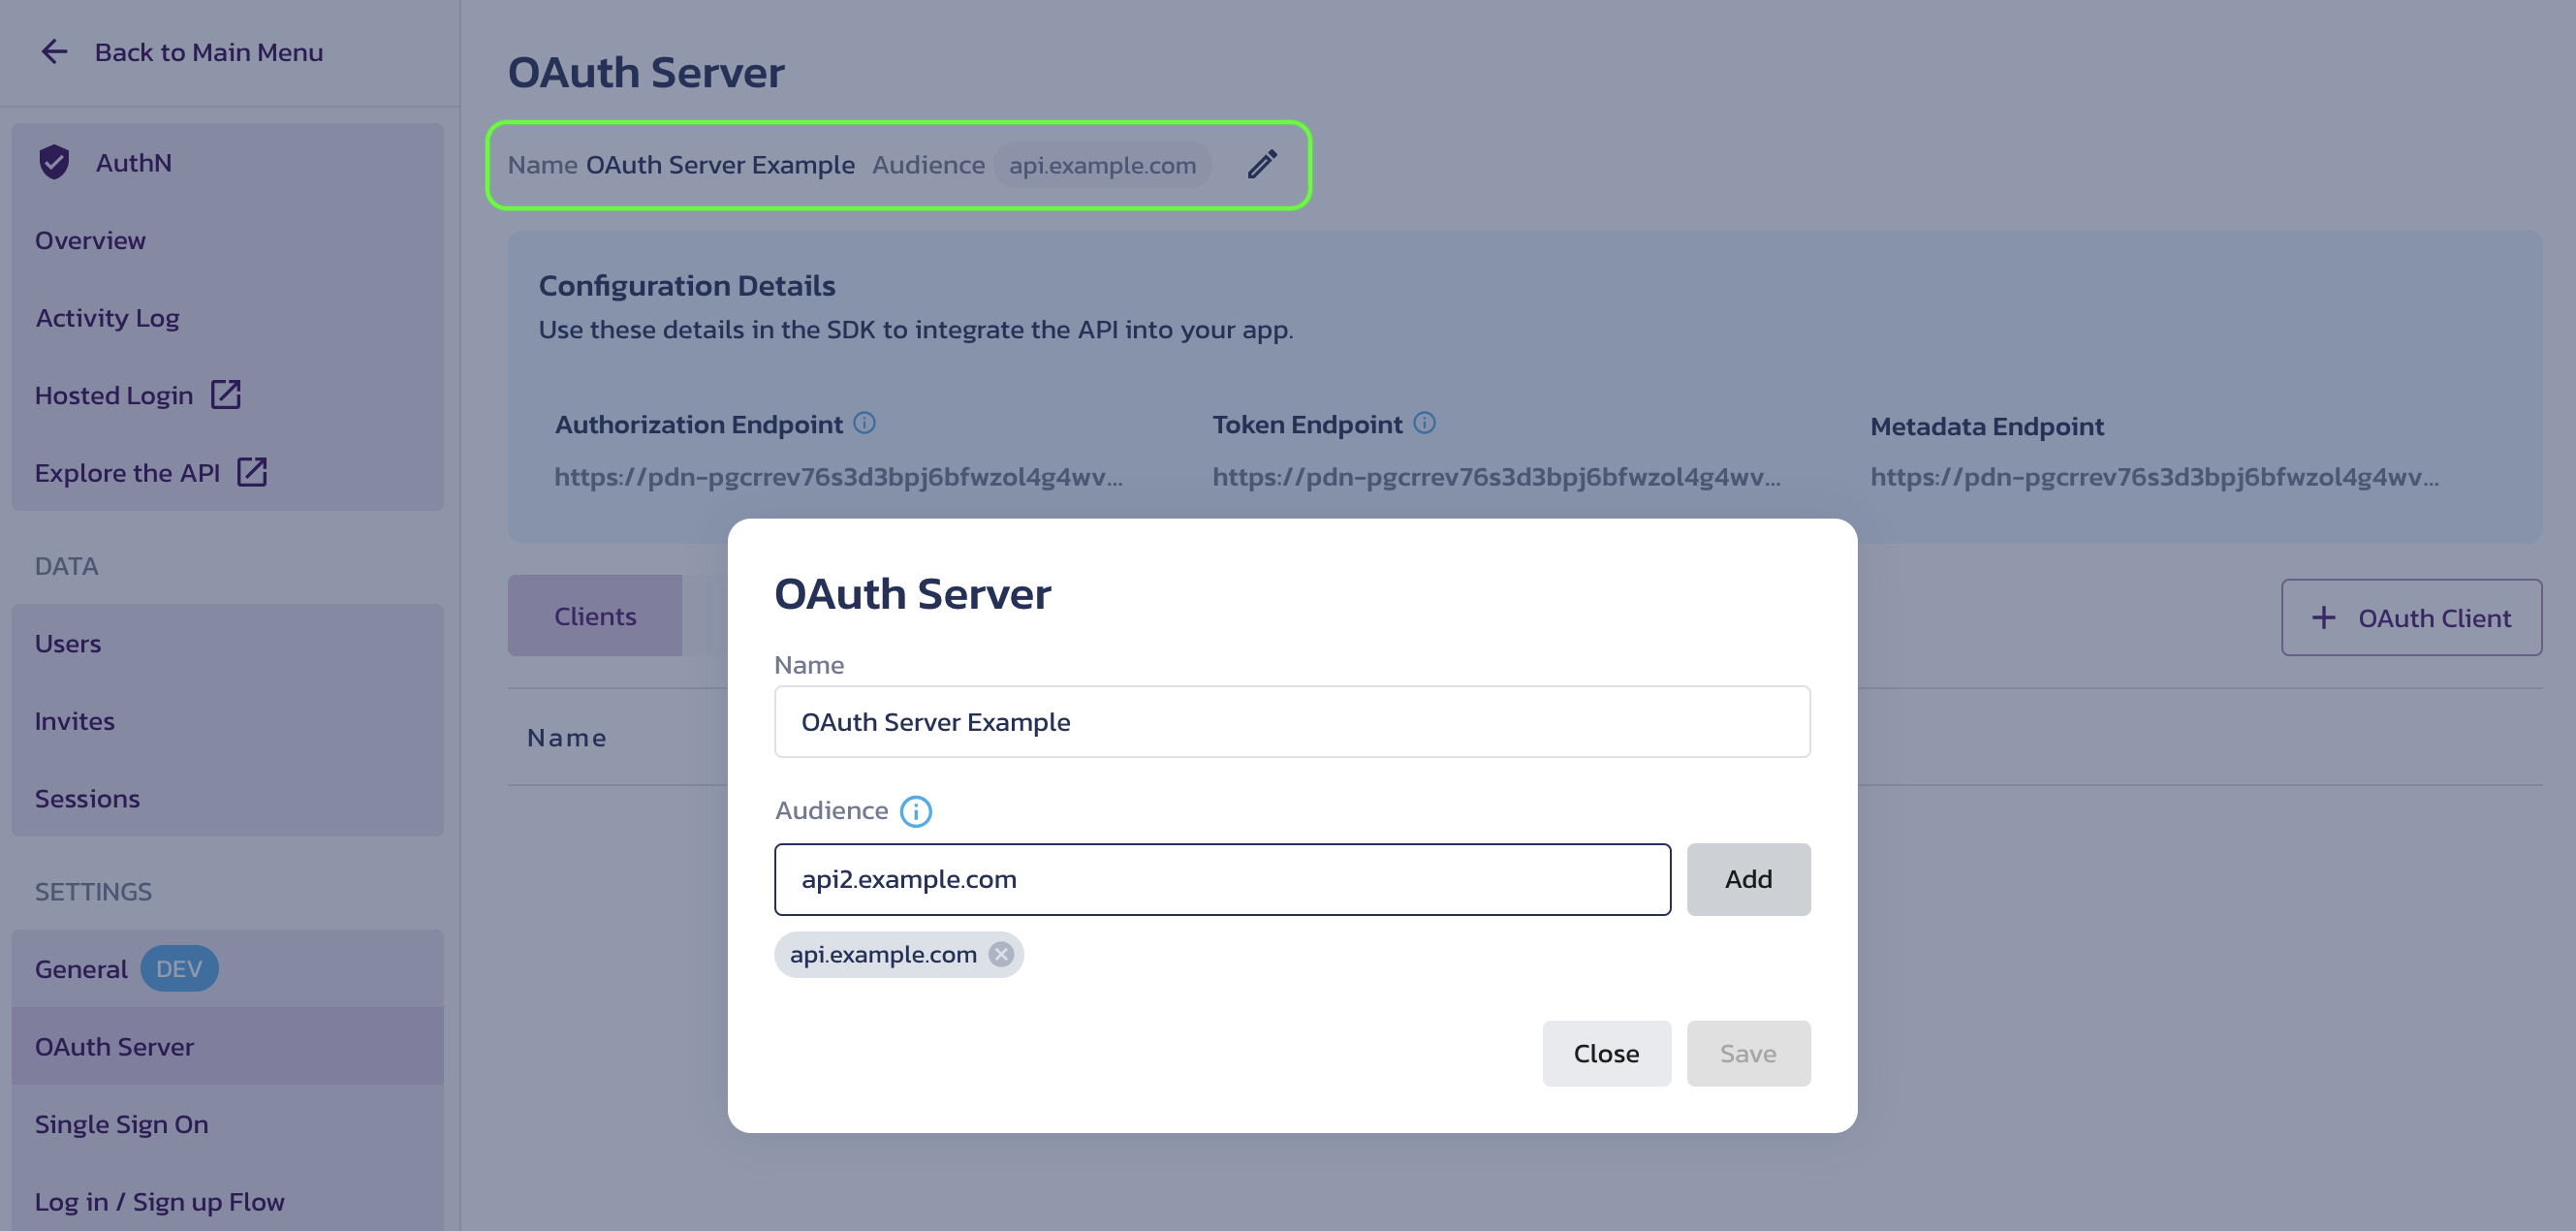
To manage audience values, click the pencil button next to the Audience label. In the edit dialog, type in an audience identifier and click Add to add a new value. Click the x button next to an existing audience value to remove it. Click Save to apply your changes.
You can also update the name of your OAuth Server in this dialog.
Configuration Details
In the Configuration Details section, you can find reference to the OAuth Server endpoints and copy them by clicking the corresponding tiles:
- Authorization Endpoint - Use this endpoint to start the Authorization Code grant .
- Token Endpoint - Use this endpoint to exchange an authorization code during the Authorization Code grant or client credentials during the Client Credentials grant for an access token.
- Metadata Endpoint - Use this endpoint to obtain Authorization Server Metadata in JSON format.
Clients
If you plan to support granular access to your services and APIs, you might want to start by setting up custom scopes on the Scopes tab.
Click the Clients tab to display existing OAuth 2 client registrations. To register a new client app, click the + OAuth Client button on the right.
In the Create OAuth Client dialog, use the following inputs to provide details about your client:
- Name - Assign a recognizable name to your client as it will appear in the list of clients in the OAuth Server settings. You can update this name at any time.
- Grant Types - Select the grant types your client application will use. Currently, only the Client Credentials grant is supported, but the Authorization Code grant with OpenID Connect (OIDC) extension will become available soon.
- Client secret expires in - Specify the lifespan for the new client secret. After it expires, you must generate a new secret for your client application.
- Access token expires in - Specify the lifespan for access tokens issued by the AS to this client.
- Allowed Scopes - You are required to add one or more scopes. Place the cursor in the input, select a scope value, and add it using the + button. This will enable the OAuth Server to add the scope to the tokens it issues to the client application. You can manage available scope values on the Scopes screen.
- Default Scopes - The scope values you add to the client registration are automatically included in the default scope. This default scope is added to the access token when no specific scope is requested during the authorization flow. You can remove the default values by clicking the
xbutton.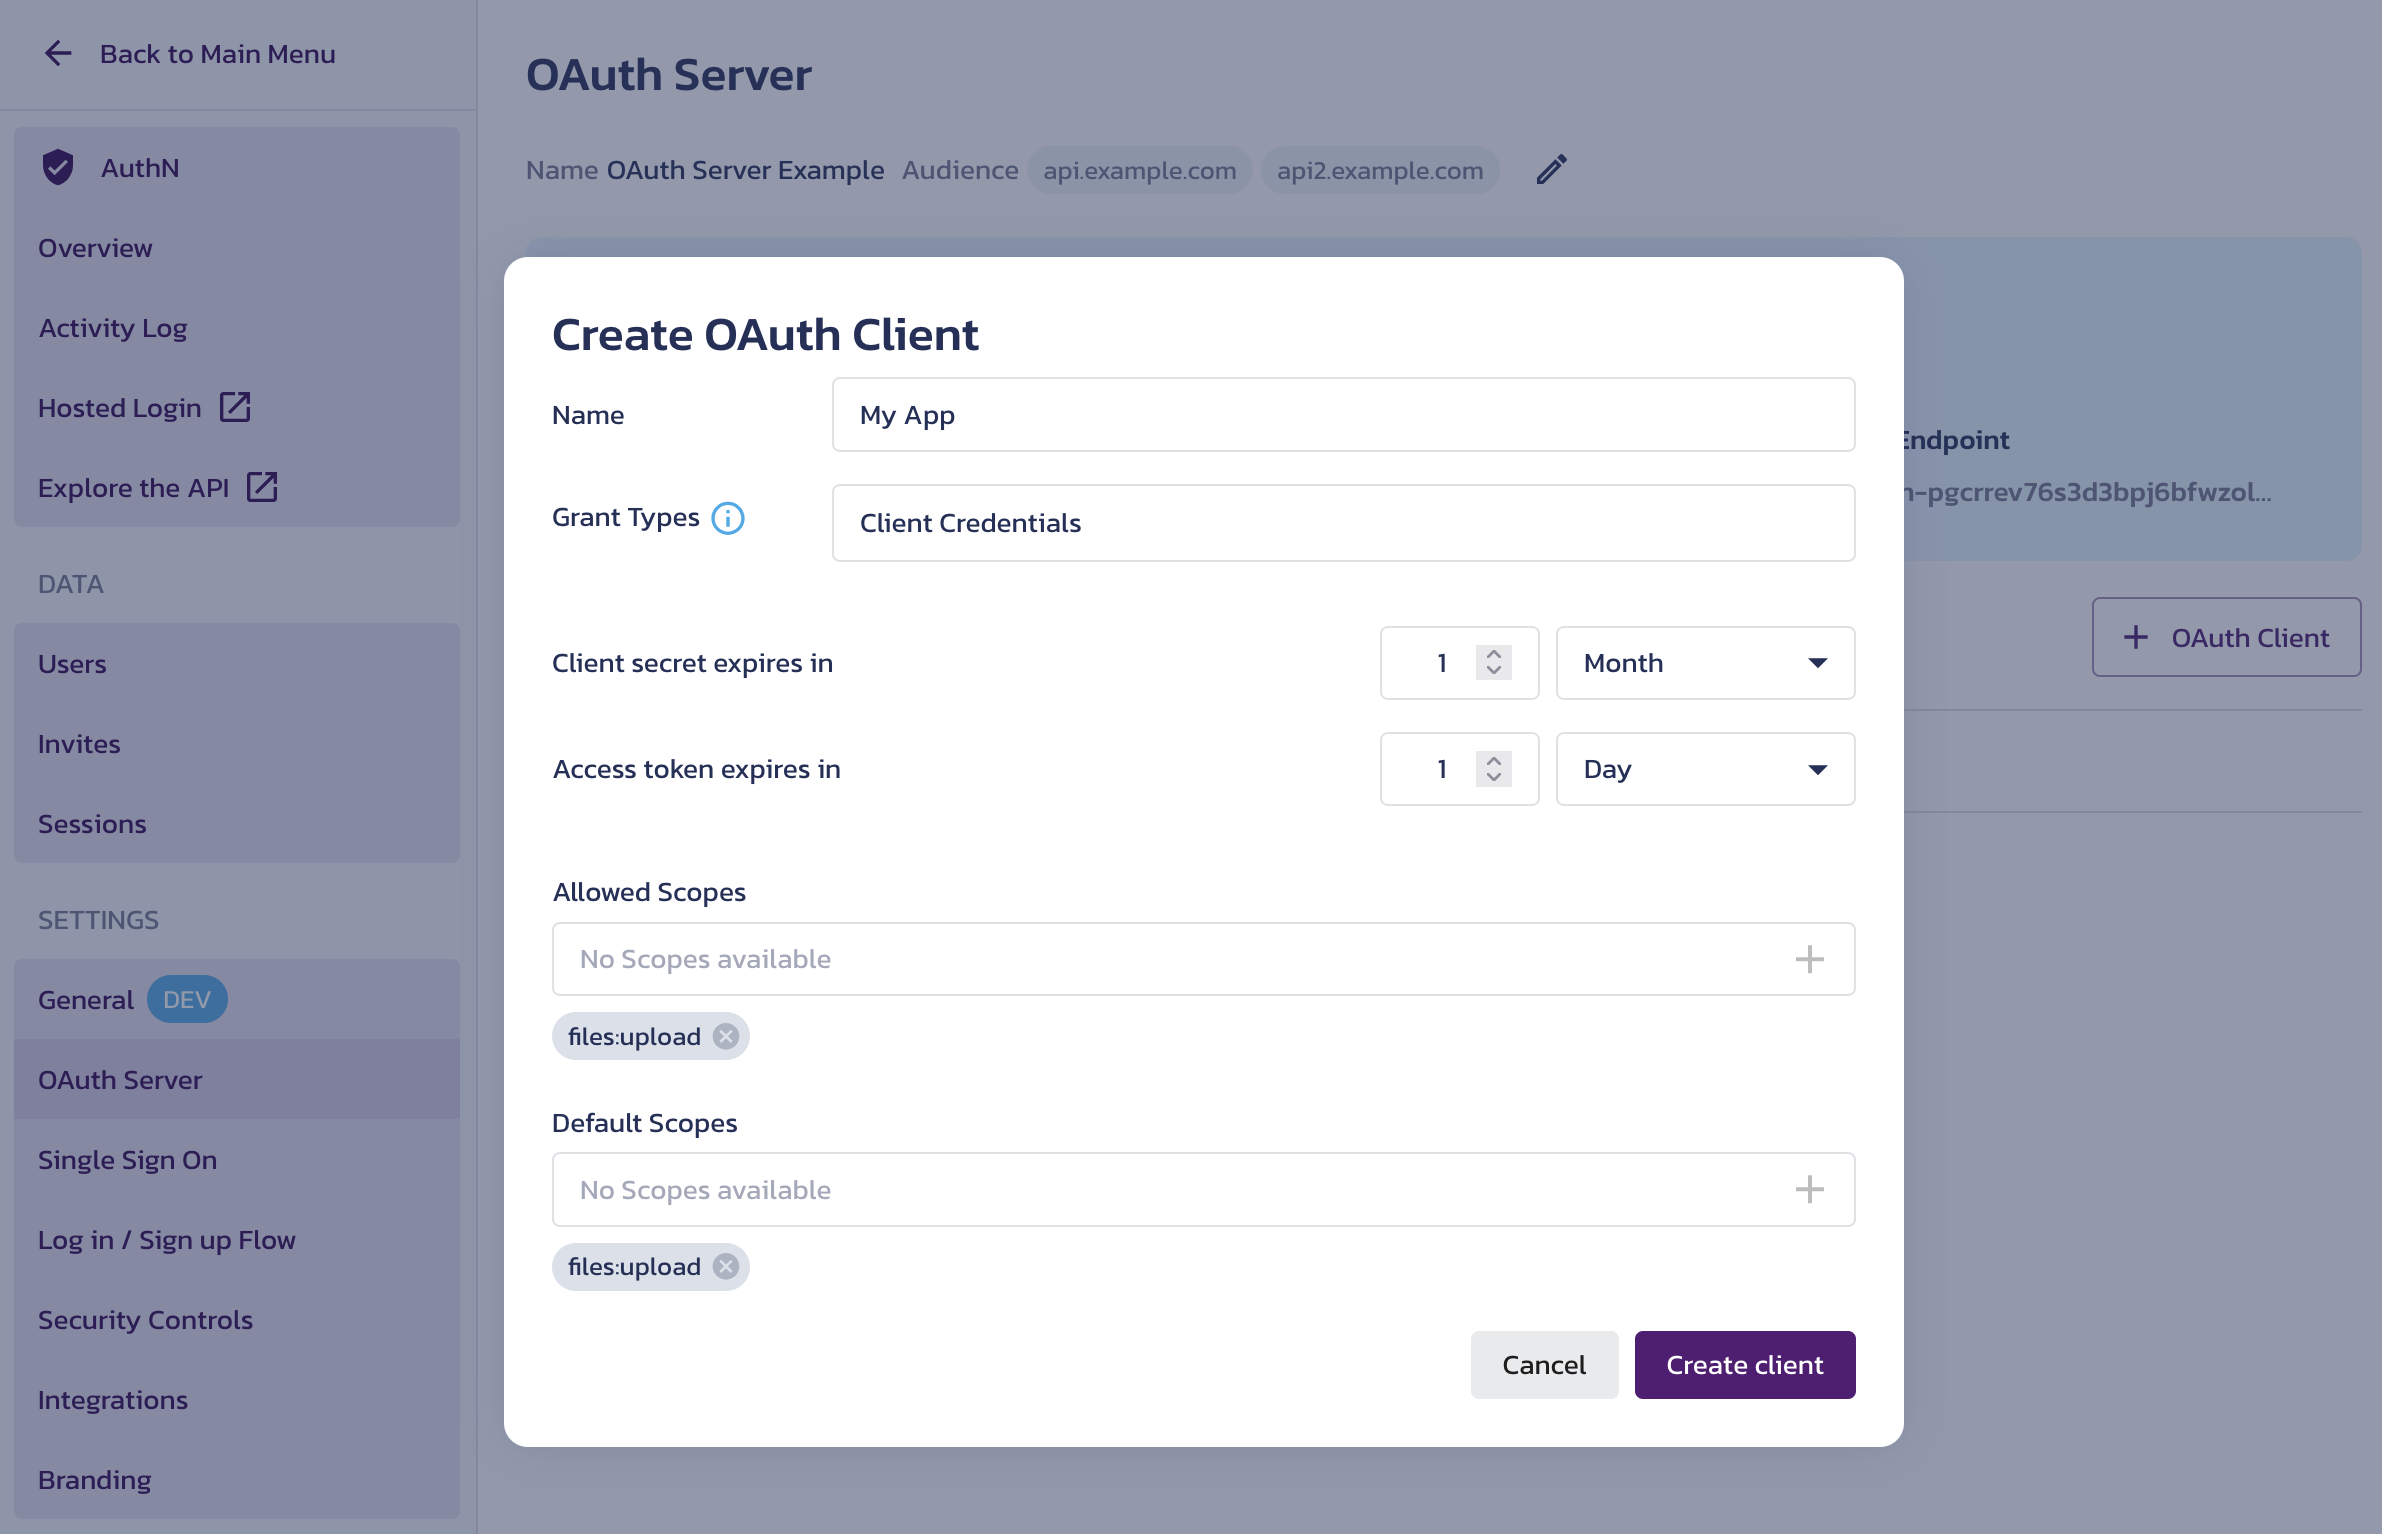
Register OAuth Client in AuthN's OAuth Server - Click the Create client button.
- After registering the client, copy its secret from the Your OAuth Client Secret dialog by clicking on the Client Secret tile. Once you close the dialog, you will not be able to access the secret value again. However, you can add new secrets to the client later, with the option to copy them.
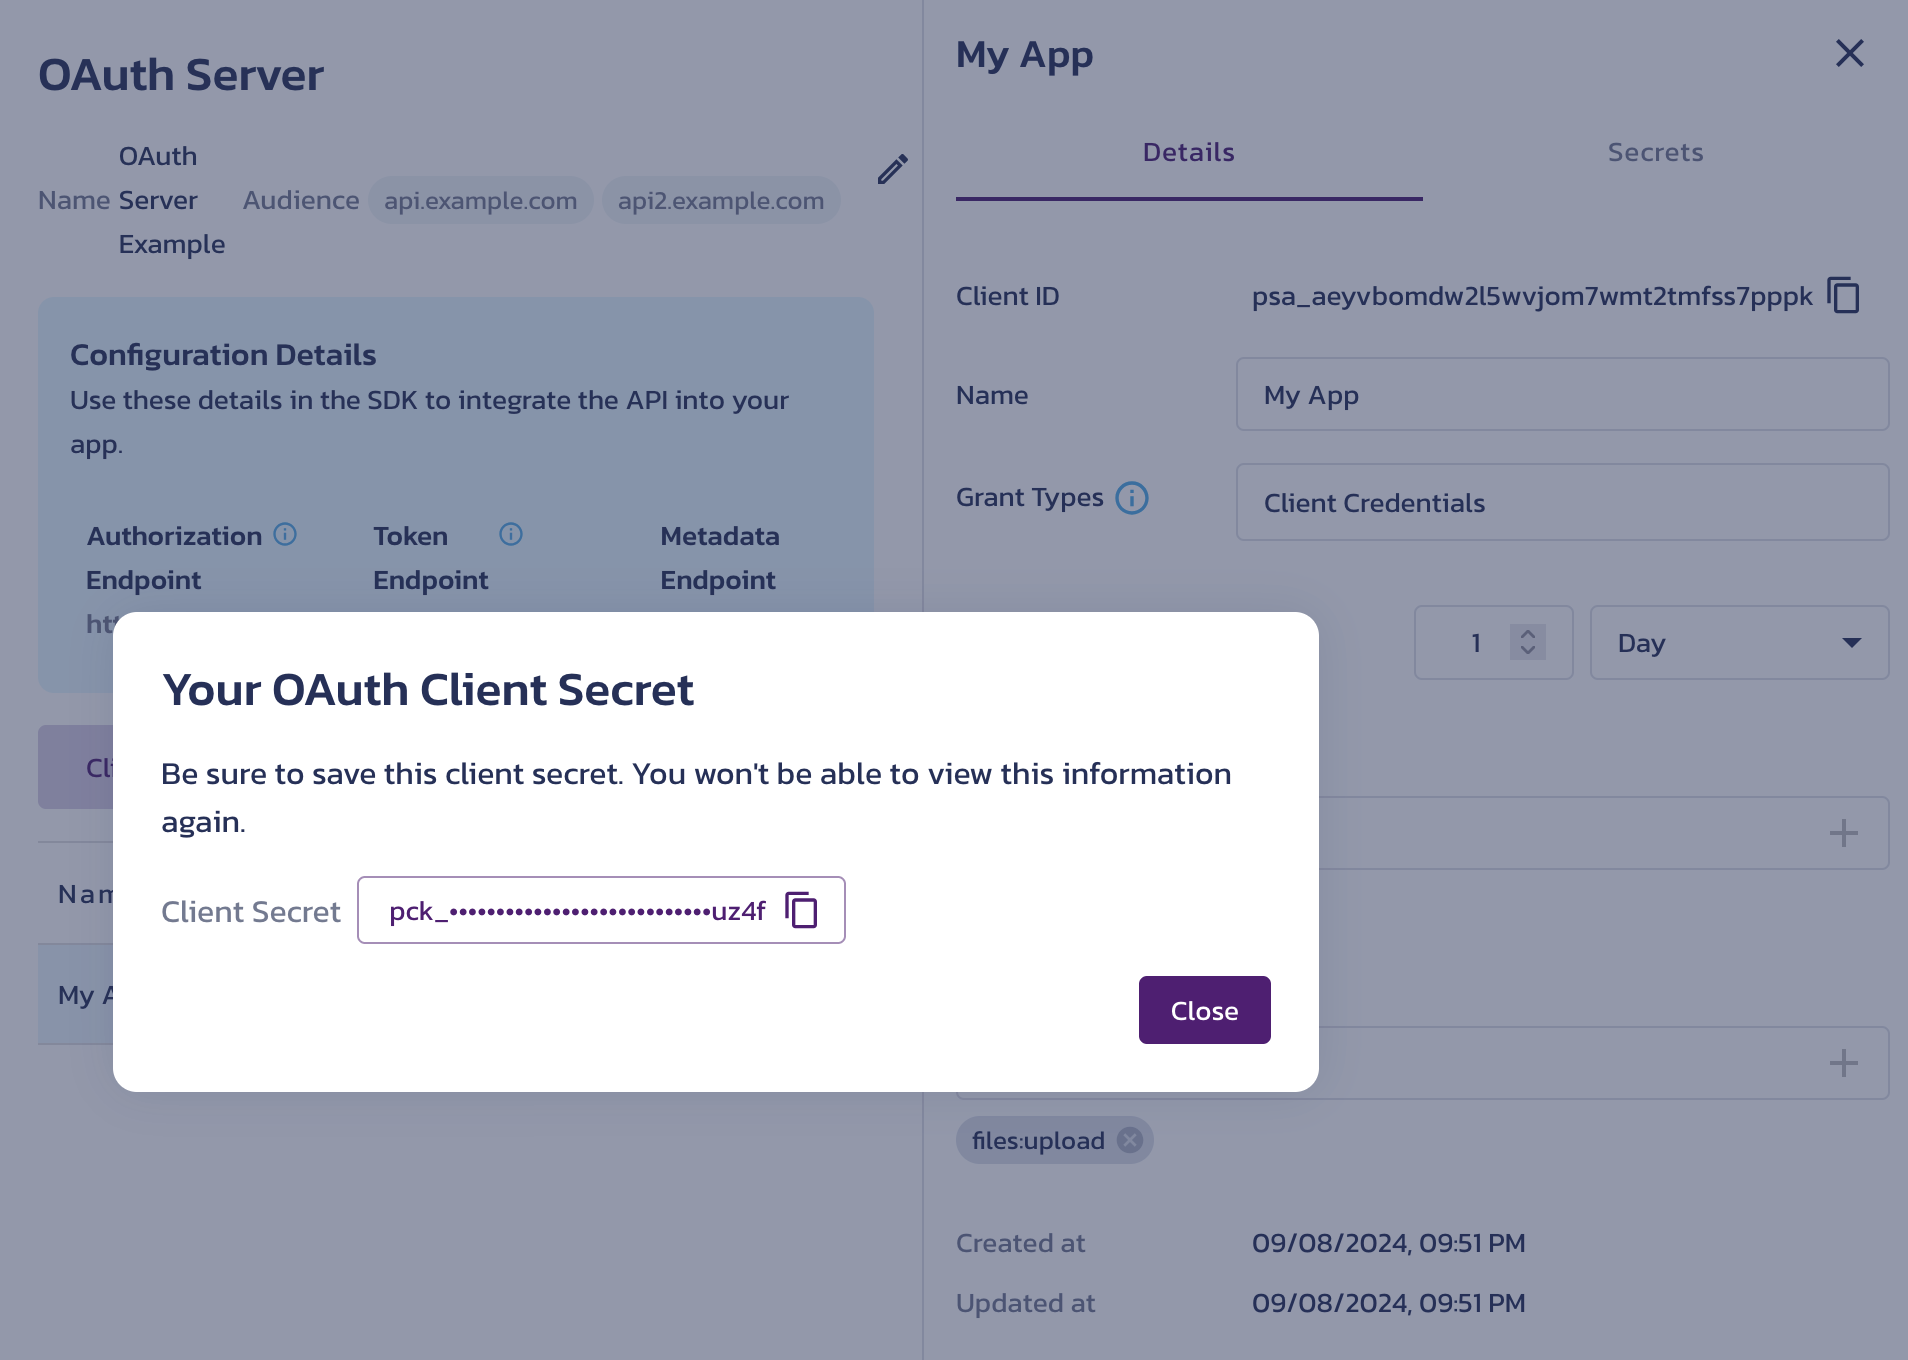
Copy Client Secret - Select a client record from the list to view and edit its Details. To access client-specific actions, click the triple-dot button in the client's row. This menu lets you delete the client registration or add a new client secret. You can also manage the client’s secrets on the Secrets tab.
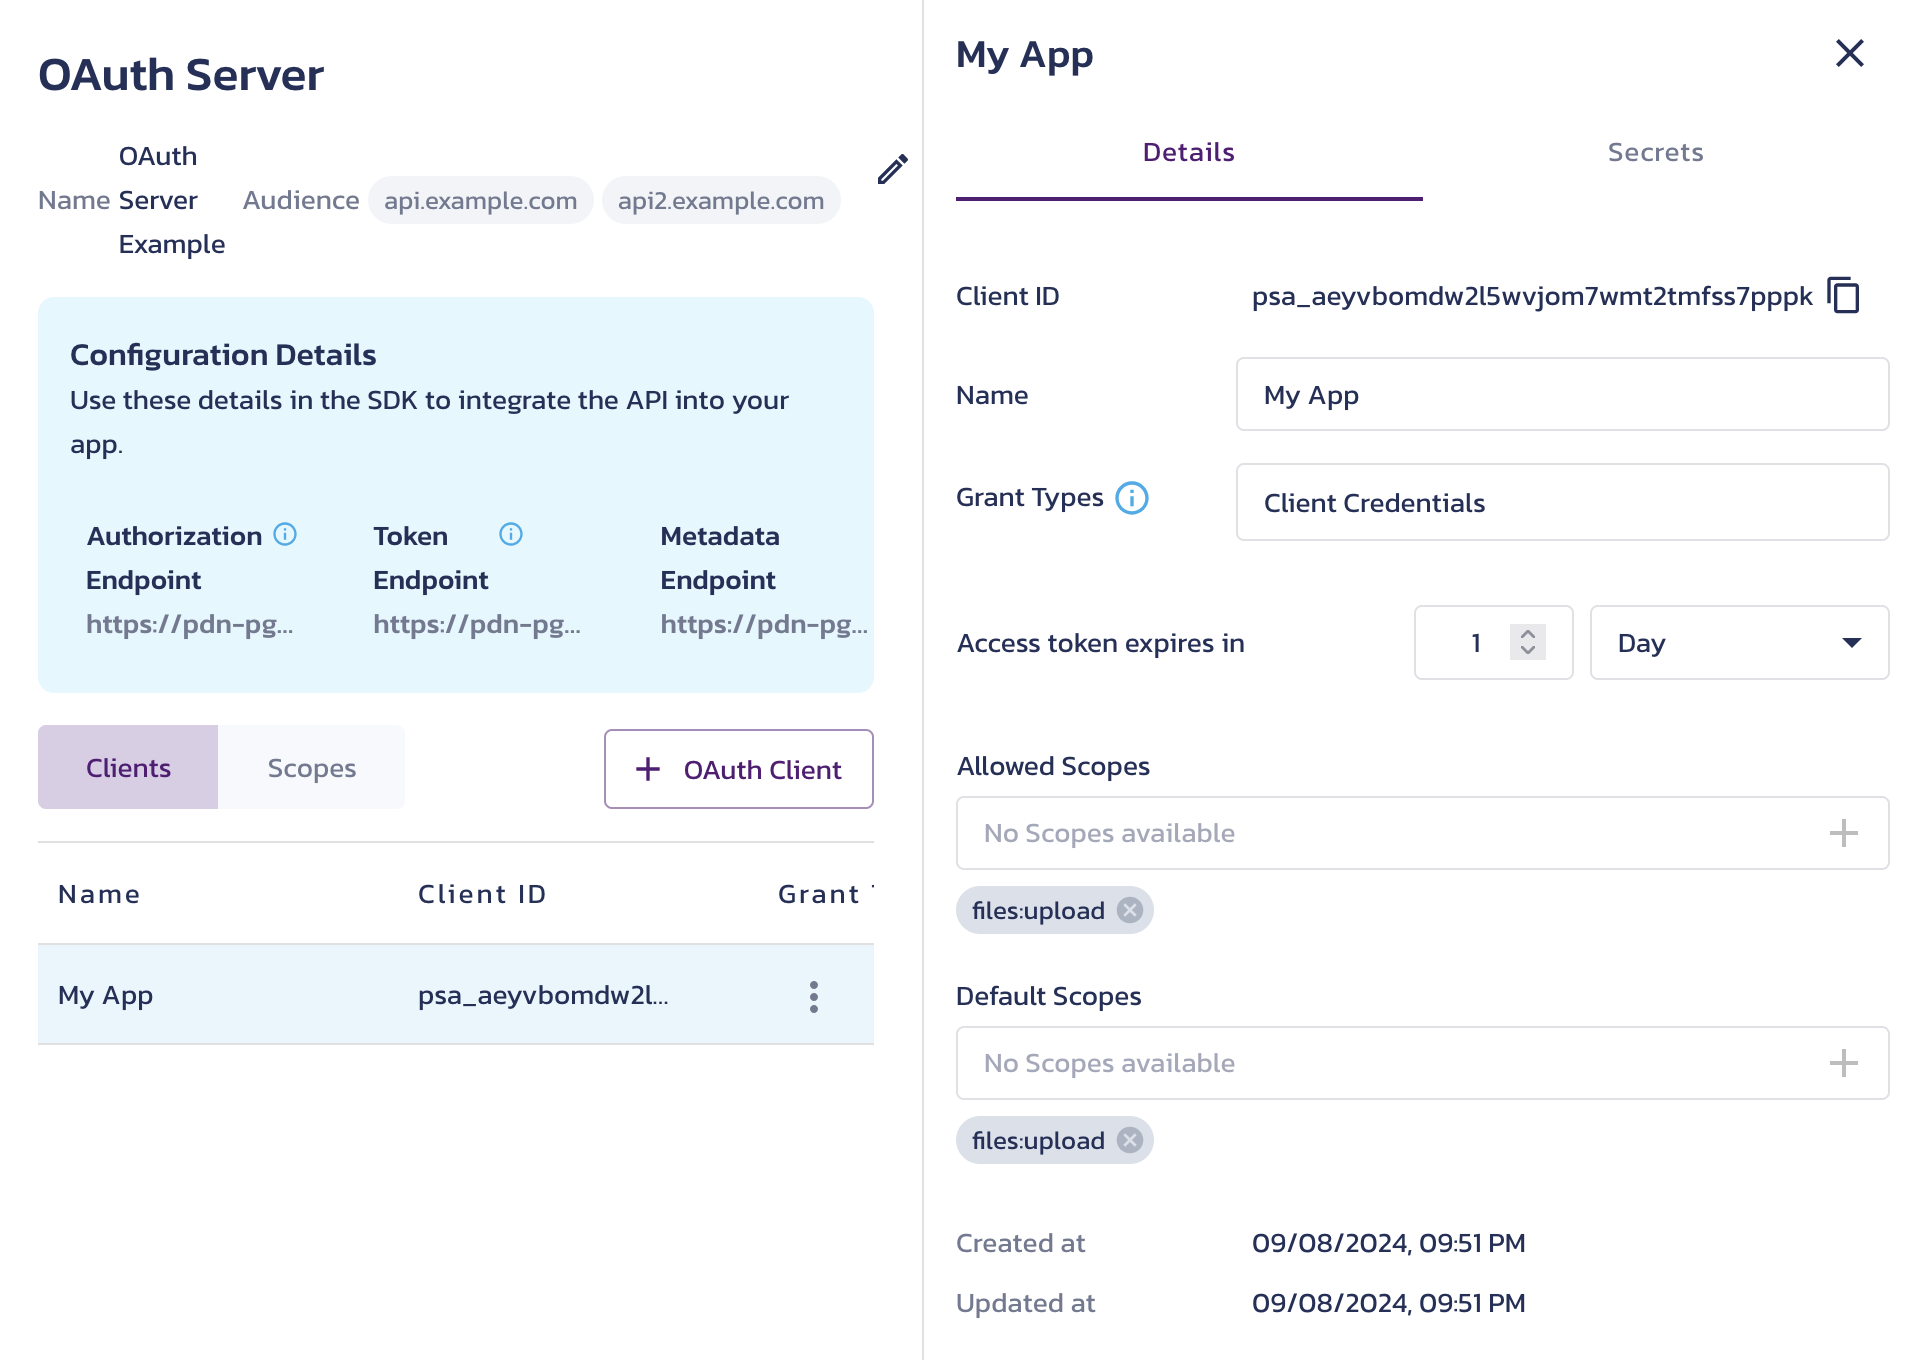
OAuth Client Registration Details and Client-specific Actions
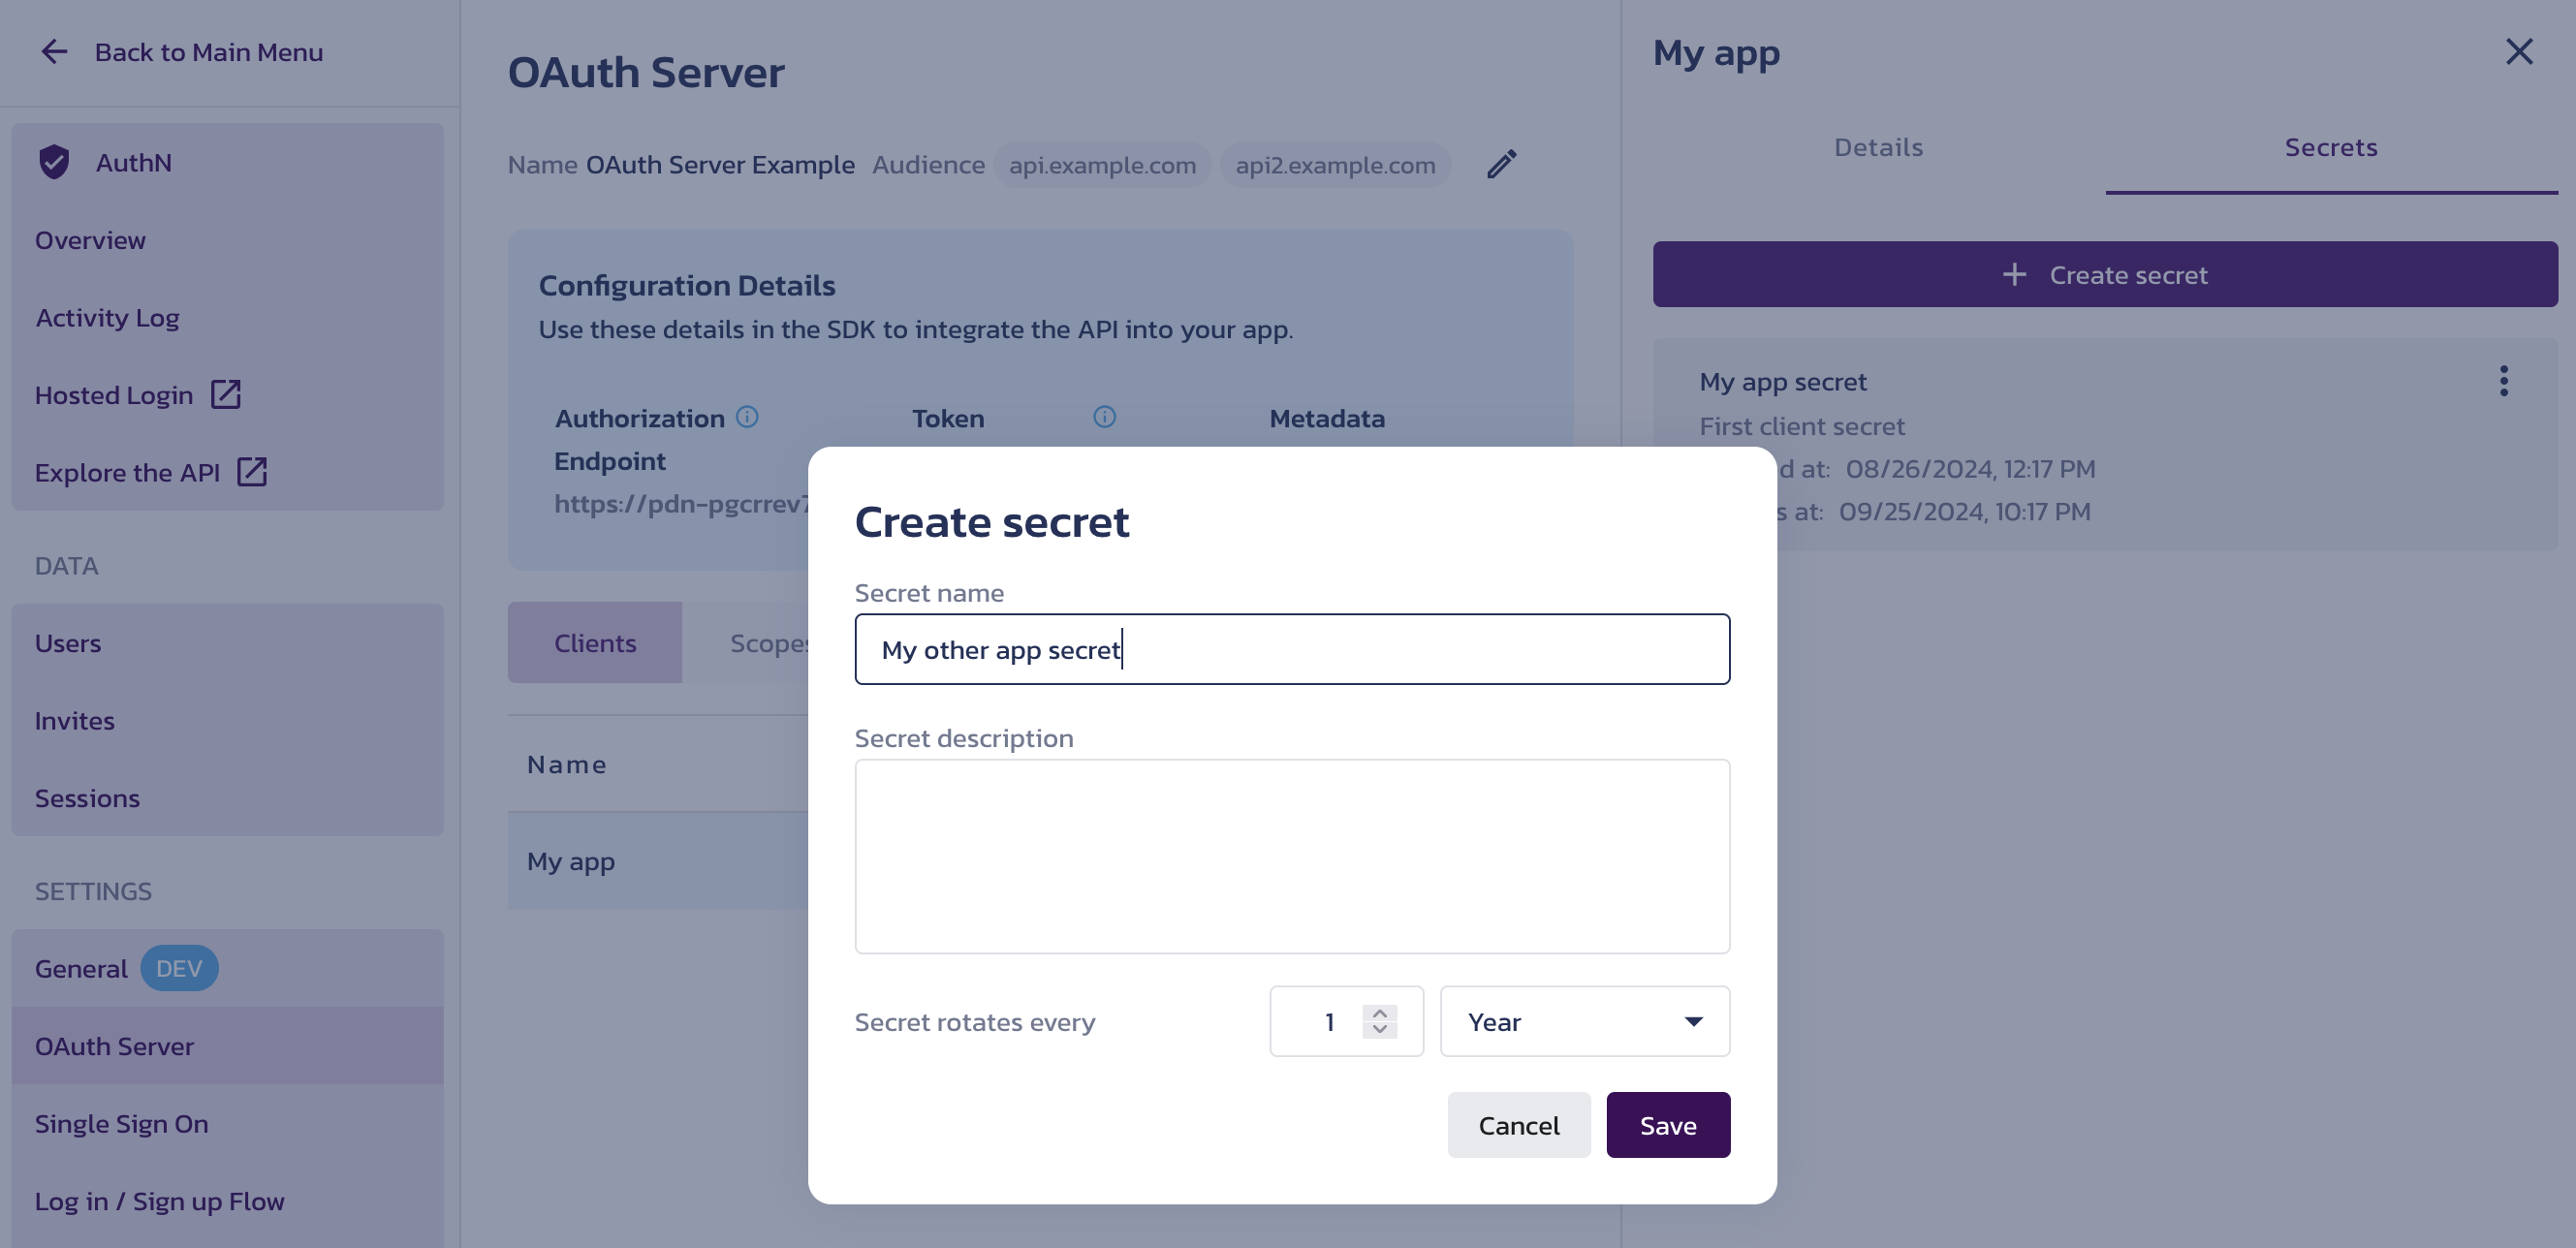
Create a New Client Secret
Scopes
Custom scopes
In OAuth 2 authorization flows, the optional scope parameter requests specific permissions to be included in a token. On the Scopes tab, you can add, modify, and delete custom scope values that your resource server recognizes.
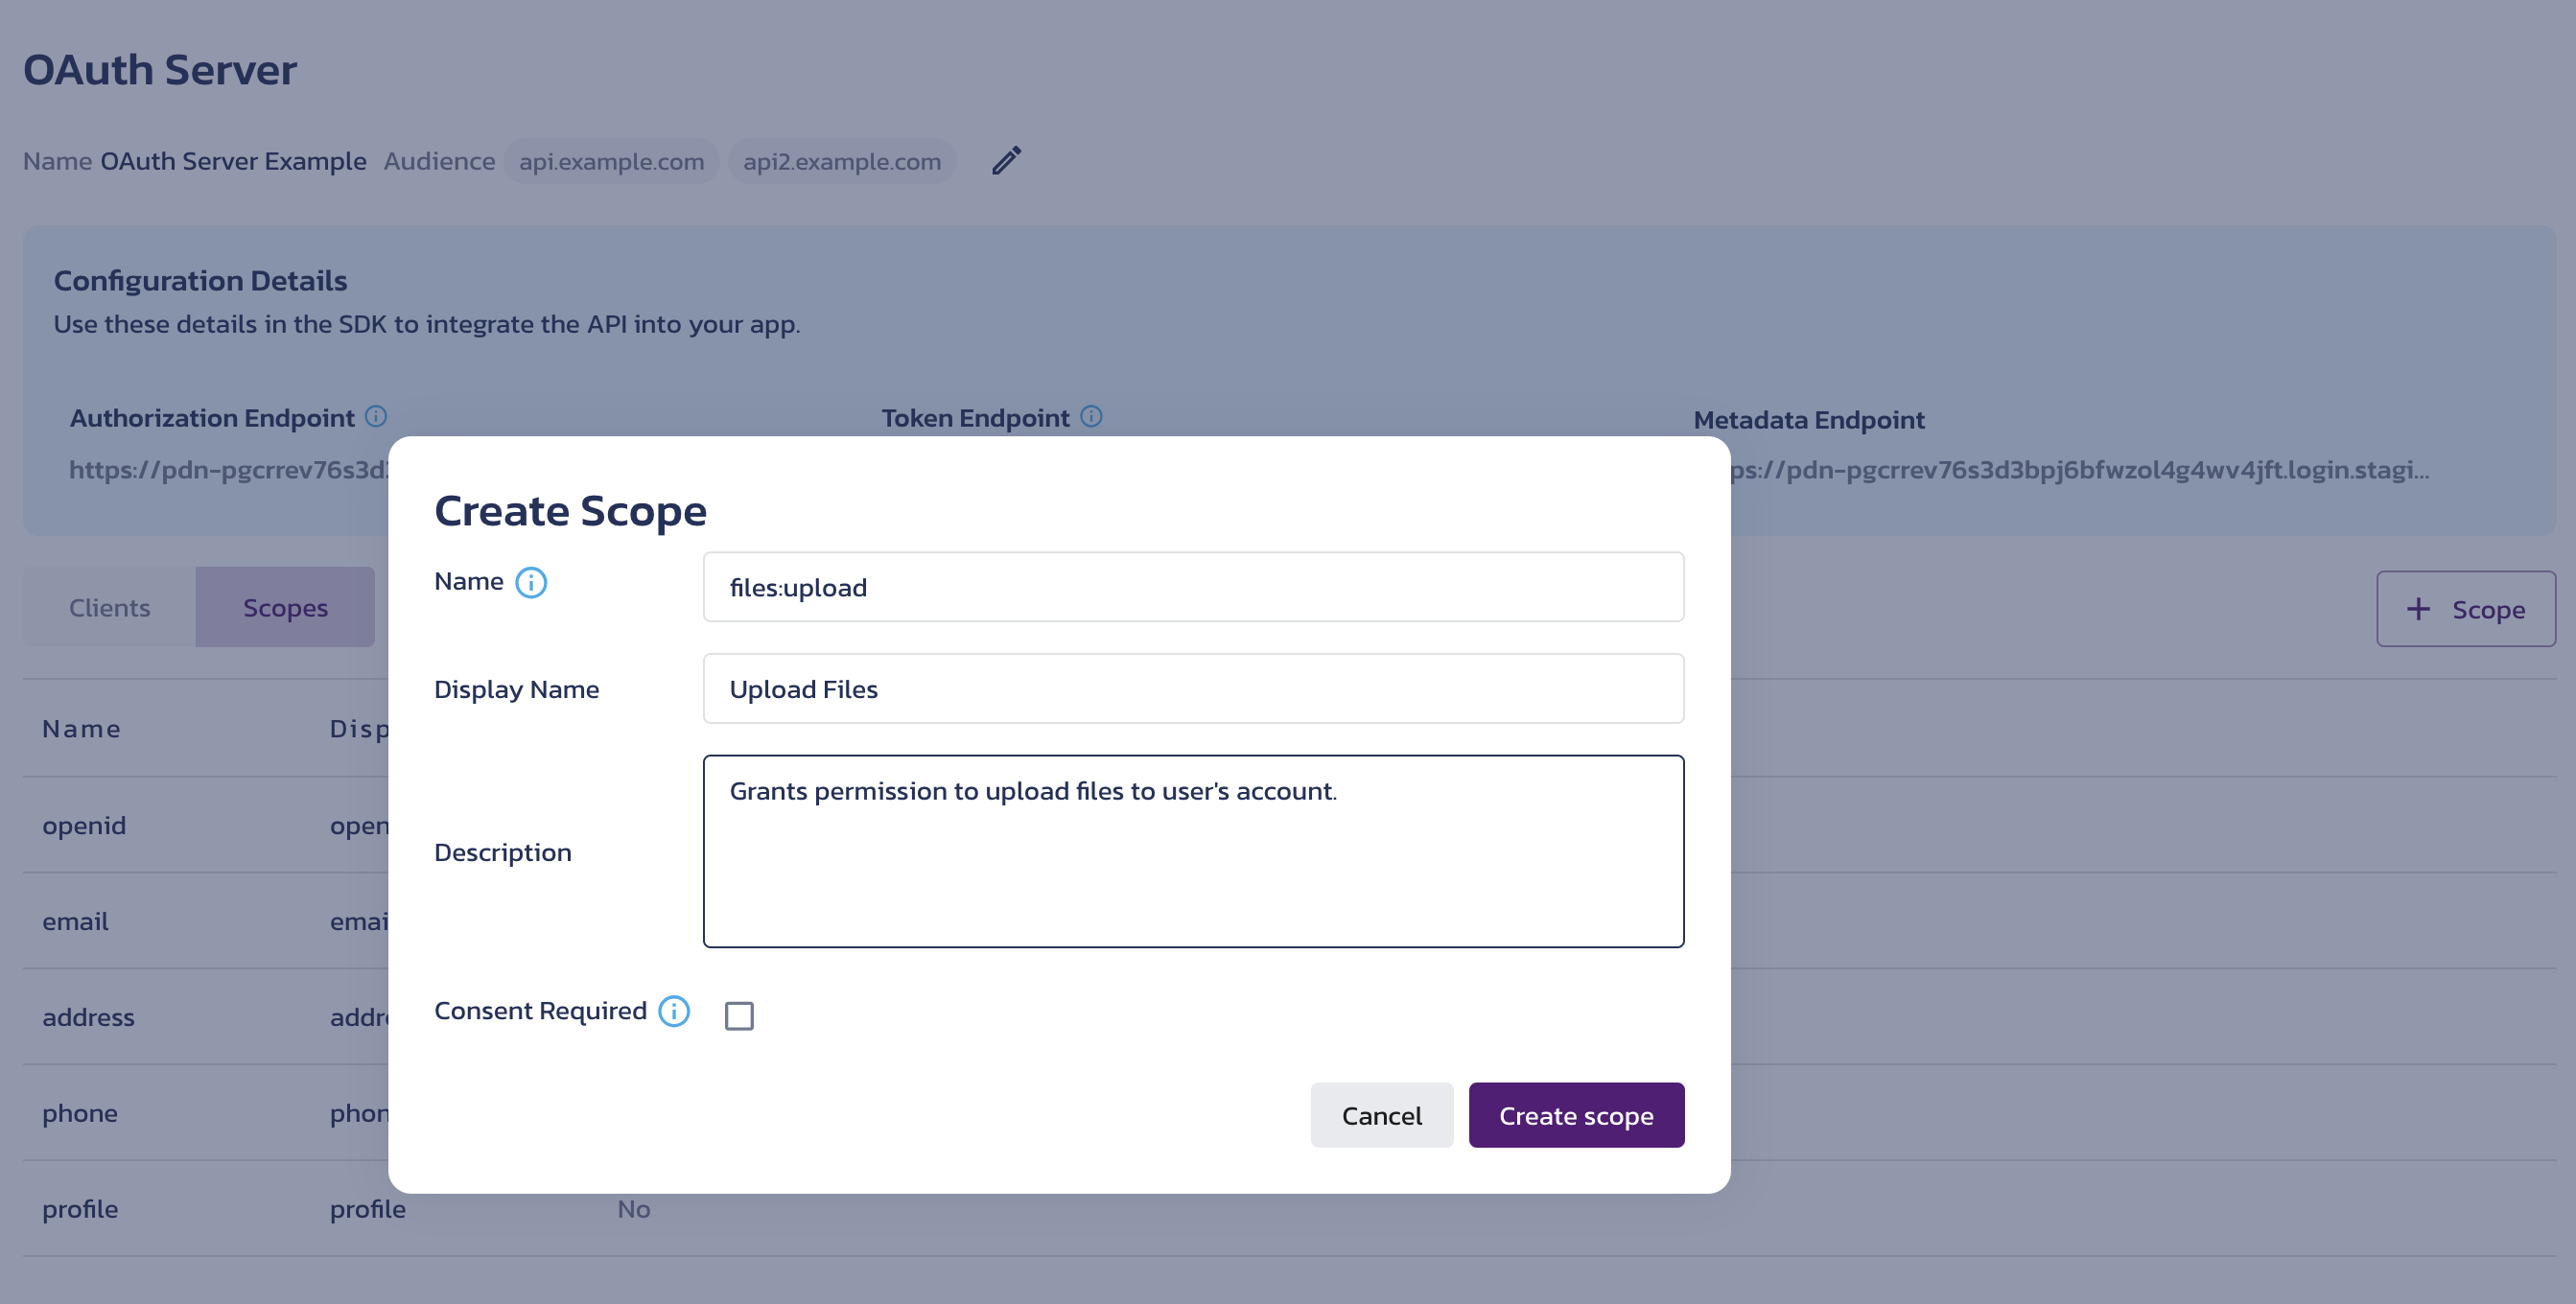
To add a custom scope value, click the + Scope button on the right. In the Create Scope dialog, provide the new scope value details in the following fields:
-
Name - Define the scope value. This value will be included in the
scopeparameter during the authorization flow, and if granted, added to the access token's scope. -
Display Name - Provide a recognizable name that will appear in the Display Name column in the scopes list.
-
Description - Explain what this scope value represents. For example, describe the permissions granted with this scope value.
-
Consent Required - Check this option to require explicit user approval for adding this scope value to the access token. This setting applies only to the Authorization Code grant.
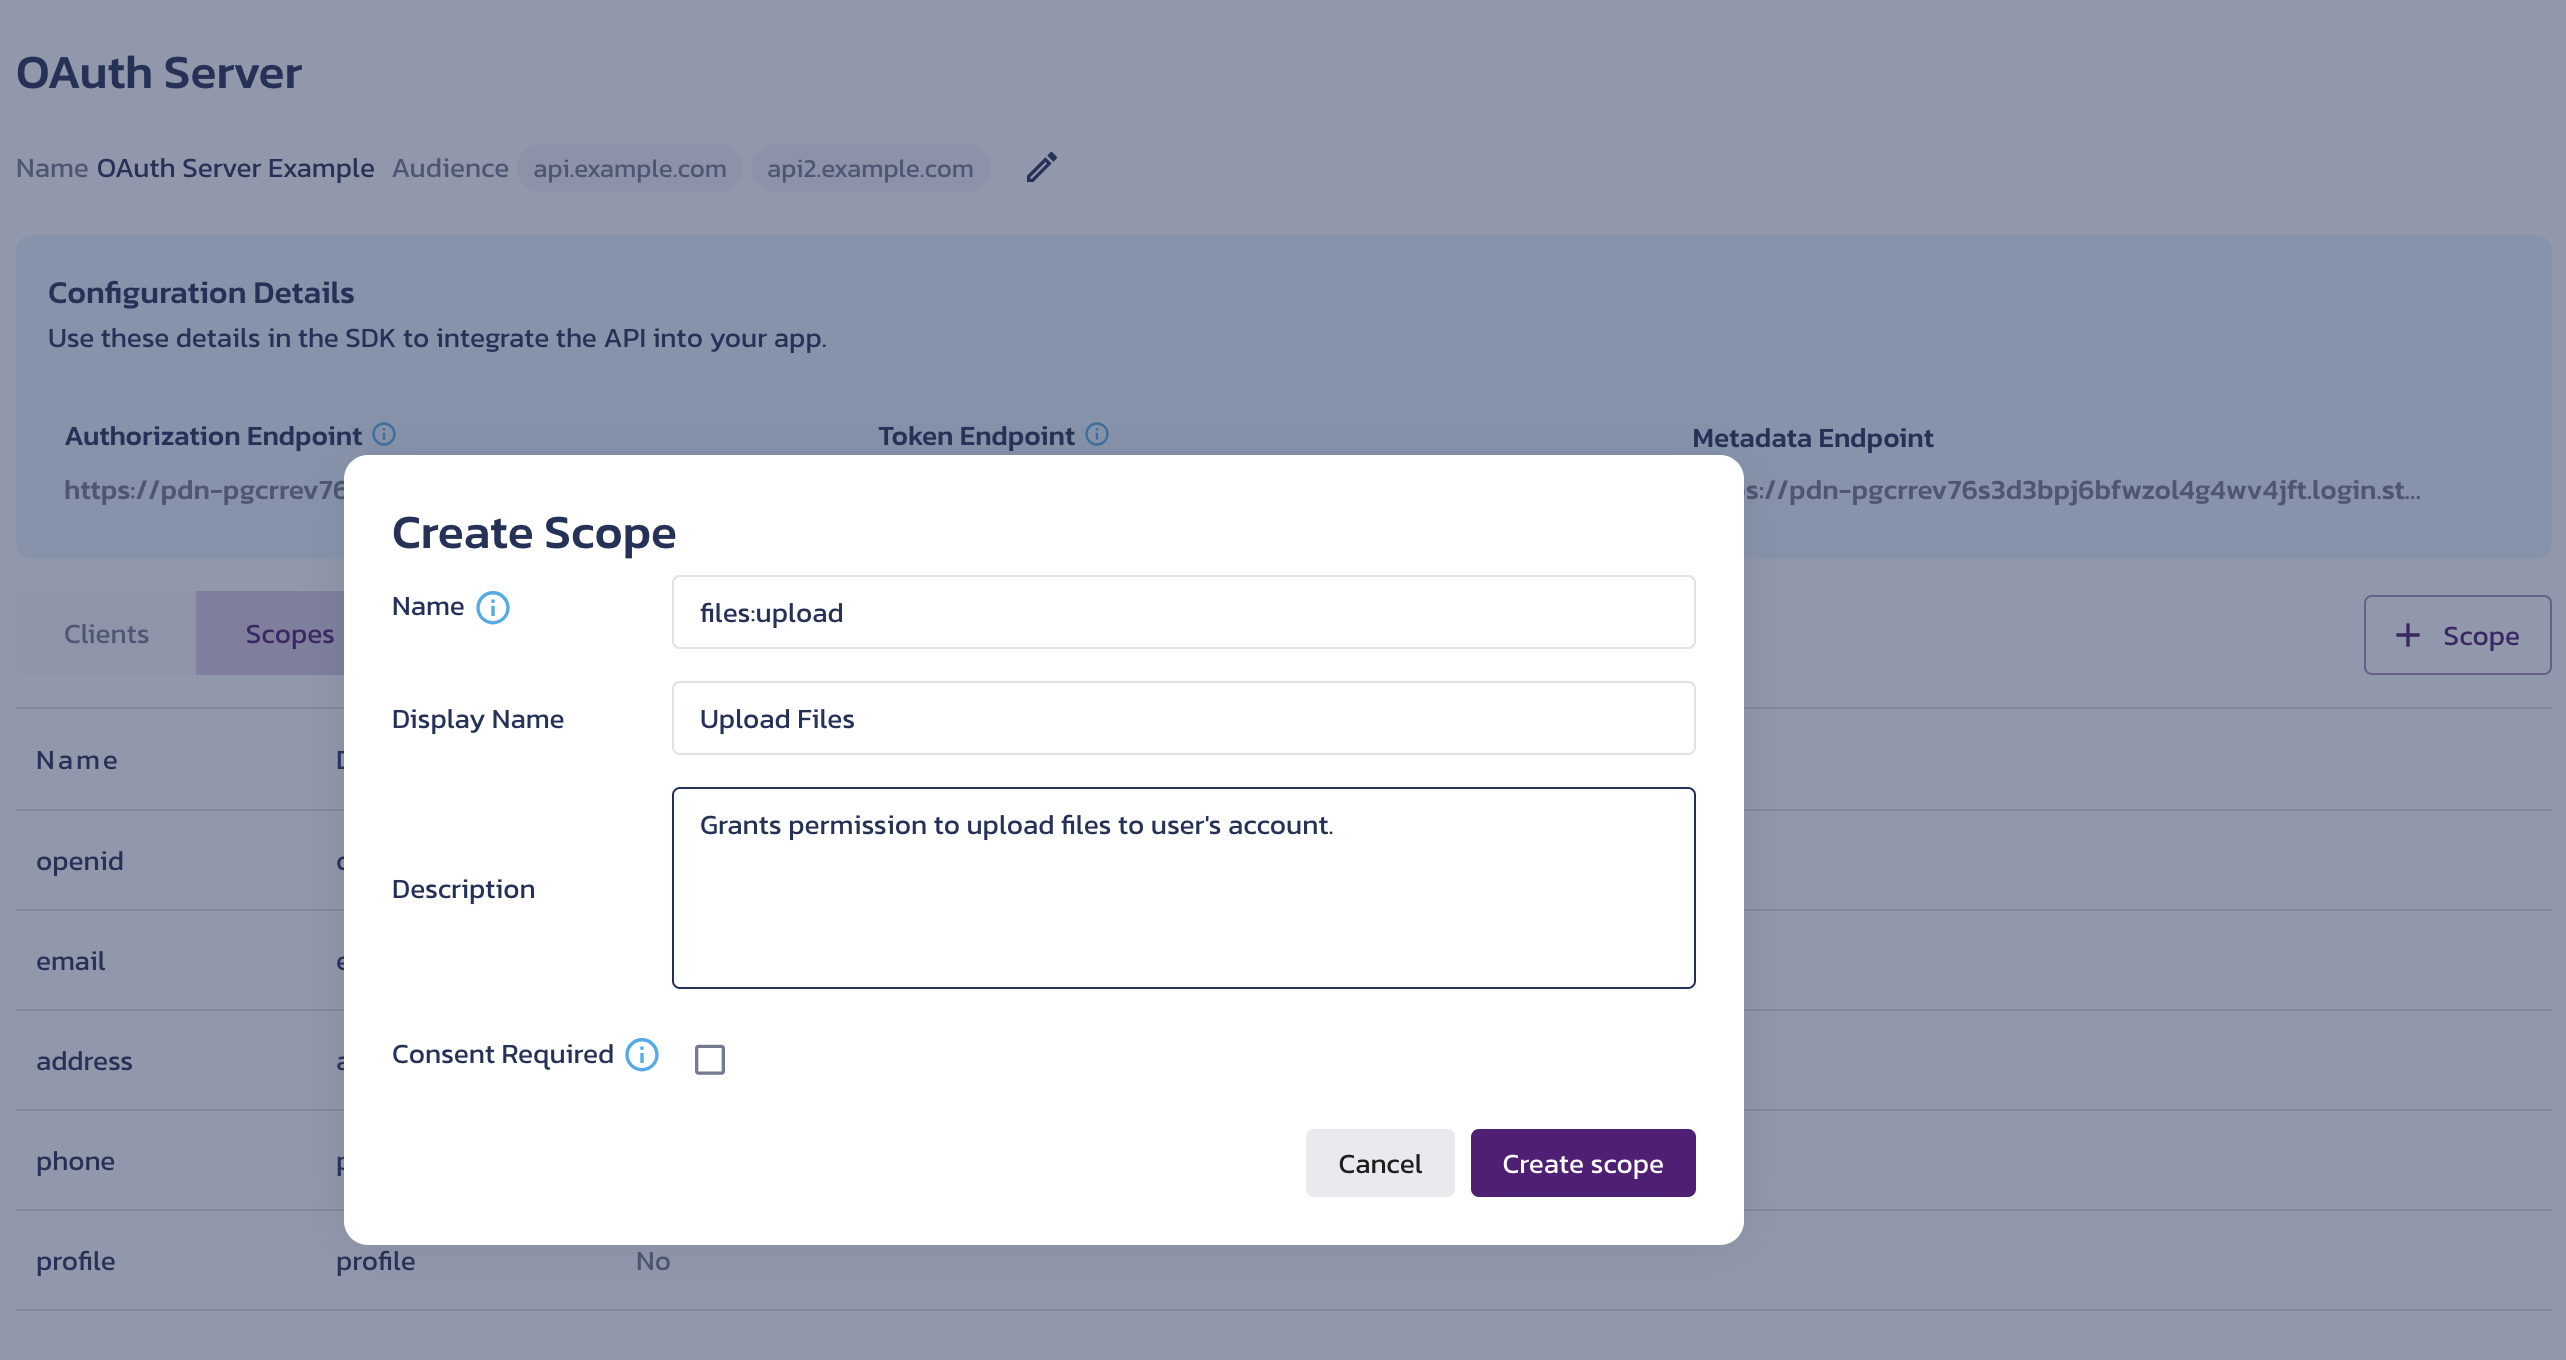
Predefined scopes
-
openidWhen supported by the AS, the
openidscope value extends the Authorization Code grant to include OpenID Connect (OIDC) authentication. By adding this value to thescopeparameter, the client application requests the user's identity information in the form of an ID Token from the AS.Additional OIDC-defined scope values can be used to request specific claims (that is, user information fields) to be included in the ID Token.
The OIDC scope values are provided by default on the Scopes page.
The predefined scopes apply only to the Authorization Code grant.
To edit a scope value, click a row in the list, and the scope value details will be displayed on the right. You can update all scope value properties except for its name. Click Save to apply your changes.
In the Clients section on the scope value details screen, you can see which client applications can request this scope to be added to the access tokens issued by the AS.
To delete a custom scope, click the triple-dot menu in the selected scope's row.
Client Credentials grant
Diagram
The OAuth Server supports the Client Credentials grant . Your client application can use this grant to exchange its client ID and secret for access tokens.
Request access token
-
Exchange the client credentials for an access token at the token endpoint.
Send your access token request to the OAuth Server domain, which you can find in the OAuth Server Configuration Details.
For example, save the domain into an environment variable. You will also need the client ID and its secret to authorize the request.
Set environment variablesexport PANGEA_AUTHN_OAUTH_SERVER_DOMAIN="pdn-pgcrrev76s3d3bpj6bfwzol4g4wv4jft.login.staging.aws.us.pangea.cloud"
export PANGEA_CLIENT_ID="psa_7phb65...wvij7c"
export PANGEA_CLIENT_SECRET="pck_tv67r5...pm7vpf"note:Alternatively, your application can GET it from the authorization server metadata:
GET: /.well-known/oauth-authorization-servercurl --location "https://$PANGEA_AUTHN_OAUTH_SERVER_DOMAIN/.well-known/oauth-authorization-server"response{
"grant_types_supported": [
"client_credentials"
],
"introspection_endpoint": "https://pdn-bz2qkqu75erqiry7ubuy5b5t462tswyj.login.aws.us.pangea.cloud/v1beta/oauth/token/introspect",
"scopes_supported": [
"openid",
"email",
"address",
"phone",
"profile",
"files:upload"
],
"token_endpoint": "https://pdn-bz2qkqu75erqiry7ubuy5b5t462tswyj.login.staging.aws.us.pangea.cloud/v1beta/oauth/token",
"token_endpoint_auth_methods_supported": [
"client_secret_basic"
],
...
}Authorize your request with the client credentials using the Basic authentication scheme . For example, on a Unix-like system, including macOS, you can use the
base64utility:Create client credentials for the Authorization headerecho -n "$PANGEA_CLIENT_ID:$PANGEA_CLIENT_SECRET" | base64Basic authentication valuecHNhXzdwaGI2NXFpaWd1bXV2NHJyYWhxazNnbmFod3ZpajdjOnBja190djY3cjVreGtpbHE2c2xzdnByeXU0azVzdnBtN3ZwZg==Use the credential in your request to the token endpoint. Provide the following parameters:
grant_type- Use "client_credentials" as the value.- (optional)
scope- Add space-delimited values that your resource server can understand before making the authorization decision.
For example:
POST: /v1beta/oauth/tokencurl --location "https://$PANGEA_AUTHN_OAUTH_SERVER_DOMAIN/v1beta/oauth/token" \
--header 'Content-Type: application/x-www-form-urlencoded' \
--header 'Authorization: Basic cHNhXzdwaGI2NXFpaWd1bXV2NHJyYWhxazNnbmFod3ZpajdjOnBja190djY3cjVreGtpbHE2c2xzdnByeXU0azVzdnBtN3ZwZg==' \
--data-urlencode 'grant_type=client_credentials' \
--data-urlencode 'scope=files:upload' -
The OAuth Server validates the client credentials.
-
The OAuth Server responds with an access token . In the response, you receive a token value, either opaque or a signed JWT. The token type is always "Bearer", and the token lifespan is expressed in seconds in the
expires_infield.Depending on the Session Configuration option selected on the AuthN Session Configuration page within the General section, the access token value could be an opaque string or a signed JWT:
/v1beta/oauth/token response: opaque (stateful) access token{
"access_token": "pts_hpbc3k...xps6vf",
"token_type": "Bearer",
"expires_in": 86399
}/v1beta/oauth/token response: signed JWT (stateless) access token{
"access_token": "eyJhbGciOiJFUzI1NiIsImtpZCI6InB2aV91Zmw0cnlkcTNpdnZrZTU0dzNzb2twZXllaWxud2Q1eXwxIiwia3R5IjoiSldUIn0.eyJpc3MiOiJodHRwczovL3Bkbi1wZ2NycmV2NzZzM2QzYnBqNmJmd3pvbDRnNHd2NGpmdC5sb2dpbi5zdGFnaW5nLmF3cy5wYW5nZWEuY2xvdWQiLCJzdWIiOiJwc2FfYWV5dmJvbWR3Mmw1d3Zqb203d210MnRtZnNzN3BwcGsiLCJleHAiOjE3MjYwMjYxNzYsIm5iZiI6MTcyNTkzOTc3NiwiaWF0IjoxNzI1OTM5Nzc2LCJqdGkiOiJwbXRfeXN0cXB5eG42c3d5aGd1Zm9iZmFmanFxN2xhNXBkZWIiLCJ0b2tlbl90eXBlIjoiY2xpZW50X2FjY291bnQiLCJvd25lciI6Ik15IEFwcCIsInNjb3BlcyI6WyJmaWxlczp1cGxvYWQiXX0.KXoklx3F0QGdMAUgT8g-Pm5n_FwPaQPpqjs4_LMS17eqNZDYn3FzG3Q7rRMnqnZPbmDvdwbZFu31ErYMbXXLSQ",
"token_type": "Bearer",
"expires_in": 86399
} -
Your application authorizes a request to the resource server by adding the bearer token to the Authorization header.
For example:
curl --location 'https://api.example.com/resource' \
--header 'Authorization: Bearer pts_hpbc3k...xps6vf' \
--header 'Content-Type: application/json' \
--data '{
  "resource-id": "resource-1"
}'
Validate access token
Opaque access token
-
The resource server introspects the access token.
Authorize your request with the client ID using the Basic authentication scheme. For example, on macOS, you can use the
base64utility:Create client credentials for the Authorization headerecho -n "$PANGEA_CLIENT_ID:" | base64note:You must add a colon after the client ID to indicate the separation between the username (client ID) and password, even though the latter is not required.
Basic authentication valuecHNhXzdwaGI2NXFpaWd1bXV2NHJyYWhxazNnbmFod3ZpajdjOg==Provide the access token value as the
tokenparameter:POST: /v1beta/oauth/token/introspectcurl --location "https://$PANGEA_AUTHN_OAUTH_SERVER_DOMAIN/v1beta/oauth/token/introspect" \
--header 'Content-Type: application/x-www-form-urlencoded' \
--header 'Authorization: Basic cHNhXzdwaGI2NXFpaWd1bXV2NHJyYWhxazNnbmFod3ZpajdjOg==' \
--data-urlencode 'token=pts_hpbc3k...xps6vf' -
The OAuth Server returns a standard Introspection Response :
response{
"client_id": "psa_aeyvbo...s7pppk",
"scope": "files:upload",
"aud": [
"api.example.com",
"api2.example.com"
],
"iss": "https://pdn-pgcrrev76s3d3bpj6bfwzol4g4wv4jft.login.staging.aws.us.pangea.cloud",
"exp": 1726025937,
"iat": 1725939537,
"nbf": 1725939537,
"jti": "pmt_ygi5fd...age35p",
"token_type": "Bearer",
"active": true
}note:Currently, only opaque access tokens issued by the AuthN OAuth Server can be introspected.
Signed JWT
-
The RS validates the stateless access token.
The decoded JWT payload contains similar data to introspection results:
Decoded JWT payload{
"iss": "https://pdn-pgcrrev76s3d3bpj6bfwzol4g4wv4jft.login.staging.aws.us.pangea.cloud",
"sub": "",
"exp": 1726026176,
"nbf": 1725939776,
"iat": 1725939776,
"jti": "pmt_ystqpy...a5pdeb",
"client_id": "psa_aeyvbo...s7pppk",
"token_type": "Bearer",
"active": true
}Verify JWT signature
To verify the signature of a JWT received by your application, your application can retrieve the public key from the JSON Web Key Set (JWKS) available at the issuer's /v1beta/oauth/jwks.json path. Pangea issues standard JWTs that can be validated with JWKS using your favorite library. This approach to validate JWTs is widely supported.
In protected environments, you could also retrieve the corresponding public key using Vault APIs.
Use JWKS
If your application, such as a mobile app, cannot safely store the Vault service token, you can instead use the publicly available JWKS to generate the public key. Append /v1beta/oauth/jwks.json path to the issuer URI in a decoded JWT and use it to retrieve the JWKS. For example:
jwks.json{
"keys" : [
...,
{
"alg" : "ES256",
"crv" : "P-256",
"kid" : "pvi_dzbpej...nt5xwh|2",
"kty" : "EC",
"x" : "HNVhj_BFpDZWc5i-1TRR2dLmSgvzlLbKD6BUDsUKGeo",
"y" : "laA5au3cuwoy78dwzi7E2urphJpk8tUF0RBHaavdQe8"
},
{
"alg" : "ES256",
"crv" : "P-256",
"kid" : "pvi_dzbpej...nt5xwh|1",
"kty" : "EC",
"x" : "kWqMYYDrxFLR0S88wxisf6ro7JaQwRZlDhSUiHPe9sc",
"y" : "MFxmc5OF4cRaQ0dDakw6pAG3xIINFeyzuYqWeQs19yk"
}
]
}New versions of keys will be added to the set as the JWT key saved in Vault is rotated. The key version is shown in the "kid" value after the
|delimiter.To automate the JWKS retrieval and application you can use one of the JWT Libraries for Token Signing/Verification .
Example:
pip install 'pyjwt[crypto]'Use JWKSimport jwt
from jwt import PyJWKClient
token = "eyJhbGciOiJFUzI1NiIsImtpZCI6InB2aV9qZGp5amFudnZtb3hpMnB1N3RtcWFnY3B4enV2bnViZXw1Iiwia3R5IjoiSldUIn0.eyJzdWIiOiIxMjM0NTY3ODkwIiwibmFtZSI6IkpvaG4gRG9lIiwiaWF0IjoxNTE2MjM5MDIyfQ.SflKxwRJSMeKKF2QT4fwpMeJf36POk6yJV_adQssw5c"
url = "<JWKS-path>"
jwks_client = PyJWKClient(url)
signing_key = jwks_client.get_signing_key_from_jwt(token)
data = jwt.decode(
token,
signing_key.key,
algorithms=["ES256"],
options={"verify_exp": False},
)
print(data)Use public key from Vault
To obtain the public key dynamically, you can request it from the Vault /v1/get endpoint by providing the JWT key ID and authorizing the request with a Vault service token. You can get the default service token for Vault from its Configuration Details under Vault Overview in the Pangea User Console, or you can create a service token in Project Settings >> Tokens and explicitly associate it with Vault.
export PANGEA_DOMAIN="aws.us.pangea.cloud"
export PANGEA_VAULT_TOKEN="pts_gqmqvvxk4yhirapuhw6bs7nswu"
Note that the items in Vault can be versioned. Rotating the JWT signing key will require the use of an appropriate version of the public key in your application. In the request data, you can optionally provide the version number or request all versions of the public key via the "version" parameter. If you don't specify a version in your request, the latest will be returned.
/v1/get JWT public keycurl --location "https://vault.$PANGEA_DOMAIN/v1/get" \
--header "Authorization: Bearer $PANGEA_VAULT_TOKEN" \
--header 'Content-Type: application/json' \
--data '{
"id":"pvi_jdjyja...uvnube",
"version":"all"
}'The latest public key version for verifying the JWT signature will be included as
result.current_version.publicwithin the response. Older versions can be found in the "version" array. Including previous keys allows you to accept tokens minted just before the signing key has been rotated, either manually or on an automated schedule./v1/get response{
"result": {
"current_version": {
"public_key": "-----BEGIN PUBLIC KEY-----\nMFkwEwYHKoZIzj0CAQYIKoZIzj0DAQcDQgAEGY4p4VYSqOAh2yncQE31kJaWzgAr\n/fVvYAyf7hnkd6bhJmN24IiujCiYhKiRWA7QGwF7jmPvTDjxwd4/0RSt8Q==\n-----END PUBLIC KEY-----\n",
"state": "active",
"version": 1,
...
},
"id": "pvi_jdjyja...uvnube",
"item_state": "enabled",
"metadata": {
"authn_config_id": "pro_jbxwlz...52jda3"
},
"purpose": "jwt",
"type": "asymmetric_key",
...
"versions": [
{
"public_key": "-----BEGIN PUBLIC KEY-----\nMFkwEwYHKoZIzj0CAQYIKoZIzj0DAQcDQgAEGY4p4VYSqOAh2yncQE31kJaWzgAr\n/fVvYAyf7hnkd6bhJmN24IiujCiYhKiRWA7QGwF7jmPvTDjxwd4/0RSt8Q==\n-----END PUBLIC KEY-----\n",
"state": "active",
"version": 5,
...
},
...,
{
"public_key": "-----BEGIN PUBLIC KEY-----\nMFkwEwYHKoZIzj0CAQYIKoZIzj0DAQcDQgAEo4Y3Vh3dU2EaiFrPAZ1LKVukdHz5\n7wKJmEOMB4x8TyvIEuC/w61yr3fdU23rBpyPguAx/IWnVI2UV8TAjZ7HVQ==\n-----END PUBLIC KEY-----\n",
"state": "deactivated",
"version": 1,
...
}
]
},
"status": "Success",
"summary": "Key pair retrieved",
...
}In the above example, the latest/current version is
5.-----BEGIN PUBLIC KEY-----
MFkwEwYHKoZIzj0CAQYIKoZIzj0DAQcDQgAE5kCKMlbs8eYSxV8JzGkpmy1CI9BO
AJHqsQ2ubRr1dQkVwH183NFs6/8khtMUTtCzmtZ7F/hjAVG7QUxkzt/kLA==
-----END PUBLIC KEY-----note:For testing your JWT, for example on https://jwt.io/, you can get a public key from Vault Secrets & Keys in the Pangea User Console:
- Navigate to AuthN General >> Session Settings and click the Signing Key Vault ID link. This will take you to the JWT key saved in Vault.
- The JWT Key form for the selected Vault item should be opened on the right-hand side. If it is not, click on the row representing your JWT Key.
- In the JWT Key form, click the triple-dot menu button and select Copy public key.
- Save the key in a location accessible to your application.
Process claims, make authorization decision
-
Your resource server is likely to base its authorization decisions on the following fields in the introspection response:
- "active" - A value of
trueindicates that the token is valid and currently active. A value offalsemeans the token is invalid, expired, revoked, or otherwise inactive. - "client_id" - Represents the client ID which initially requested the token.
- "scope" - Space-delimited scope values that are included in the token.
- "aud" - Represents the intended service(s) or API(s) for which this access token is issued.
- "iss" - The origin of the OAuth Server.
- "exp" - The token's expiration date.
- "iat" - The token's issue date.
- "nbf" - The token's effective date.
Each date is expressed as the number of seconds since the Unix Epoch (January 1, 1970, UTC).
- "active" - A value of
-
The resource server returns data from the API or responds with an error .
Authorization code grant
Authorization Code flow is the most secure of the user-based OAuth flows, particularly when used with public clients and Proof Key for Code Exchange (PKCE). This improves upon and replaces the now-deprecated Implicit Grant Type previously used in client-side applications. Its security benefits include:
- Minimized exposure of the access token - The token is not transmitted via URLs, avoiding potential exposure in browser history or server logs.
- Separation of authentication and token exchange - Authorization request and token response occur in separate steps using different communication channels - authorization happens via the front channel, while the token exchange occurs in the back channel - reducing the risk of interception attacks.
- Improved security with PKCE - PKCE ensures that the token request and response are securely linked to the same client, providing an additional layer of protection against replay and interception attacks.
Typical Authorization Code Grant workflow:
- A user requests a resource from a client.
- The client creates an authorization code request to the authorize endpoint.
- The client redirects the user to the authorization server.
- The user authenticates to the authorization server and provides consent for the client to access the resource.
- The authorization server issues a short-lived one-time authorization code for the user to the client.
- The client sends the authorization code to the authorization server.
- The authorization server responds with an access token and, optionally, a refresh token.
- The client then sends the access token to the resource server and requests the resource.
- The resource server responds with the requested resource.
Proof Key for Code Exchange (PKCE)
PKCE extends OAuth 2.0 authorization code grant capabilities by providing an additional layer of security in the authorization flow. It is designed to help prevent attacks such as authorization code interception. It is often used in web applications where the client is unable to store the secret, such as in a mobile app or browser-based Javascript app.
Typical PKCE workflow:
- The client generates a random code verifier, a string that will be used as a security layer.
- The client then transforms the code verifier by hashing it with an algorithm. This becomes the code challenge.
- The newly-created code challenge is then sent to the authorization server as part of the authorization code request.
- The user authenticates on the authorization server.
- The authorization server returns an authorization code to the client.
- The client then requests the access token from the authorization server by sending the authorization code, and includes the code verifier generated in step 1 in the request to prove it is the originator of the request.
- The authorization server then utilizes the code verifier against the code challenge to affirm the code verifier matches. If it does, the authorization server issues an access token.
- The client then uses the access to retrieve the requested resource from the resource server.
Configure the OAuth client
In order to configure your OAuth client to use authorization code grants (both with and without PKCE), you need to configure your OAuth client in the OAuth Server page of AuthN on the Pangea User Console.
- In the AuthN service page of the Pangea User Console, click OAuth Server.
- Click + OAuth Client.
- Type a name for the client in the Name field.
- Select
Authorization Codefor the Grant Type. - Type allowed redirects into the Allowed Redirect URLs, clicking the + button after completing each one to add it to the list. The URL must contain "https", as in this example:
https://www.example.com - Select any desired allowed scopes to restrict what permissions can be requested by the client application. An allowed scope is the scope that a client app can include in the
scopeparameter when making an authorization request. - Set the Default Scopes from the list of the allowed scopes. This scope will be included in the token if the client does not specify a scope in the authorization request.
- Click Create Client to complete the OAuth Server configuration.
- A modal displays that contains your client secret. Make sure you copy and save your client secret to a secure location because this is the only time it will be displayed. You can create a new secret by clicking the menu beside the OAuth Server client in the Client table and clicking + Create Secret.
- After you have saved your client secret, click Close.
Test your authorization code configuration
You can test your configuration using Postman to verify that everything is working correctly. If you don't have Postman, you can download it for free.
- Open Postman to test the configuration.
- In the Authorization tab, set the Type to
OAuth 2.0. - Configure the token in Postman similar to this in Configure New Token:
- Token Name -
Pangea_AuthCode - Grant Type -
Authorization Code (With PKCE)if you want to use PKCE, orAuthorization Codeif you don't. - Callback URL - Copy this Callback URL and paste it into the `Allowed Redirect URLs** for the OAuth Client you defined in Configuring the OAuth client and click **+** to add it to the list.
- Auth URL - This is the Authorization Endpoint found at the top of the OAuth Server page of the AuthN service in the Pangea User Console. Hover on the URL and click the copy button that displays, then paste it into the Auth URL in Postman.
- Access Token URL - Similar to the Auth URL, this is the Token Endpoint found at the top of the OAuth Server page. Hover on the URL and click the copy button that displays. Paste the link into the Token URL field in Postman.
- Client ID - Click on the OAuth Server you created, and then click the copy button beside the Client ID field. Paste it into the Client ID field in Postman.
- Client Secret (only used for
Authorization Code) - The Client Secret that was copied when configuring the OAuth Client. - Scope - Type the desired scopes from the Allowed Scopes list. Put a space between each scope, but do not put any punctuation.
- State - A parameter added to the URL that is used to prevent cross-site request forgery attacks (CSRF). Type a string of any length to add a state in Postman. This is usually generated and added to the URL by the client app.
- Token Name -
- Once you have defined the token request in Postman, click Get New Access Token.
- A web page will open and you should be able to proceed through the authentication process as normal. Users do not see any visible difference in the authentication process.
- The Access and ID tokens (if
openidvalue is included in the scope) are sent back to the client, and the contents can be decoded and verified. Check out the Validate access token section for more information on token validation.
Claims
Claims can be added to tokens in order to supply essential information about the user during authentication. These are defined in the Pangea User Console on the Claims tab of the OAuth Server page. A claim requires defining certain information to make it valid: Name, Scope, Tokens, and Value.
Adding a claim to a token using Pangea User Console
A claim is automatically added to the token that the claim is created for, and requires no additional configuration. You can add up to 100 claims to a single token.
To create a claim:
- On the OAuth Server page of AuthN, click the Claims tab.
- Click + Claim to create a new claim.
- Provide the following data:
- Name - Name for the claim. Only letters, numbers, dashes, and hyphens are accepted characters. Must be at least two characters, with a maximum of 256 characters.
- Scope - One or more scope values; if any of them are included in the authorization request, this custom claim will be added to the token response.
- Tokens - Token that the claim will be added to, can either be Access Token, ID Token, or both tokens.
- Value - The profile field whose value is populated to the claim if the
scopeof the claim is included in the request. If noscopeis needed to populate the claim and is therefore not provided, the profile field value will automatically populate to the token response.
- Click Save.
- The claim will automatically be added to the defined tokens.
Here is an example of how claims will display in the filled out form:
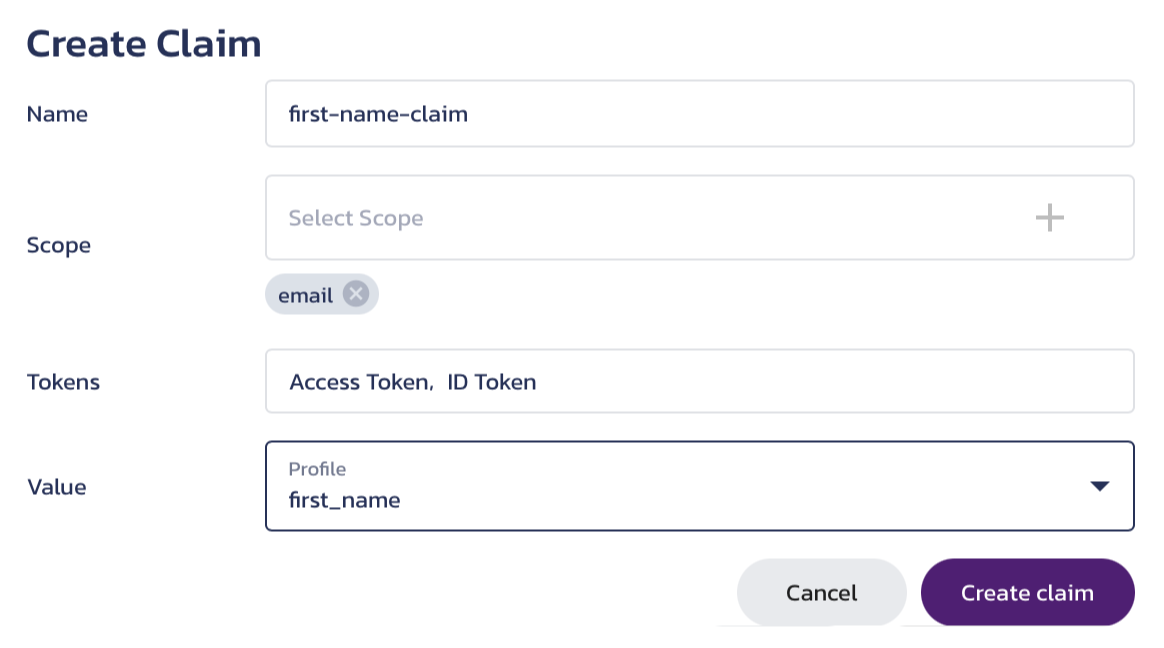
Viewing claims in a token
Your access token can be an opaque or JWT token, depending on the AuthN Session Configuration settings. If it is a JWT, then when you decode it, you will see claims in the pangea.claims section of the token. If your token is opaque, you can introspect it, and the claim will display in the same section of the introspection results.
Your ID token is always in JWT format.
Decode a JWT token
If you selected JSON Web Tokens (JWT) in AuthN Session Configuration, then your Access Token would return a JWT. The returned JWT, once decoded, includes the pangea.profile array and the claim first_name that was mapped to the email scope. It would look similar to the one below.
{
  "iss": "https://pdn-bz2...wyj.login.aws.us.pangea.cloud",
  "sub": "pui_g23...vcjj",
  "exp": 1737059220,
  "token_type": "Bearer",
  "scope": "openid profile",
  "pangea.profile": {
    "email": "alice@example.com",
    ...
  },
  "pangea.intelligence": {
    "user_intel": false,
    ...
  },
  "pangea.claims": {
    "first-name-claim": "Alice"
  },
  ...
}
Because the email was supplied in the API request, then the first_name of the user profile was added to the response. The last_name was not added because it was not in the claim. You can set up more claims to include additional information into the response and provide all necessary data about the user to the app.
Introspect an opaque token
To introspect an opaque access token you can use the introspection endpoint, which you can find by visiting the Metadata Endpoint provided in the OAuth Server Configuration Details.
An introspection call will look similar to this:
curl --location 'https://pdn-bz2q...swyj.login.aws.us.pangea.cloud/v1beta/oauth/token/introspect' \
--header 'Content-Type: application/x-www-form-urlencoded' \
--header 'Authorization: Basic cHNh...WNiOg==' \
--data-urlencode 'token=ptu_xxpchi...smn2e7'
Authorize your request using base64-encoded Client ID for a public client or Client ID and Client Secret for a confidential one.
The claims in an introspected token will look similar to this:
{
  ...
  "pangea.claims": {
    "first-name-claim": "Alice"
  },
  "active": true
}
Was this article helpful?