Import Users
Users can be imported into AuthN using a comma-separated values (CSV) file.
During the import process, you have the option to map fields between the files and the user data in AuthN. When importing users with hashed passwords, additional data such as the hash algorithm, salt, salt order, number of hash iterations, etc., is required.
You can import users from any system using CSV files. Below are instructions on migrating users from Firebase and Auth0, which involve additional preparation of user data before it can be imported into AuthN.
Both Firebase and Auth0 allow the export of user data in JSON format, which might be easier to process if you need to make changes to the data. Currently, AuthN supports direct import only from a CSV file, but you can convert your JSON data to CSV using a script. An
example script for converting JSON to CSV is provided at the end of this document.Firebase migration
Export users with Firebase CLI
The first step in migrating users from Firebase is to export them:
-
Install the Firebase Command Line Interface (CLI) to enable exporting users using a command in the terminal.
-
In a terminal window, use Firebase CLI to export users from your Firebase project:
-
Sign in to your Firebase account:
firebase login -
List your Firebase projects:
firebase projects:list -
Export users replacing the
<project-id>placeholder with the actual Project ID value in the following command:firebase auth:export firebase-users.csv --format=CSV --project <project-id>This will export your users into a file with the specified name.
-
Get additional data required for importing password hashes
-
Sign in to your Firebase console and open your project.
-
Select Authentication and then select the Users tab.
-
Next to the Add Users button, click the three dots button to open the menu, and then select Password hash parameters. Your parameters should resemble the following:
hash_config {
  algorithm: SCRYPT,
  base64_signer_key: XXXX/XXX+XXXXXXXXXXXXXXXXX+XXXXXXXXXXXXXXXXXXXXXXXXXXXXXXXXXXXXXXXXXXXXXXXXXXXXXXXXXXX==,
  base64_salt_separator: Aa==,
  rounds: 8,
  mem_cost: 14,
}
You will use these values when importing your user data with hashed passwords.
Prepare Firebase CSV for import by AuthN
-
The Firebase CSV export omits headers in the exported user data. However, the AuthN import functionality expects headers in the first row of a CSV. You can manually add the headers following the Firebase
CSV format guide.note:As of April 2024, Firebase describes 26 fields in their CSV format guide, but the exported data contains 29. You can use placeholder headers for the additional fields, as shown in the example below:
UID,Email,Email Verified,Password Hash,Password Salt,Name,Photo URL,Google ID,Google Email,Google Display Name,Google Photo URL,Facebook ID,Facebook Email,Facebook Display Name,Facebook Photo URL,Twitter ID,Twitter Email,Twitter Display Name,Twitter Photo URL,GitHub ID,GitHub Email,GitHub Display Name,GitHub Photo URL,User Creation Time,Last Sign-In Time,Phone Number,?,?,?
Import users from Firebase
-
Open the AuthN Users page in the Pangea User Console.
-
Click + New.
-
Click Import Users. This will open an Import users dialog.
-
Click Import CSV. This will open a file selector.
-
Navigate to the CSV file containing your user data, select it, and submit the file selection. This will open a User profile mapping dialog.
-
In the dialog, map the CSV fields to the AuthN user fields:
-
Map the Required
emailfield to the corresponding field in your user data with valid email values. -
If desired, you can also map the Optional fields.
If your user data contains password hashes, you can map it to AuthN's
password_hashfield. Importing password hash allows your users to sign in and complete the enrollment process during their first login. To ensure this works correctly, you need to provide the correct values from your Firebase hash config:- Map the Password Hash field in the Firebase data to the
password_hashfield in AuthN. This will display a Password Hash section at the bottom of the User profile mapping dialog. - In the Password Hash section, for Hash Algorithm, choose FIREBASE-SCRYPT. This will open a Hash Parameters dropdown.
- In the Hash Parameters dropdown, select Manual. This will display inputs for additional password hash parameters. You may need to scroll down to see all of these parameters. Some of them may be pre-populated by default:
- Set Cost Factor to match the mem_cost in the Firebase hash config, which is
14by default. - For Parallelism, enter
1. - Set Block Size to match the rounds in the Firebase hash config, which is
8by default. - For Salt Separator, enter the value from base64_salt_separator in the Firebase hash config.
- For Signer Key, enter the value from base64_signer_key in the Firebase hash config.
- For Salt, select Per-User. This will display Per-User Salt Field.
- For Per-User Salt Field, choose the Password Salt field from the Firebase CSV.
- Set Cost Factor to match the mem_cost in the Firebase hash config, which is
During their first authentication, imported users will be required to complete their enrollment process.
- Map the Password Hash field in the Firebase data to the
-
-
Click Import. This will take you back to the Import Users dialog with the list of recent imports.
-
Click Done.
-
Refresh the AuthN Users page in the Pangea User Console to view the newly imported user records.
If you encounter errors during the import process, ensure that your user data is correctly mapped to the required AuthN fields and that it contains valid values.
You can import a CSV file multiple times without overwriting existing users with the same email addresses. Only users with unique email addresses are processed and added to AuthN.
Auth0 migration
Export Auth0 user data
The first step in migration is to export existing users from Auth0.
Export users using Auth0 Management API
-
Navigate to Auth0 Dashboard and select your tenant.
-
Enable Auth0 API explorer under Applications >> APIs >> API Explorer.
-
Collect your Auth0 API explorer application information for making API requests:
- Under Applications >> APIs:
- API Audience for Auth0 Management API
- Under Applications >> Applications >> API Explorer Application >> Settings:
- Domain
- Client ID
- Client Secret
- Under Authentication >> Database >> Username-Password-Authentication:
- Database Identifier
In the following examples, replace the placeholders with the values specific to your application:
export AUDIENCE="<API Audience>"
export DOMAIN="<Domain>"
export CLIENT_ID="<Client ID>"
export CLIENT_SECRET="<Client Secret>"
export CONNECTION_ID="<Database Identifier>" - Under Applications >> APIs:
-
Request an access token:
curl --location "https://$DOMAIN/oauth/token" \
--header 'Content-Type: application/json' \
--data '{
    "client_id": "'"$CLIENT_ID"'",
    "client_secret": "'"$CLIENT_SECRET"'",
    "audience": "'"$AUDIENCE"'",
    "grant_type": "client_credentials"
}'
The response will contain an access token in the "access_token" field:
{
  "access_token": "eyJ...BFQ",
  "scope": "read:client_grants...delete:client_credentials",
  "expires_in": 86400,
  "token_type": "Bearer"
}
Use this token in your next request:
export ACCESS_TOKEN="<access_token>" -
Send a request to export the users. For example:
curl --location "https://$DOMAIN/api/v2/jobs/users-exports" \
--header "Authorization: Bearer $ACCESS_TOKEN" \
--header 'content-type: application/json' \
--data '{
    "connection_id": "'"$CONNECTION_ID"'",
    "format": "csv"
}'note:The above example requests users for a database connection. To export all tenant users, only specify the "format" parameter.
Conversely, you can include additional criteria to further limit the number of exported user records and/or specify what fields to export. For example:
curl --location "https://$DOMAIN/api/v2/jobs/users-exports" \
--header "Authorization: Bearer $ACCESS_TOKEN" \
--header 'content-type: application/json' \
--data '{
    "connection_id": "'"$CONNECTION_ID"'",
    "format": "csv",
    "limit": 5,
    "fields": [
        {
          "name": "user_id"
        },
        {
            "name": "email"
        },
        {
            "name": "identities[0].connection",
            "export_as": "provider"
        }
    ]
}'
You can learn more in Auth0 documentation .
The response will contain a reference to the export job under the "id" field.
{
  "connection": "Username-Password-Authentication",
  "connection_id": "con_XXXXXXXXXXXXXXXX",
  "format": "csv",
  "id": "job_v03DmlXLgekQfZXW",
  "status": "pending",
  "type": "users_export",
  ...
}
Use this job ID in your next request:
export JOB_ID="<id>" -
Request the resulting download URL for the job. For example:
curl --location "https://$DOMAIN/api/v2/jobs/$JOB_ID" \
--header "Authorization: Bearer $ACCESS_TOKEN"
In the "location" field within the response, find a presigned URL, which you can use to download the exported user data:
{
    "type": "users_export",
    "status": "completed",
    ...
    "location": "https://l0-prod-prod-us-4-usw2-export-users.s3.us-west-2.amazonaws.com/job_v03DmlXLgekQfZXW/dev-xxxxxxxxxxxxxxxx.csv.gz?X-Amz-Algorithm=AWS4-HMAC-SHA256...&X-Amz-SignedHeaders=host"
}note:The downloaded file could be a
gziparchive. In that case, you'll need to extract the CSV file before importing it by AuthN. For example:gunzip dev-tenant.csv.gz
Export users using Auth0 Admin UI
-
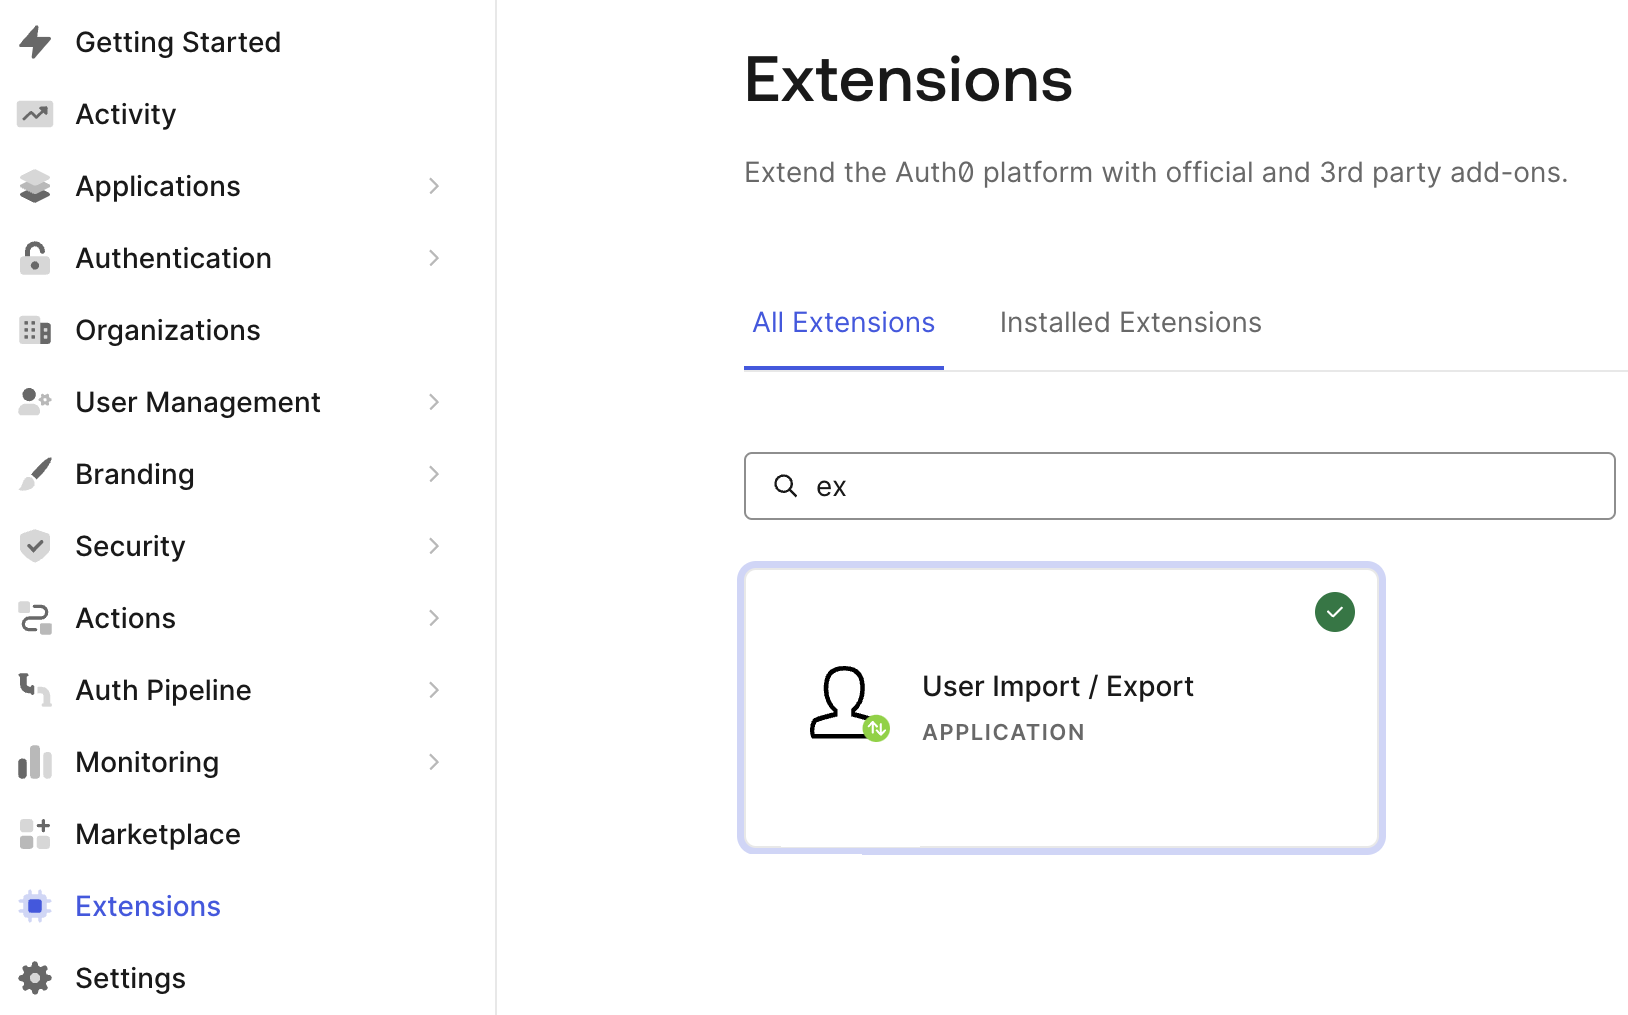
In the Auth0 Dashboard, navigate to Extensions.
-
If you haven't installed it already, locate and install the User Import / Export extension.
-
Under Installed Extensions, open the User Import / Export extension.
-
If prompted, accept the authorization request from the extension to access your Auth0 account.
-
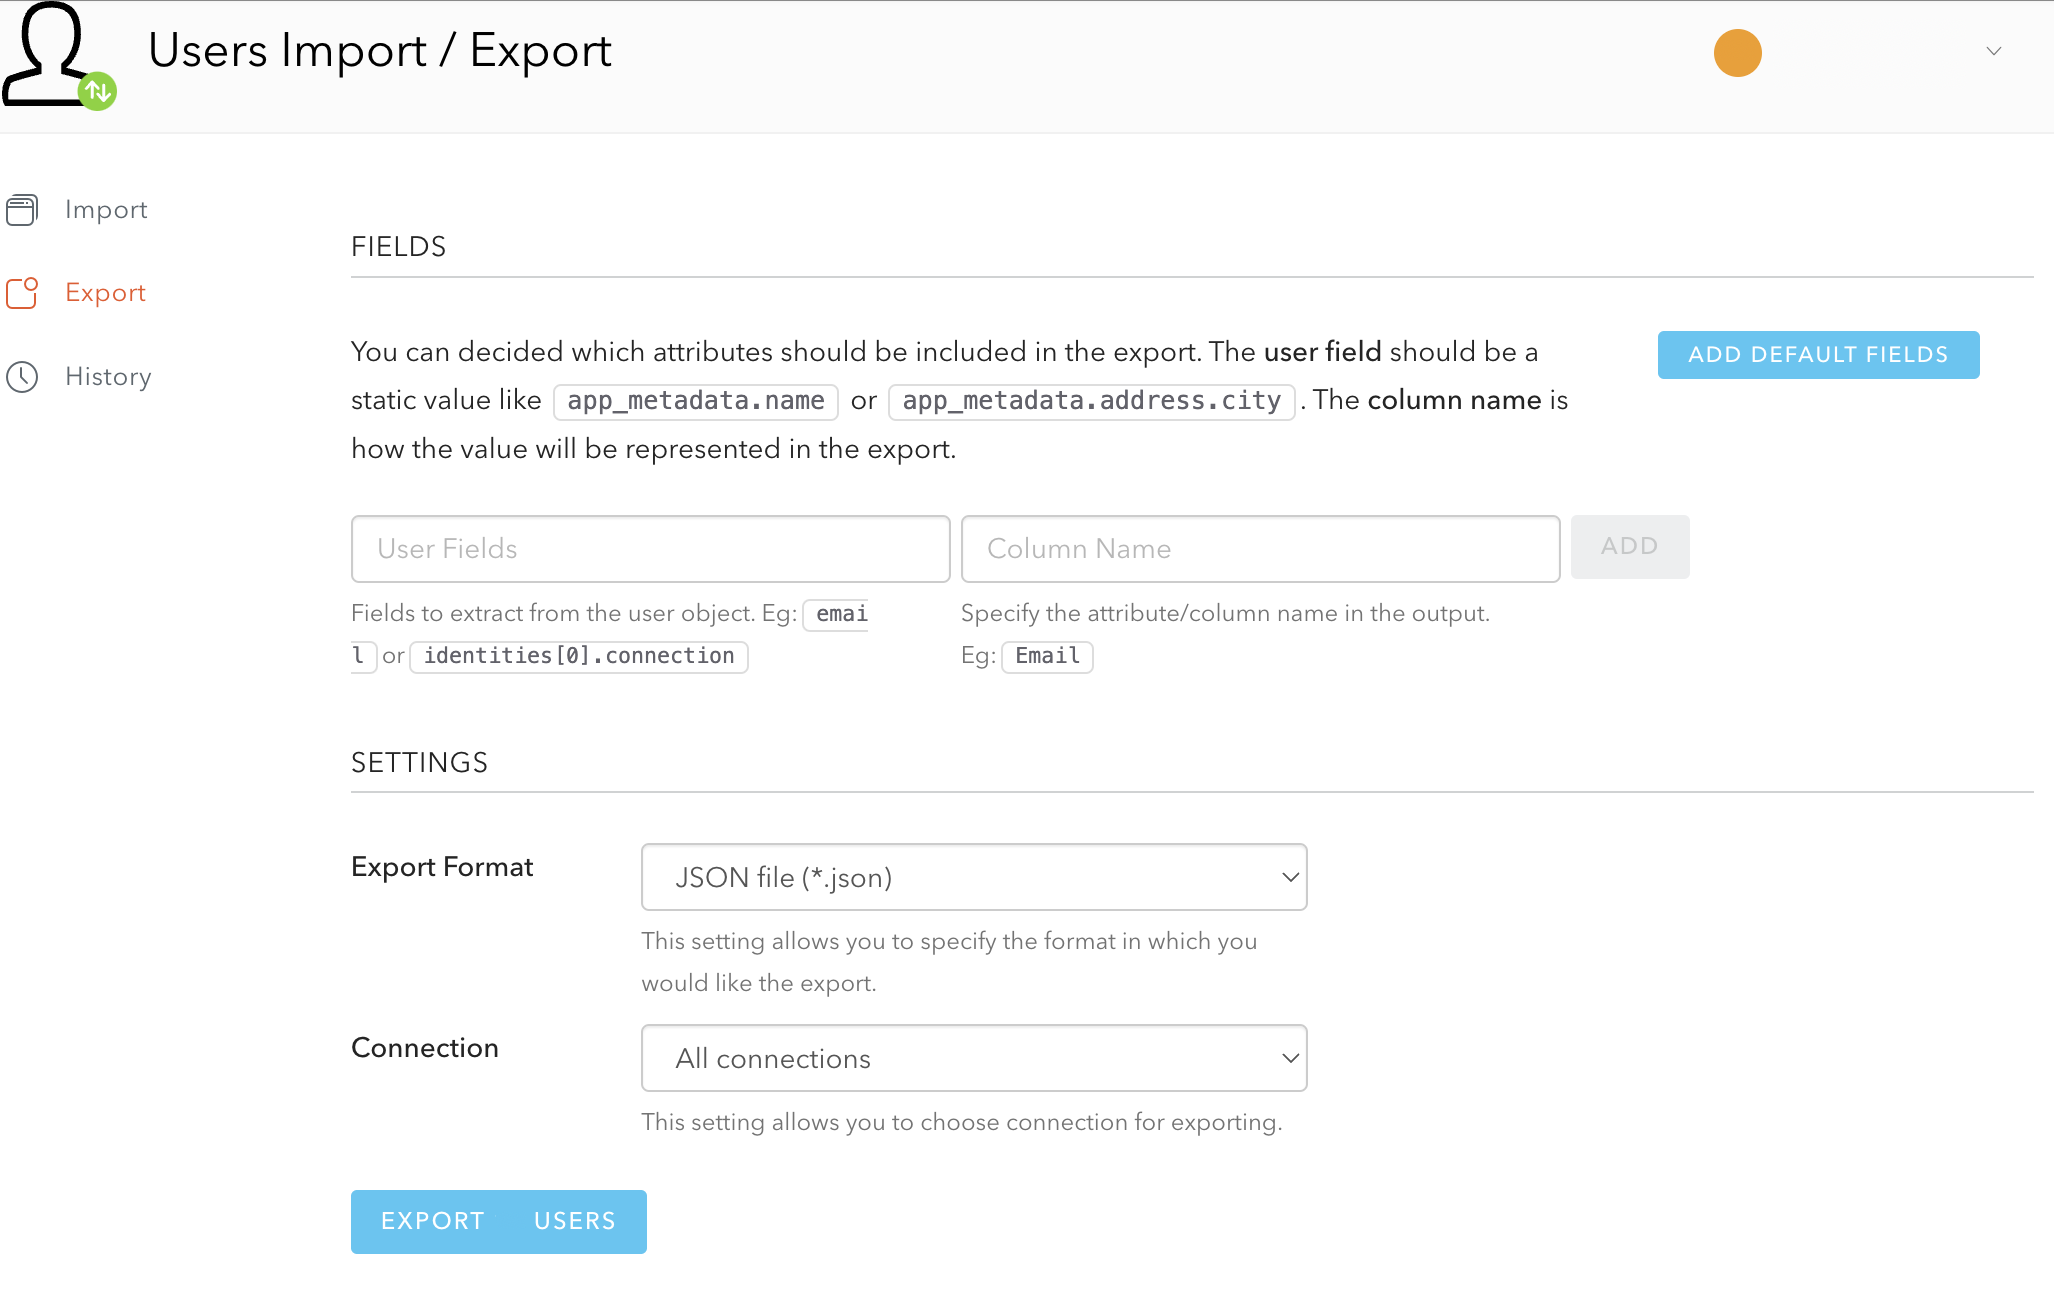
Click Export.
-
Optionally, specify the fields to export and the corresponding column names in the exported data. By default, all available for download fields will be included.
-
Select the CSV option in the Export Format dropdown.
-
Optionally, select your user database in the Connection dropdown.
-
Click Export Users to download the user data as a CSV file.
Request password hashes
By default, password hashes are not included in the user data exported from an Auth0-hosted database. To add password hashes to the user data imported by AuthN, you will need to open a ticket with Auth0 support. Note that requesting this service is not currently available for the Auth0 free subscription tier. Refer to Auth0 documentation for details.
Import users from Auth0
As of May 2024, user data exported from Auth0 in CSV format contains a leading single quote character. This character might invalidate some data, such as email addresses, which are required by AuthN. Therefore, it needs to be removed before import.
-
Open the AuthN Users page in the Pangea User Console.
-
Click + New.
-
Click Import Users. This will open an Import users dialog.
-
Click Import CSV. This will open a file selector.
-
Navigate to the CSV file containing your user data, select it, and submit the file selection. This will open a User profile mapping dialog.
-
In the dialog, map the CSV fields to the AuthN user fields:
-
Map the Required
emailfield to the corresponding field in your user data with valid email values. -
If desired, you can also map the Optional fields.
If your user data contains password hashes, you can map it to AuthN's
passwordHashfield. Importing password hash allows your users to sign in and complete the enrollment process during their first login.- Map the passwordHash field in the Auth0 data to the
password_hashfield in AuthN. This will display a Password Hash section at the bottom of the User profile mapping dialog. - In the Password Hash section, for Hash Algorithm, choose BCRYPT.
During their first authentication, imported users will be required to complete their enrollment process.
- Map the passwordHash field in the Auth0 data to the
-
-
Click Import. This will take you back to the Import Users dialog with the list of recent imports.
-
Click Done.
-
Refresh the AuthN Users page in the Pangea User Console to view the newly imported user records.
If you encounter errors during the import process, ensure that your user data is correctly mapped to the required AuthN fields and that it contains valid values.
You can import a CSV file multiple times without overwriting existing users with the same email addresses. Only users with unique email addresses are processed and added to AuthN.
Example script for converting JSON to CSV
The following script uses JSON keys to add missing headers to the resulting CSV file.
import json
import csv


def convert_json_to_csv(json_file_path, csv_file_path):
    # Open the JSON file and load the data
    with open(json_file_path, 'r') as file:
        data = json.load(file)

    # Open a CSV file for writing
    with open(csv_file_path, 'w', newline='') as file:
        csv_writer = csv.writer(file)

        users = data["users"]
        print(len(users))
        # Write the header row based on keys from the first element of the data
        if users:
            csv_writer.writerow(users[0].keys())

            # Write data rows
            for item in users:
                csv_writer.writerow(item.values())

    print(f"CSV file has been created successfully at {csv_file_path}.")


# Get file paths from user
input_json_file = input("Enter the path to your input JSON file: ")
output_csv_file = input("Enter the path for the output CSV file: ")

# Call the function to convert JSON to CSV
convert_json_to_csv(input_json_file, output_csv_file)
Was this article helpful?